

2:15
8:50
Afterwards. I then drew and colored the armor pieces on top of the base drawing. Now.MoreAfterwards. I then drew and colored the armor pieces on top of the base drawing. Now.
Is Blender 3D really free?
Yes, blender 3D is an open source program, free to anyone for use,for 3D modeling, texturing, rigging, skinning, fluid, smoke simulation, animation, rendering, and video editing. One can earn money through making their own commercial project.
How to create 3D characters in Blender?
Create Your Own Game Character at http://www.darrinlile.comIf you're new to Blender, watch this Blender Quick Start Guide first: https://youtu.be/lZe3tGWSy6s...
Where to find 3D models for Blender?
Blender 3D Printing [2021]
- Blender 3D Printing Preparations. I am going to be using this chess pawn model that I made. ...
- 3D Printing Add-on – Your Best Friend. A very important thing that you need to know before proceeding any further is the 3D Printing add-on.
- Fixing Mesh for 3D Printing. ...
- Daz3D Figures That You Can Print. ...
- Conclusion – Blender 3D Printing. ...
How to create anime action lines in Blender?
Remaking Anime scenes in Blender 3D. As someone who loves watching Japanese anime, I've been wanting to create (or recreate) an anime scene in Blender. Photorealism is my preferred artstyle when creating a scene in Blender, however this time, just like my Green Gardens remake, I wanted to go towards an artstyle that matches what the scene is ...
See more

Can you use Blender to make anime?
This was time consuming. But Blender enables us to draw with Grease Pencil after the animation is finished. It may not be the way for photo-real CG but it's a good way for 2D Anime. This helps reducing rigging costs.”
How do you make a 3D animation in Blender?
1:5521:53Tutorial: Create this Satisfying 3D Animation in Blender - YouTubeYouTubeStart of suggested clipEnd of suggested clipInto a sphere with some magic animating in 3d simulation. Start off by adding another object thisMoreInto a sphere with some magic animating in 3d simulation. Start off by adding another object this will be a sphere. So go shift a add mesh uv sphere hit z to go into wireframe.
How do you make anime 3D?
0:001:01How to Animate 3D Characters in 1 Minute - YouTubeYouTubeStart of suggested clipEnd of suggested clipMove it around in 3d space to make sure it looks good at all angles. And then move about eightMoreMove it around in 3d space to make sure it looks good at all angles. And then move about eight frames forward in the timeline. And adjust the rig.
How do I make 3D in Blender?
Overall steps for preparing a 3D model with BlenderImport the model into Blender.Decimate the model.Unwrap the model (UV unwrapping).Assign materials.Bake the textures.Export the model as a GLB file.
Is learning Blender hard?
Blender is quite challenging to learn since it is complex with many tools and operations, but users may typically begin getting comfortable with the software after a few weeks. However, proficiency in Blender will take years of experience.
Is Blender animation easy?
Blender is one of the go-to open-source software choices for animation. Surprisingly, it doesn't take much to get started on creating simple character animations. Once you have a final 3D character model, you can bring it to life with the software's numerous animation features and tools.
Are anime 2D or 3D?
2D Anime Is Currently More Popular in Japan Although much of the rest of the world has developed towards creating primarily 3D animation, the core market for animation in Japan still largely has a preference for 2D works.
Is 3D animation easier than 2D?
Regarding 2D animation, the level of difficulty also depends on your skill level. If you can draw quickly and efficiently (getting the form right immediately), it will probably be easier for you. 3D animation is quicker because you don't need to animate every frame as you do with 2D animation.
Is Blender 3D free?
Blender is the free and open source 3D creation suite. It supports the entirety of the 3D pipeline—modeling, rigging, animation, simulation, rendering, compositing and motion tracking, even video editing and game creation.
Is Blender good for 3D animation?
Blender 3D is a good choice for creating 3D animations as it has all of the required tools to create and render animations from start to finish. You can define your render parameters, create and rig your entire 3D scene, and render your final product all within Blender if you need to.
Is Blender a cad?
In general Blender is not similar to CAD. It does have some Non destructive tools. It is easy to get into the idea that one is better than the other, but CAD software and 3D art and animation are simply just two different things. If you want to construct stuff, then use a CAD software.
Is Blender a video editor?
Blender comes with a built-in video sequence editor allows you to perform basic actions like video cuts and splicing, as well as more complex tasks like video masking or color grading. The Video Editor includes: Live preview, luma waveform, chroma vectorscope and histogram displays.
Description
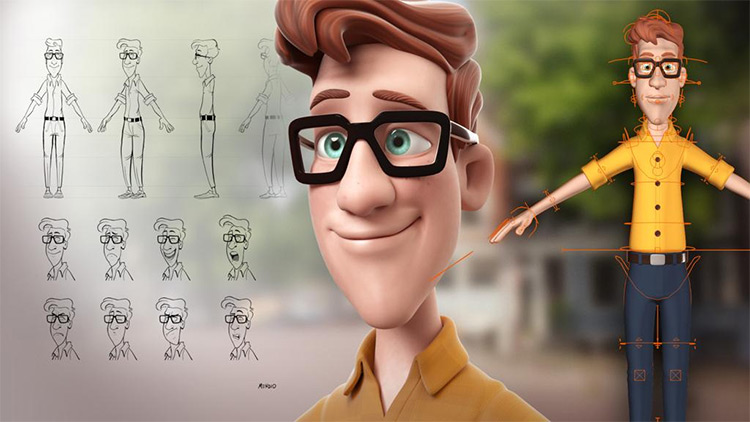
So basically what this course is is a series for people who want to learn how to make a character in blender from a reference image. This is fundamental in character modeling. Weather it be for games or a film modeling a character from a reference image is usually how the job gets done.
Who this course is for
The people who should take this course are beginners in blender who are new to character creation.
Instructor
I have been working in blender for over 6 years. I have taught myself the program from a beginners level and worked my way up. I have modeled characters and creatures from different series and fro my own mind. I even created a youtube channel for modeling some of the media's most beloved characters.
What is animation in Blender?
Animation is what will make your creations turn to life. And because of that it’s safe to say that it is one of the most important tools available in 3D. This led to the creation of this How to Animate in Blender tutorial, in which you can learn everything a total beginner needs to know to start animating in the Blender.
How to create an animation?
Creating Animation. To create your first animation you will need to add your first keyframe. Keyframe is a frame that defines the parameters of your object. Two keyframes that have different parameters of the object will create an animation. Best to see this yourself to understand.
How many keyframes do you need for animation?
You have created only one frame, probably an end frame. For proper animation you need at least two keyframes – a start and an end frames. I have transformed my object, but then it jumped back to how it was before that. You have not created a keyframe after transforming an object.
Where is the Play Animation button in Dope Sheet Editor?
Which can create a proper animation. So it is the time to see it in full, right? To play animation use the Play Animation button [Spacebar] at the bottom of the Dope Sheet Editor.
Where is the timeline editor in Blender?
And to work with them you will need to use some sort of Animation Editor. In the Default Blender layout you can find the Timeline Editor at the bottom.
Can you animate objects at the same time?
Meaning that you can animate your object rotating, scaling and moving at the same time if you create keyframes for that information. I recommend playing around and creating a couple of keyframes yourself, seeing how it works and what you can do.
Is Blender good for animating?
After all, Blender has really good animating tools. We will jump right away into animating in Blender. If you want to learn the basics of how to use Blender – read out Blender Basics Tutorial series. And How to Move in Blender to learn how to handle 3D space and more around it.
Introduction
In this tutorial, I will show the process of making the “Space Cadet” 3D Illustration. The main focus is to create a cartoon character with realistic materials.
Concept of the image
This image is based on a concept by the French artist Guillaume Singelin, who is a comic book artist and illustrator. Heavily Influenced by Toriyama and Otomo, and focused on making cartoon characters. This image portrays a space cadet.
Modeling Loop process
I always use the same method for modeling. First making a basic block out of the shapes until my eyes get tired of the image, and then I make a render and draw over it what is missing. That helps me out thinking about what I need to focus on next. I do this over and over until I can no longer find details to add or modify.
UVs and Texel Density
Mark all the seams and then Unwrap them to make the UVs of all the meshes, then apply the same texel density to all of them to have the same texture resolution – I used 40.96 px/cm. Finally, join a maximum of meshes per tileset. This project took a total of nine 4K tilesets.
Reference board
I make a board to assemble my references, divide the board by meshes and start looking for objects that have the textures I want to achieve in each one. In this project, the essential references were the spacesuit, the hands, and the freckles. That's why I have a lot more images of them.
Importing and baking
When Importing the mesh, be sure to use the PBR – Metallic Roughness template and OpenGL at the Normal Map Format. After that I start baking the first Tileset, because the size of the textures is in 4K, that's the measure I use in Output Size at the Baking. In the ID Map Change the Color Source to Vertex Color. With that, you will mask easily.
Emissive material
First I make a 4K Image that I will use as alpha in the screen monitor, then add the Emissive channel inside Substance Painter. I use this alpha as a base, but I will be adding multiple layers over it. First, an Ambient Occlusion to make the center look brighter than the corners, then a scanline effect to give an oldish feeling.
Popular Posts:
- 1. when did citrus anime come out
- 2. are anime more successful in the 21st century
- 3. how to sell anime expo ticket
- 4. is my dress up darling anime finished
- 5. do vas for anime get residuals
- 6. what anime shows sex
- 7. don't want to get hurt anime
- 8. did the tokyo ghoul anime end
- 9. a-kon controversy anime convention
- 10. how to become a anime character