
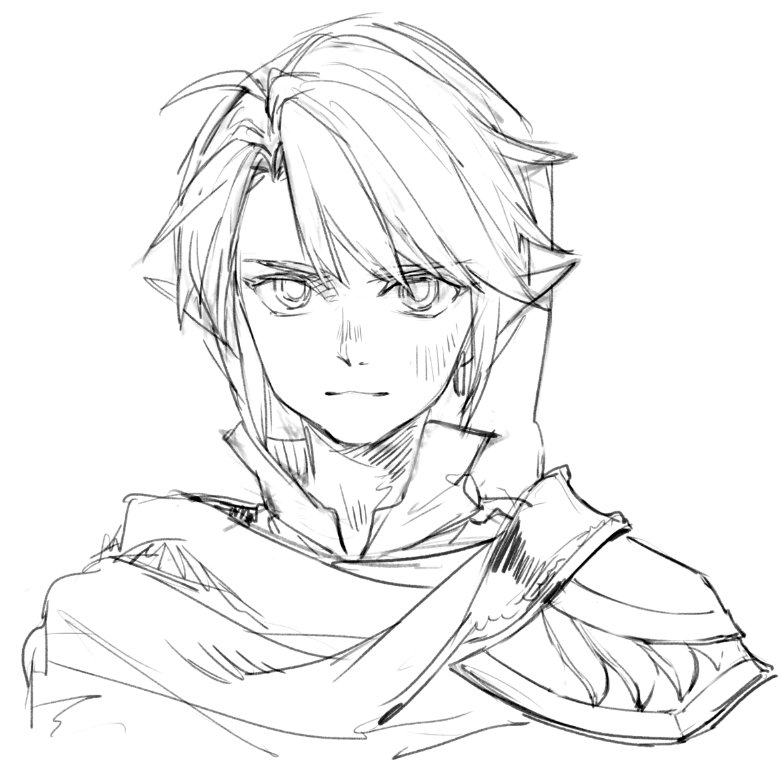
Draw a vertical line at the center of the entire head and chin part. Make three parallel horizontal lines that will intersect their middle with the vertical line. This will be the lines to guide the placement of Link's facial features. Draw Link's brushy hair, pointy ears, chin outline and his elf hat. Begin tracing the outline of Link's body.

0:37
27:11
And draw it about this big of course that's going to be part of his head so we're going to bringMoreAnd draw it about this big of course that's going to be part of his head so we're going to bring these two sides down as usual. And we're going to make it rather narrow for anime.
How to draw an anime character?
When drawing an anime character’s body, the arms should reach approximately mid-thigh. No matter what kind of body style you’re drawing, following these guidelines will ensure that you create proportional anatomy. At this point, you will have a full-body sketch of your anime character.
How to draw an anime eyebrow?
Sketch the eyebrows above the horizontal line. Draw a long, downward curving line for each eyebrow. Make them slightly longer than the upper lash line you drew for the eyes. Then, thicken the ends of the brows that are at the center of the face. If you’re drawing a feminine anime character, make the eyebrows fairly thin.
How do you draw an anime nose?
Anime noses are subtle, and they’re usually only defined when you’re looking at a character from the side. To draw your character’s nose, draw a short, simple vertical line along the center of the face at the halfway point between the horizontal line and the chin. Make the line longer if you want your character’s nose to be big.
How to draw link from Legend of Zelda franchise?
Learn two ways on how to draw Link from the Legend of Zelda franchise! You can do this by following these simple steps. Draw a medium circle for the head at the center of the page. Draw a slightly curved vertical line near the center of the circle. Draw a spade-like shape beneath the circle. This will be the guide to Link's chin and jaw.
How do you draw a link face Botw?
6:089:48How to Draw Link from Zelda: Breath of the Wild - YouTubeYouTubeStart of suggested clipEnd of suggested clipAnd again you'll see me playing with the mouth playing with the nose. Playing with the chin. TheMoreAnd again you'll see me playing with the mouth playing with the nose. Playing with the chin. The hair sometimes helps me frame the face. So I will draw it in a different times.
How do you draw a cartoon link?
13:4815:28How to Draw Link | Legend of Zelda - YouTubeYouTubeStart of suggested clipEnd of suggested clipRight at the bottom just touching those two lines. And draw a smaller circle on the inside. Now forMoreRight at the bottom just touching those two lines. And draw a smaller circle on the inside. Now for the bottom of the arm. And start right by the handle. Here. And curve in towards the wrist.
How do you draw Zelda breath of the wild?
0:0017:50How to Draw Princess Zelda | The Legend of Zelda | Breath of the WildYouTubeStart of suggested clipEnd of suggested clipUp. There's a nice round curve for the face then let's come back to where we started on the edge i'mMoreUp. There's a nice round curve for the face then let's come back to where we started on the edge i'm going to go ahead and draw a big circle for her eyes. And same thing right across about right here.
How do you draw Link's Awakening?
0:118:59EASY How to Draw LEGEND OF ZELDA - Links Awakening - YouTubeYouTubeStart of suggested clipEnd of suggested clipPlay around sub.MorePlay around sub.
How do you draw Ganon?
0:1316:35How to Draw Ganon 1/2 - Legend of Zelda - Easy Things To DrawYouTubeStart of suggested clipEnd of suggested clipAnd he had such a really hit a cool expression he had this kind of joker like face in that thing.MoreAnd he had such a really hit a cool expression he had this kind of joker like face in that thing. And i'm going to be using a pencil as you can see i'm already starting.
How do you draw links in Twilight Princess?
1:3326:33How to Draw Link from "The Legend of Zelda" - YouTubeYouTubeStart of suggested clipEnd of suggested clipYou need for that iris to be tucked underneath a little bit underneath that upper eyelid. Well let'sMoreYou need for that iris to be tucked underneath a little bit underneath that upper eyelid. Well let's go ahead and start drawing the lines for the nose. And the mouth.
How do you draw links in Skyward Sword?
9:0326:13How to Draw Link and the Skyward Sword (The Legend of ZeldaYouTubeStart of suggested clipEnd of suggested clipAnd pretty much the other side mirrors the first side that we drew. I get these details in just likeMoreAnd pretty much the other side mirrors the first side that we drew. I get these details in just like that and then we've got a circle. Coming out around just above links hand put that in like that.
How do you draw Zelda Art for Kids Hub?
0:0310:47How To Draw Link From Zelda - YouTubeYouTubeStart of suggested clipEnd of suggested clipAnd also another eye on the right the same size kind of looks like a bird. Now we're going to draw aMoreAnd also another eye on the right the same size kind of looks like a bird. Now we're going to draw a highlight in the top left of each eye draw a little oval.
How do you make Naruto?
0:038:38How to Draw Naruto- Simple Video Lesson - YouTubeYouTubeStart of suggested clipEnd of suggested clipHey there today i'm going to show you how to draw naruto. So we'll start with the eyes as usual. SoMoreHey there today i'm going to show you how to draw naruto. So we'll start with the eyes as usual. So on the sides.
How to draw anime characters?
While artists have varying preferences about how to structure an anime character’s head and face, they all start with the same basic principle: First draw a circle, and then draw a horizontal line and vertical line directly ...
How to draw anime girl eyes?
Start by sketching a curved upper eyelid, then draw a short line extending down from the outer corner of the eye. Leave the inner corner of the eye open for a softer look. Then, add a circle in the middle of the eye as the iris. Draw a smaller circle—the pupil—in the middle of the iris.
How long should an anime character's legs be?
The legs of an anime character should be approximately as long as the top half of the character, from the top of the head to the waist. Finally, add in the arms. A good rule of thumb is to align the elbow with the character’s waist, and then extend the rest of the arm (including the hand) to about mid-thigh.
What pen do you use to highlight a character?
While you will mostly ink with a black pen, it can also be helpful to have a white jelly pen on hand—you can use this to add highlights, like the reflection points in the character’s eyes. You may also choose to add additional colors with colored pencils or medium of your choice.
How to make a reflection in the eye?
Leave the inner corner of the eye open for a softer look. Then, add a circle in the middle of the eye as the iris. Draw a smaller circle—the pupil—in the middle of the iris. To create primary and secondary light reflections, add in one or two additional circles within the iris.
How to draw anime head?
1. Draw an oval and divide it into 4 sections. This will be the basic outline of your anime character’s head. The proportions don’t have to be exact, but make the oval narrower at the bottom since that will be the chin. Once you’ve drawn the oval, draw a horizontal line through the center of it. Then, draw a vertical line through the center ...
How to draw a nose in anime?
To draw your character’s nose, draw a short, simple vertical line along the center of the face at the halfway point between the horizontal line and the chin.
How to draw hands well?
Community Answer. The best trick for drawing hands well is to study your own hands first. Notice the shape, color, texture, angles, etc. Draw your hand in dozens of different positions and in different lighting. This isn't a shortcut, per se, but it's an exercise that will improve your drawing.
How to draw a stick figure?
Make the hands about 1/5 the length of the arm, and make the feet about 1/6 the length of the legs. To get the proportions right, make your stick-figure outline about 7 times as tall as your character’s head. Have the arm lines start about 1/5 of the way down the line you draw for the torso.
How to draw a short hair character?
However, if your character’s hair is going to be short, draw a narrow oval on each side of the head. Have the top of the ears line up with the horizontal line running through the center of the face, and have the bottoms line up with the bottom of the nose. Then, draw the flaps of the ear inside each oval.
Can anime characters draw hair?
The hairstyle you choose for your character is up to you, but generally, anime hair features pointed ends and distinct sections. You can draw a short, buzzed hairstyle, a medium-length style, or long, flowy hair. Whichever hairstyle you choose, avoid drawing individual strands of hair.
Manga drawing ideas
See also 10+ Step By Step Unicorn Drawing Tutorials - How To Draw Unicorn?
how to draw anime?
Your email address will not be published. Required fields are marked *
Popular Posts:
- 1. what apps can i watch anime on for free
- 2. is tokyo ghoul anime good
- 3. did the assassination classroom anime end
- 4. a picture of anime fox
- 5. can you make anime with clip studio
- 6. how to draw anime character
- 7. which traumatized anime girl are you quiz
- 8. how to remove anime from continue watching on funimation
- 9. where can you watch the anime given
- 10. how to sketch a face anime