How do you draw simple anime hair?
Drawing Neatly Combed Anime HairDraw the head and hairline. ... Draw the side sections of the hair with steady cures somewhat hugging the shape of the face. ... Add some small hair clumps for the bottom background hair.Finally you can add a little clump of hair hanging down from the middle of the front section of the hair.
How do you draw anime hairstyles?
Draw an outline of the head using a pencil, this will only serve as your guide in drawing the hair. Draw the hairline. Imagine a long hair style you want and to which direction the hair strands flow. Try drawing simple long slanted and curved lines of the hairstyle you want.
How do you draw hair step by step?
3:0212:28DO'S & DON'TS: How to Draw Realistic Hair - YouTubeYouTubeStart of suggested clipEnd of suggested clipI'm just using lines that flow with the direction that the hair is going in and when you are drawingMoreI'm just using lines that flow with the direction that the hair is going in and when you are drawing your lines make sure that they do have motion.
How do guys draw anime hair for beginners?
Start the drawing with an outline of the head and the hairline.Step 1 – Draw the Front of the Medium Long Hair. Anime medium long male hair front drawing. ... Step 2 – Draw the Sides of the Medium Long Hair. ... Step 3 – Draw the Top/Back of the Medium Long Hair. ... Step 4 – Finish the Line Drawing. ... Step 5 – Add Some Shading.
Why is drawing hair so hard?
Hair is very difficult to draw, because what we see is different than what we know. You can't simply draw all the hairs in the form of lines, because that's not what we see when we look at hair. What we see must be simplified to lines and shades, and there are many ways to do it.
What do anime hair colors mean?
Meaning, in most cases, the color of an anime character's hair does not reflect some natural hair color or a racial stereotype – instead, it is supposed to be a hint towards their personality and their role in the plot.
How do you color anime hair?
0:032:39EASIEST WAY TO COLOR ANIME HAIR - YouTubeYouTubeStart of suggested clipEnd of suggested clipThe first step is to select the solid color of your preference. And use the bucket tool to fill theMoreThe first step is to select the solid color of your preference. And use the bucket tool to fill the entire area of the hair. This would be your base.
How do you make a cartoon hair?
18:3626:47How To Draw Hair For Women & Girls: CARTOONING 101 #9YouTubeStart of suggested clipEnd of suggested clipDifferent lines as we come down and around to give that appearance of the hair coming. Around. I donMoreDifferent lines as we come down and around to give that appearance of the hair coming. Around. I don't like to go too crazy like I said with these lines. So use them sparingly.
How do you sketch curly hair?
2:2428:14How to Draw Long Curly Hair - YouTubeYouTubeStart of suggested clipEnd of suggested clipLet's start our stroke right here. Begin your stroke with a curve extend it down to the right curveMoreLet's start our stroke right here. Begin your stroke with a curve extend it down to the right curve your stroke down even more as you reach the boundary. Line. Now we have a smooth s like shape.
How do you make an anime smile?
2:3138:54HOW TO DRAW SMILING HAPPY EXPRESSIONS (Real Time)YouTubeStart of suggested clipEnd of suggested clipThis will be doing the same sort of thing but just a little bit wider. And sweeping down to theMoreThis will be doing the same sort of thing but just a little bit wider. And sweeping down to the outside edge a bit more. And then i'm just going to come down. Here bring in that shape.
How do you draw boy hair with pencil?
0:356:25How To Draw Men's Hair - Short Hair Graphite Pencil Tutorial - YouTubeYouTubeStart of suggested clipEnd of suggested clipAnd just roughly marking out the lights and the darks to do this i'm using sweeping almost flickingMoreAnd just roughly marking out the lights and the darks to do this i'm using sweeping almost flicking motions going in the direction of the hair to start trying to build up some of that hair texture.
How do you draw anime ears?
0:274:48How to Draw Manga: 10+ Ways to Draw Ears! - YouTubeYouTubeStart of suggested clipEnd of suggested clipView i draw a curvy line shaped like the letter c. Then i draw a line that bumps out at the bottomMoreView i draw a curvy line shaped like the letter c. Then i draw a line that bumps out at the bottom and then follows the curve of the ear. The ear and front view is similar i just draw it.
Why is anime hair drawn in clumps?
One good reason for this is that if you are drawing multiple frames of animation or multiple panels of a manga it will simply be too time consuming to draw anything overly detailed.
What is anime hair?
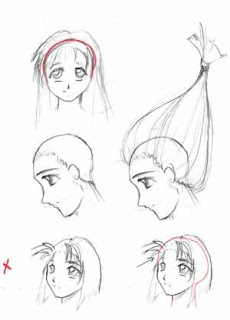
The pigtails are another very common style of anime hair. Same as the ponytail example you can see that this particular drawing can pretty much be broken down into the front and back section of the hair. With the “back hair” split into the hair covering the head and the pigtails. There are really only tiny bits of actual “side hair”.
How to tell if your hair is curly?
From the hairline draw two lines going towards the sides of the head to indicate the front hair. To show that the hair is curly you can draw these lines in light waves.
What is the hardest hairstyle to draw?
Anime curly hair drawing breakdown. Curly hair is probably the most challenging anime hairstyles to draw. This particular hairstyle can again be split into the front sides and back with the front hair being similar to the previous example. Anime curly hair step by step drawing.
What is the most common hairstyle in anime?
Long straight hair is probably one of the most common hairstyles in anime and is fairly easy to draw. Above you can see the breakdown of the long hair drawing example into: Red – Front Hair. Green – Side Hair. Blue – Back/Top Hair. You can apply a similar breakdown to drawing other hairstyles as well.
How many parts does anime hair have?
Anime neatly combed hair drawing. This hairstyle can again be split into three parts with the front, side and back hair. The front section of the hair however is a little different from the previous examples. Anime combed hair step by step drawing.
Can you split hair over one eye?
For the hairstyle with hair over one eye you can yet again split the hair into the front, sides and back. In this style the front section of the hair will be fairly large and sort of merge into the “side hair” next to the covered eye.
How to draw anime male hair?
Anime male hair front drawing. Draw the front of the hair in fairly large clumps that start from around the top of the head and go down well past the hairline. Make the clump/clumps in the middle slightly longer than the sides.
Why is my anime hair drawn in clumps?
The reason for this is that short hairs can’t reach far enough to join into as a big a clump.
How to draw a medium long man?
Anime medium long male hair front drawing. Begin the drawing of the actual hair by adding the part that goes down the middle of the face. It can start from about the top of the head and go down to around the tip of the nose (if it was shown).
What is the hairstyle of the eyes?
One common characteristic of this hair is that the portions that would cover the eyes are often swept to the sides with one big chunk going down the middle of the face to around the tip of the nose.
What is medium length hair?
The medium length hair (or some variation of it) is probably one of the most generic hairstyles in anime and manga. Very common to the “average guy” protagonists. Before drawing the hair draw an outline of the head along with the hairline.
How to Draw Anime and Manga Hair
First start with the basics of drawing hair. The simple short hairs for anime can be drawn in three simple steps.
Drawing Different Styles of Anime Hairstyles for Female
Here are some different illustrations showing how to drawings anime and manga hairstyles for a female character. Different hairstyles have different approaches to draw and given below are some of the popular anime hairstyles examples.
Conclusion
There can be a many different styles of hair which you can draw. Some of them are covered in the above Illustration. You can use the above illustration and can combine it to form a new type of hairstyle which Suits your character.
How to draw a hairstyle?
Step 1. Draw the "helmet" to mark the distance from the head. Straight hair usually is not very voluminous, so you don't have to add a lot of distance. Advertisement.
How to make hair more detailed?
If you want to make the hair more detailed, you can add lines following the rhythm. Be careful when drawing these lines inside the wavy strands, though—they may look too heavy with long lines inside. Instead, try to pick your pen/pencil up from time to time to make the lines less continuous.
Why is hair so complex to draw?
Hair is a very complex subject to draw, because it's like a substance that can take many shapes and forms. Because of this, manga artists have developed a special method of simplifying hair. In manga or anime, you draw hair as a mass or a cloth. This way it can be drawn quickly, with exaggerated shading that conceals the lack of detail.
Does wavy hair add distance?
Although a wavy hairstyle may look quite voluminous at first, it doesn't add a lot of distance to the top (of course, feel free to modify it for an exaggerated effect!).
Drawing Anime & Manga Hair
The hairstyles of anime are often created based on real hairstyles however it typically, it is drawn as clumps instead of individual hair strands. The reason behind this is that if you’re creating multiple animation frames or multiple panels in manga, it’ll be too much time-consuming to draw anything that is too elaborate.
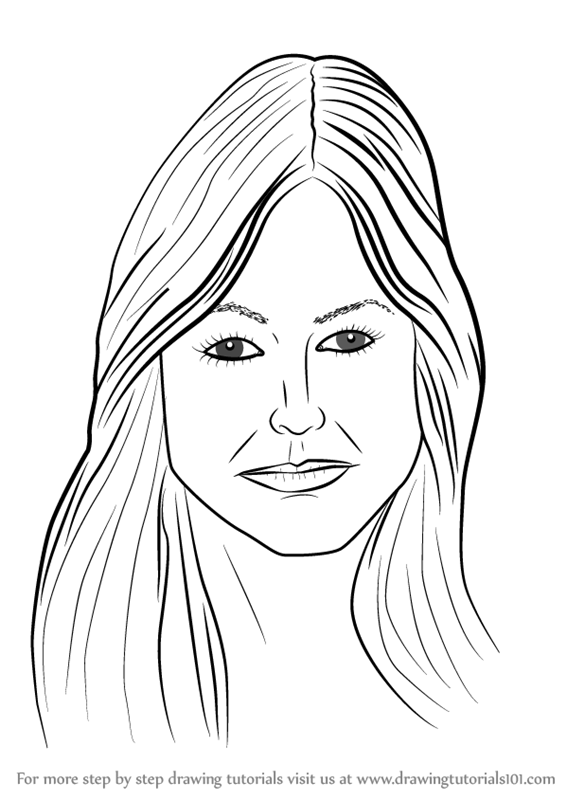
Drawing Long Anime Hair
Hair that is long and straight among the more well-known hairstyles used in anime and is relatively simple to draw.
Drawing Short Anime Hair
The drawing of short hair above is a bit like the long hair, with hair again broken down into three main components: sides, front and back.
Drawing Trimmed Anime Hair (Hime Cut)
For hair that has been cut, make a clump of hair using straight ends that appear as if they’ve been taken away by sissors.
Drawing Long Messy Anime Hair
The messy, long hair is similar to the first one, but with additional hair in clumps. It can also be split into three sections, similar to the other examples we have seen to date.
Drawing Anime Hair Over One Eye
If you want to wear hair over one eye, it is possible to divide hair into sides, front and back. In this hairstyle, the front part of hair will be rather large and then blend with hair that is “side hair” adjacent to the closed eye.Anime hair over one eye step by step drawing
Drawing Anime Hair Pigtails
The pigtails are a different typical style of anime hair. Similar to the ponytail, you will notice the pigtails can be easily broken in the back and front portion of hair. The “back hair” divided into the hair that covers hair on the scalp and hair that covers the pigtails.
How to draw anime characters?
While artists have varying preferences about how to structure an anime character’s head and face, they all start with the same basic principle: First draw a circle, and then draw a horizontal line and vertical line directly ...
How to draw anime girl eyes?
Start by sketching a curved upper eyelid, then draw a short line extending down from the outer corner of the eye. Leave the inner corner of the eye open for a softer look. Then, add a circle in the middle of the eye as the iris. Draw a smaller circle—the pupil—in the middle of the iris.
How long should an anime character's legs be?
The legs of an anime character should be approximately as long as the top half of the character, from the top of the head to the waist. Finally, add in the arms. A good rule of thumb is to align the elbow with the character’s waist, and then extend the rest of the arm (including the hand) to about mid-thigh.
How to make a reflection in the eye?
Leave the inner corner of the eye open for a softer look. Then, add a circle in the middle of the eye as the iris. Draw a smaller circle—the pupil—in the middle of the iris. To create primary and secondary light reflections, add in one or two additional circles within the iris.
What pen do you use to highlight a character?
While you will mostly ink with a black pen, it can also be helpful to have a white jelly pen on hand—you can use this to add highlights, like the reflection points in the character’s eyes. You may also choose to add additional colors with colored pencils or medium of your choice.
What is the difference between a character's nose and mouth?
The character’s nose and mouth will typically be much smaller and simpler than the eyes. The nose, for instance, may just be two small lines that represent the nostrils. Similarly, the mouth may be a simple curved line.
Popular Posts:
- 1. where can i watch the pokemon sword and shield anime
- 2. is darling in the franxx a good anime
- 3. how to draw anime in action
- 4. where does the jujutsu kaisen anime end in the manga
- 5. do you tgink henti is cute anime
- 6. how do you draw anime noses
- 7. what made anime popular in america
- 8. what is the best place to buy anime merch
- 9. how to draw your name anime
- 10. what is the longest anime series ever