How to Create an Anime Artwork in Photoshop
- Step 1 – The Outline Most people draw the outline on paper then use a scanner to load the outline into Photoshop. ...
- Step 2 – Separating the Outline ...
- Step 3 – Base Color ...
- Step 4 – Adding Shadows ...
- Step 5 – Dodge and Burn ...
- Step 6 – Adding Reflected Light ...
- Step 7 – Coloring the Outline ...
- Step 8 – Creating the Smokes ...
Full Answer
See more

How do you make anime effects in Photoshop?
How to add cartoon effects to photos in Photoshop.Add your image. Choose the image you want to cartoonise into Photoshop.Convert your image into a Smart Object so you can make non-destructive edits. Go to the Filter menu and click Convert for Smart Filters.Apply the Poster Edges effect. ... Save your cartoonised photo.
Is Photoshop good for anime?
Photoshop is has not been designed for animations but it does have the feature which is not well designed. Photoshop was mainly designed to work with photos but users where soon using it for other application like website and graphic design and Adobe upgraded Photoshop to work well with website and graphic design.
How do I Photoshop an anime character into a photo?
0:006:44easiest way to add anime characters to your pictures with your phoneYouTubeStart of suggested clipEnd of suggested clipSo you're going to go to pics. Art. You're going to click on the plus sign and pick the picture thatMoreSo you're going to go to pics. Art. You're going to click on the plus sign and pick the picture that you want to use so I'm going to be using this one. You're going to go to the bottom to add photo.
How do people add anime effects to photos?
0:105:44Photo into Anime Style Effect - Anime Effect in Photoshop - YouTubeYouTubeStart of suggested clipEnd of suggested clipSo first i made two copies of my background layer by pressing plus j and after that i named. Them.MoreSo first i made two copies of my background layer by pressing plus j and after that i named. Them. So first i am going to change the sky in this picture. Then i desaturate my top layer.
How do you make anime pictures?
How to turn a picture into an animation.Upload your image. Upload your desired image from your photo library or select a stock image to feature in your design.Animate your photo. Select the Animation tool and choose from a handful of creative animation options. ... Save and download.
How do people make anime backgrounds?
2:387:07Basic Backgrounds | EASIEST Way To Draw Anime Background - YouTubeYouTubeStart of suggested clipEnd of suggested clipThis is a painting method that has become popular in the drawing. Community recently to make it workMoreThis is a painting method that has become popular in the drawing. Community recently to make it work you need to add some very bright highly saturated lighting onto the character.
How do you edit anime girls into pictures?
0:297:39How to Make Cool Photo Edits on Your Phone Using PicsArt - YouTubeYouTubeStart of suggested clipEnd of suggested clipSo basically what you're going to do is you're going to open up pixart. And this is a free app toMoreSo basically what you're going to do is you're going to open up pixart. And this is a free app to use they do have some premium features but for majority of the fun things you can do to your pictures.
How do you put a cartoon face on a picture?
These Free Cartoon Face Photo Apps Include So Many Wild TransformationsVoilà AI Artist App. The Voilà app is one of the best options to animate your features due to all the different styles of animations you can try. ... Snapchat. ... Instagram. ... TikTok. ... ToonMe. ... Cartoon Photo Editor. ... Clip2Comic Cartoon. ... Insta Toon.More items...•
How do you make a picture into a character?
0:1413:11Turn your Selfie into a 3D Character with HeadShot - YouTubeYouTubeStart of suggested clipEnd of suggested clipCome down to headshot. And then click on headshot. Or if you look over here on my left hand cornerMoreCome down to headshot. And then click on headshot. Or if you look over here on my left hand corner you have a tab here it says headshot. You click on that also to get the headshot.
Are anime effects free?
AnimeEffects is developed on http://github.com/hidefuku/AnimeEffects and distributed as a free software under the GPLv3 license. Of course, we do not impose any restrictions on a animation work using AnimeEffects.
How do I animate a picture without Photoshop?
How to create a GIF without photoshopGIPHY's GIF Maker. GIPHY, the company with the world's largest library of animated GIFs, now offers a GIF Maker that is free and so much fun to use. ... GIFs.com. ... Imgur's Video to GIF. ... Boomerang for Instagram. ... LICECap.
How can I animate a picture for free?
For those of you who don't feel like investing too much time and effort into the task, there are plenty of other tools and apps that can help you animate still photos online....6 Ways To Animate Still Photos Online Or With AppsPixaMotion. Price: Free. ... Plotagraph. ... Movepic – Photo Motion. ... StoryZ. ... GIFMaker.me. ... 3Dthis.
Is there an app that turns you into an anime character?
So it should come as no surprise that a smartphone app called TwinFACE, now available on the Google Play store, is designed to transform your selfie into an anime character.
How do you make a Chibi in Photoshop?
1:2230:44How to Draw Chibi Anime Character in Photoshop CS6 Lineart Tutorial ...YouTubeStart of suggested clipEnd of suggested clipOkay let's click OK and the model the anime character model that we'll be doing for this tutorialMoreOkay let's click OK and the model the anime character model that we'll be doing for this tutorial would be the infamous Saitama yeah from one punch man. So. Here is the character model for Saitama.
How do you make an anime sketch?
Learn how to draw anime characters in this step-by-step guide.Step 1: Draw the Head.Step 3: Draw Anime Mouth.Step 4: Add the Final Touches.Step 1: Outline the Face.Step 2: Add the Facial Features.Step 3: Finish With the Hair.Step 1: Draw the Face and Neck.Step 2: Add the Eyes, Nose, and Mouth.More items...•
Is Photoshop an application software?
Adobe Photoshop, computer application software used to edit and manipulate digital images. Photoshop was developed in 1987 by the American brothers Thomas and John Knoll, who sold the distribution license to Adobe Systems Incorporated in 1988.
How to make an outline in Photoshop?
Most people draw the outline on paper then use a scanner to load the outline into Photoshop. Begin by opening the outline image into Photoshop. Use the Levels tool (Image > Adjustments > Levels) to correct the contrast of the outline.
How to sharpen a brush?
Select the Brush tool and set the hardness to 100%. This will give the brush a sharp edge.
Can you add a base color to a white background?
Now that we have the outline and white background separated, we can add the base color.
Why are tones important in anime?
Tones are very important part for the Anime look, there is a very complicated explanation behind it because in Anime, just like in other styles, tones won't represent only the light expressions over a material, but it will also represent the type of the material. In this tutorial we won't get deeper into tones, we'll focus on how to work with tones and how easy it is to draw it thanks to our organized layers and groups hierarchy.
What is the difference between creature_start.psd and creature_final.psd?
Psd Plus members will find 2 files provided in this tutorial. "Creature_Start.psd," contains only the outlines of the creature we will start to work with. "Creature_Final.psd," contains all the final organized layers in the correct hierarchy, effects and background for you to explore.
How to paint a mouth?
Painting the mouth is simple. First check the "Mouth" layer inside the "Outlines" group. Now that you can see the mouth, make sure that you choose the "Mouth" layer inside the "Colors" group. We will use two colors, I chose something between red and pink for the tongue and black for the inside mouth.
What colors do you use for eyeshadow?
We will use three different colors: White (not pure white, but a bit darker), Yellow, and Darker Yellow. Feel free to choose any colors that you want, but for the white part of the eye I highly recommended to never go with pure white for eyes or teeth because the pure white will take it's part on the Highlights, we will focus on that later on.
How to turn a line into a beam?
Press the V button for the Pan Tool. Press Command + T for the Free Transform Tool. Enter the numbers to resize and rotate the lines into beam-like shapes using these settings: X at 300, Y at 310, W at 200, H at 140, and Angle at -35. Then press Enter to apply the changes.
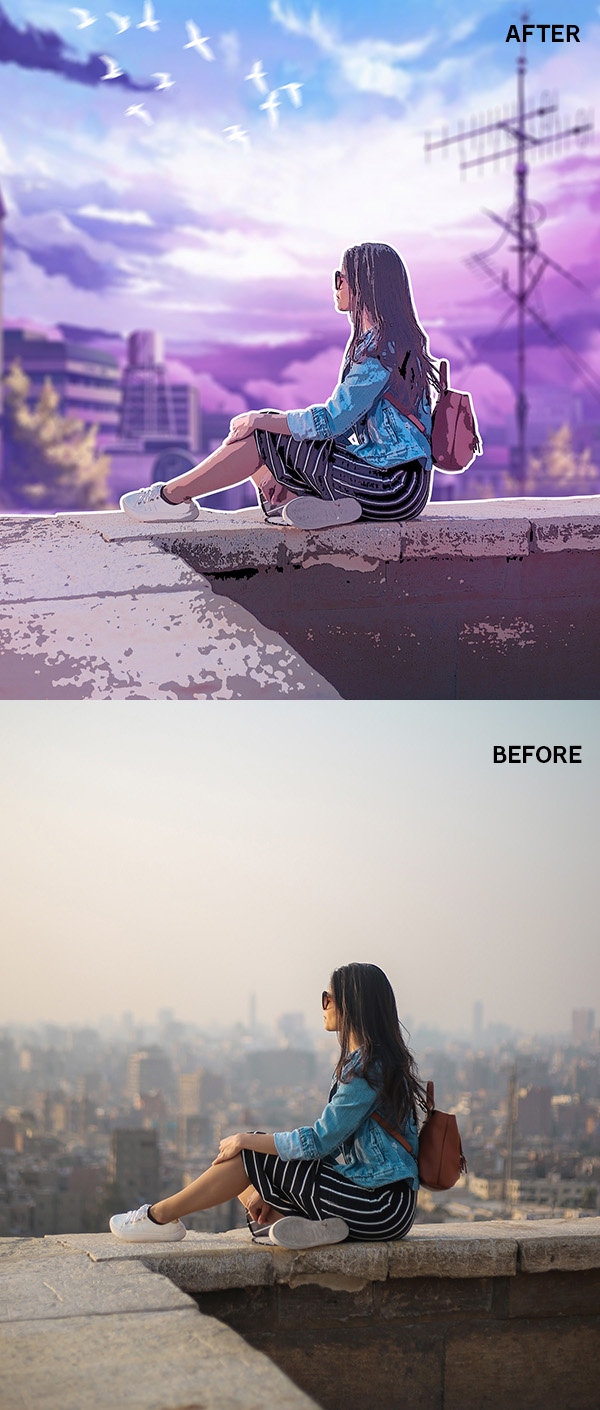
Imgkits' photo filters are an easy way to instantly convert your photos into a variety of effects such as anime filters, Pixar filters, sketches, paintings, and more. Create consistent visual aesthetics and win on social media
Imgkits' photo filters are an easy way to instantly convert your photos into a variety of effects such as anime filters, Pixar filters, sketches, paintings, and more. Create consistent visual aesthetics and win on social media.
Pixar Filter
Turn your portrait into a 3D cartoon selfie automatically using the magic of Artificial Intelligence. Upload a portrait of yourself now to cartoon yourself in one tap.
Photo to Cartoon
Ever wanted to draw cartoons for yourself? When you use our Cartoonizer, you'll be able to turn your photos into as many types of cartoons as you like in a matter of seconds. Make stunning designs with Imgkits' cartoon picture maker. You'll be amazed at what you can create—no design skills are required.
Pictures to Paint
When you get the creative spark, Imgkits will help you channel your inner Picasso, taking you from photo to painting in one click! Just select one of your photos to oil paint effects. It's that easy! Our tool is easy to use.
Photo to Sketch
Just upload your photo, click the pencil sketch button to enhance the uploaded photo to a pencil sketched image. Whether you want to sketch a picture of your fluffy pets, beautiful sunsets, city streets, or just cartoon yourself for Instagram, you can count on our AI to sketch your pictures.
Step 1
First thing you'll need is that wonderful line art you prepared in the previous tutorial. Alternatively, if you didn't join us for part one and are just here to learn how to color using the popular cell shade technique, then you will need a line art, on a separate layer to a white background, which you have permission to color.
Step 2
You'll need to change your white background to vector so that we'll have a full vector piece at the end rather than the background being raster. The simplest way to do this would be to make a white square using the Shape Tool (U) over your background and naming it "white," and then deleting your former white background layer.
Step 3
With everything organized, we're ready to go. With your Pen Tool (P) set to Shapes, as detailed in part one of this tutorial set, and with your "skin" folder selected, create a shape in color #FFF8EA for the skin. This shape should follow the line art, and include any areas where the skin is showing - in this case, the neck, face and ears.
Step 4
This may look like a big step, but its not really. Using color #FFCDA9 create a new shape above your skin base shape layer that will go around the edge of the face and hair, creating shadows where the darkest areas would be. Follow the shapes of the hair strands to make the shading feel more believable.
Step 5
Once you're happy with the placement of your shading, go back to your original skin base color, and create a new shape layer underneath the shading layers for the neck. To this shape, add a gradient overlay that fades from your skin base color at the bottom, up to the color of your shading layer.
Step 6
Now add another gradient shape layer, but this time on the face. This gradient should be a little more subtle than the one on the neck.
Step 7
Moving on to the eyes, choose a color that is slightly off white. I've picked a pale blue-gray tone. Make a new folder above the skin folder and name it "eyes". Then, create shapes in your off-white color for the eye whites, filling the area within the top and the bottom shapes of the eyes.
Step 1 – The Outline
Step 2 – Separating The Outline
Step 3 – Base Color
Step 4 – Adding Shadows
Step 5 – Dodge and Burn
Step 6 – Adding Reflected Light
Step 7 – Coloring The Outline
Step 8 – Creating The Smokes
Step 9 – Creating The Cloudy Sky
Step 10 – Adding Light
- Create a new layer and name this layer “light”. Move the layer to the very top so that it is above all the other layers.
- Select the Brush tool. In the Brushes palette (Window > Brushes), checkmark the Other Dynamicsoption.
- Set the brush hardness to 0% for soft edges.
- Create a new layer and name this layer “light”. Move the layer to the very top so that it is above all the other layers.
- Select the Brush tool. In the Brushes palette (Window > Brushes), checkmark the Other Dynamicsoption.
- Set the brush hardness to 0% for soft edges.
- Select white as the foreground color then paint the areas where you want the light to appear. The image above shows the areas that were painted.
Popular Posts:
- 1. a good hunt anime
- 2. may'n anime
- 3. are anime and manga genres the same
- 4. is ace attorney an anime
- 5. how to draw a anime guy body
- 6. can i get microsoft to set my background to anime
- 7. is orient a good anime
- 8. how a realist hero rebuilt the kingdom anime release schedule
- 9. what makes something an anime
- 10. is dragon ball z the best anime