
How to Create a Slick Anime Character in Photoshop
- Step 1. Use the ruler to create two guides in the center of the document, a horizontal and vertical one. Use the center...
- Step 2. The next line will present the side of our character's head. Select the Line Tool, make sure the Weight is set...
- Step 3. Now we are going to make a "freehand" line. ... It's always good...
Full Answer
How to make anime art in Photoshop?
How to Create an Anime Artwork in Photoshop. Step 1 – The Outline. Most people draw the outline on paper then use a scanner to load the outline into Photoshop. Begin by opening the outline image ... Step 2 – Separating the Outline. Step 3 – Base Color. Step 4 – Adding Shadows. Step 5 – Dodge and ...
How to create a slick anime character in Photoshop?
How to Create a Slick Anime Character in Photoshop 1 Use the ruler to create two guides in the center of the document, a horizontal and vertical one. ... 2 The next line will present the side of our character's head. Select the Line Tool, make sure the Weight is set at 1px. 3 Now we are going to make a "freehand" line. ... More items...
How do I create a custom character in character animator?
The easiest way to create your first custom character for Character Animator is to take advantage of the free Blank puppet template provided by Adobe. This template will allow you to layer custom character artwork over the template using Photoshop.
How to create a character for animation in SketchUp?
How to Create a Character for Animation. 1 Step 1. Start with a torso. It shouldn't be completely oval; try to make the front slightly smaller. Use #acb6b8 to color it. You don't need to copy ... 2 Step 2. 3 Step 3. 4 Step 4. 5 Step 5. More items
How do I Photoshop myself into an anime character?
0:006:44easiest way to add anime characters to your pictures with your phoneYouTubeStart of suggested clipEnd of suggested clipSo you're going to go to pics. Art. You're going to click on the plus sign and pick the picture thatMoreSo you're going to go to pics. Art. You're going to click on the plus sign and pick the picture that you want to use so I'm going to be using this one. You're going to go to the bottom to add photo.
How do you make an anime picture in Photoshop?
Follow this tutorial to quickly convert your photo to a cartoon in Photoshop.Add your image. Choose the image you want to cartoonize into Photoshop.Convert your image into a Smart Object so you can make nondestructive edits. ... Apply the Poster Edges effect. ... Save your cartoonized photo. ... Go to Filter › Liquify.
Can you draw anime in Photoshop?
Most artists create manga with Adobe tools since drawing anime in Photoshop is very convenient. In this program, you get a huge set of brushes and a gorgeous color palette to create comics.
How do you create an anime character?
8 Steps To Create an anime character online for freeChoose the artistic style you like. ... Choose a skin tone. ... Choose the eye. ... Add tear and eyebrow. ... Choose the nose & mouth shape. ... Change the hairstyle. ... Add gesture and accessories. ... Add texts to express yourself.
How can I turn myself into a cartoon?
If you prefer to cartoon photos online without downloading any photo cartoon software, you can visit these online photos to cartoon websites.ToonCamera. ... Clip2Comic & Caricature Maker. ... Sketch Me! ... Photo to Cartoon Yourself Edit. ... Moments Cartoon Caricature. ... Cartoon Camera Free. ... Cartoon yourself video effects.More items...•
What would I look like as an anime character app?
Meitu App Makes You Look Like an Anime Character | PCMag.
How do you make a Chibi in Photoshop?
4:4830:44How to Draw Chibi Anime Character in Photoshop CS6 Lineart Tutorial ...YouTubeStart of suggested clipEnd of suggested clipControl and for a new layer that's a shortcut for creating a new layer. Okay then B for brush.MoreControl and for a new layer that's a shortcut for creating a new layer. Okay then B for brush. Pushkin so now here we go you will try to draw Saitama. Here.
How do you do anime art lines?
1:2313:40[TUTORIAL] How To Draw Cleaner Lineart! - YouTubeYouTubeStart of suggested clipEnd of suggested clipSo with line art line art is very delicate all right so what I like to do is all right let's startMoreSo with line art line art is very delicate all right so what I like to do is all right let's start let's start at the hair. So we need to do is be confident in your lines.
How do you make an anime vector?
How to Animate Vectors Using Illustrator and PhotoshopStep 1: Isolate the Vector. ... Step 2: Duplicate the Vector. ... Step 3: Make Subtle Changes Frame to Frame. ... Step 4: Wash, Rinse, Repeat. ... Step 5: Copy the Vectors to Photoshop. ... Step 6: Duplicate the Layers Into a Timeline. ... Step 7: Copy and Reverse the Frames.More items...•
Can I create my own anime?
Can I make an anime on my own? Yes, but it will be a tedious process. You could consider getting help from other talented people.
What program do animators use to make anime?
Beginners can use Adobe Animate since it has lots of tutorials. There are also plenty of apps to get your hand at creating animations. What is the best animation software for anime? One of the best programs for animation is Adobe Animate, as it always provides new features in order to create the best video characters.
Who created anime?
The history of anime can be traced back to the start of the 20th century, with the earliest verifiable films dating from 1917. The first generation of animators in the late 1910s included Ōten Shimokawa, Jun'ichi Kōuchi and Seitaro Kitayama, commonly referred to as the "fathers" of anime.
Preparations
Lets make some basic tweaks before we start drawing the head. Make sure the following options are Enabled under the View menu:
Step 1
Use the ruler to create two guides in the center of the document, a horizontal and vertical one. Use the center of the document to create a circle (it will snap to the guides). Make sure that the circle's stroke size is 1px with 0% Fill Opacity.
Step 2
The next line will present the side of our character's head. Select the Line Tool, make sure the Weight is set at 1px. From the middle left side of the circle, draw a line from 1 point to the the 2nd point, as shown below:
Step 3
Now we are going to make a "freehand" line. (This will be the lower jaw / chin) don't be afraid to use the brush tool. It's always good practice to get used to drawing your own shapes and lines without depending on photoshop shape tools.
Step 5
Continue with the Ear, closing the basic shape. Follow the the points shown bellow. It's easier to see what we are drawing by disabling the guides (Command + ;)
Step 6
Draw a parallel line to the upper line, Then add a smaller line from the end of it in about 35 or 40 degrees. Follow the points shown below.
Step 7
The last step in finishing the ear is very cool because it reminds of two letters: L and C.
Step 1
First thing you'll need is that wonderful line art you prepared in the previous tutorial. Alternatively, if you didn't join us for part one and are just here to learn how to color using the popular cell shade technique, then you will need a line art, on a separate layer to a white background, which you have permission to color.
Step 2
You'll need to change your white background to vector so that we'll have a full vector piece at the end rather than the background being raster. The simplest way to do this would be to make a white square using the Shape Tool (U) over your background and naming it "white," and then deleting your former white background layer.
Step 3
With everything organized, we're ready to go. With your Pen Tool (P) set to Shapes, as detailed in part one of this tutorial set, and with your "skin" folder selected, create a shape in color #FFF8EA for the skin. This shape should follow the line art, and include any areas where the skin is showing - in this case, the neck, face and ears.
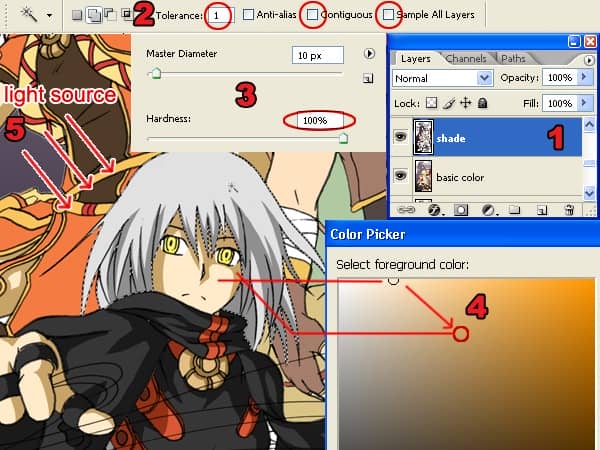
Step 4
This may look like a big step, but its not really. Using color #FFCDA9 create a new shape above your skin base shape layer that will go around the edge of the face and hair, creating shadows where the darkest areas would be. Follow the shapes of the hair strands to make the shading feel more believable.
Step 5
Once you're happy with the placement of your shading, go back to your original skin base color, and create a new shape layer underneath the shading layers for the neck. To this shape, add a gradient overlay that fades from your skin base color at the bottom, up to the color of your shading layer.
Step 6
Now add another gradient shape layer, but this time on the face. This gradient should be a little more subtle than the one on the neck.
Step 7
Moving on to the eyes, choose a color that is slightly off white. I've picked a pale blue-gray tone. Make a new folder above the skin folder and name it "eyes". Then, create shapes in your off-white color for the eye whites, filling the area within the top and the bottom shapes of the eyes.
How to make an outline in Photoshop?
Most people draw the outline on paper then use a scanner to load the outline into Photoshop. Begin by opening the outline image into Photoshop. Use the Levels tool (Image > Adjustments > Levels) to correct the contrast of the outline.
What is Luminar AI?
Luminar AI lets you turn your ideas into reality with powerful, intelligent AI. Download the photo editor and see how you can completely transform your photos in a few clicks.
What are the elements of animation?
The template file contains four types of elements: 1 Images: the parts of animation that we can see. 2 Bones: the parts of animation that direct the movement of the images, though they are not visible during the animation. 3 Labels: they help us assign the bones to the correct images. 4 Pivot: it defines the ground level.
Can you use the pen tool in Photoshop?
Ian Yates. If you have Photoshop CC, you can also use the more intuitive Curvature Pen Tool. Make sure you use the Pen Tool in Shape mode. This will color the paths automatically, and you'll be able to change the colors anytime by double clicking the thumbnail.
Is Photoshop good for animate?
As a graphic designer, you may be very familiar with working in Adobe Photoshop. But Photoshop, though very powerful, isn't good for everything—just try to animate something more advanced than a bouncing ball! Luckily, there are other programs you can use to animate a character created directly in Photoshop, so that you can design in ...
Can you animate a character in Photoshop?
Luckily, there are other programs you can use to animate a character created directly in Photoshop, so that you can design in the software meant for designing, and animate in the software meant for animating. In this tutorial I will show you how to use such a program, CrazyTalk Animator 3, to animate a character created in Photoshop.
How to preview a puppet in a scene?
At this point, if you wish to preview your puppet in a scene, select your Blank character, found under Name to the left of your workspace. Once your puppet name is highlighted, select the Add to New Scene icon located just below the Name window.
How to see draggers in puppet?
To review the draggers that are already available, select your puppet from the puppet menu to the left of your character. To the right-hand side, in the Properties window, you will see a Dragger dropdown. Select the arrow to show the draggers set up in your puppet.
Can you make your own character animation?
If you don't want to create your own character from scratch, using blank puppet templates or even taking advantage of other available puppet templates online can have you producing custom animations in no time.
Popular Posts:
- 1. which anime trap are you
- 2. what does dub mean anime
- 3. how many types of anime are there
- 4. a production anime
- 5. what anime are you buzzfeed
- 6. a future with no color anime
- 7. which anime is number 1
- 8. how to raise a boring girlfriend anime
- 9. are only japanese shows anime
- 10. a silent voice anime song