How to Draw an Anime Character Drawing Close Up
- Sketch a big circle.
- Sketch the face, neck and the shoulder.
- Add the guidelines for the face.
- Draw the basic outline of the face and the ears.
- Add the eyes, nose, and mouth.
- ... (more items)
5 Simple Steps to Drawing Anime
- Step 1: Create the Basic Structure of the Face.
- Step 2: Add Facial Features.
- Step 3: Draw the Hair.
- Step 4: Add the Body.
- Step 5: Add Details and Ink the Drawing.
Apr 22, 2021
How to draw anime for beginners?
Beginner Guide to Drawing Anime & Manga
- Make Light Line Drawings First. Draw using light lines first and then trace over them with darker lines once you are sure that everything is in the right place.
- Use Guide/Construction Lines. Use guide lines to help yourself draw. ...
- Plan Out Your Drawing & Draw Larger to Smaller. Estimate your proportions before you start drawing. ...
- Keep Different Parts of Your Drawing in the Same Stages of Completion. Try and keep the various objects in your drawing in roughly the same state of completion. ...
- Draw Things That Are Hidden. It’s sometimes a good idea to draw things that are hidden by something else. ...
- Do Drawing Exercises. As a beginner artist you can really benefit from some fairly simple exercises of drawing lines and basic geometric shapes.
- Study the Anime Style. To make art that looks like anime and manga you have to understand their defining characteristics. ...
- Check for Mistakes. If you are having trouble spotting your mistakes turn your drawing upside down or hold it up to a mirror.
What are the steps to drawing anime?
The shape of the lower part of the face is as follows:
- Two downwards lines slightly angled inwards (towards middle of face)
- A pair of light curves
- Two more downwards lines that face more inwards than previous pair
- Small curve for the chin
How to draw for beginners?
- Pull drawing exercises from the world around you. You have to start drawing somewhere, and you can start where you are: sketch the world around you. ...
- Learn to draw better by copying. Building off the work of those who’ve come before you is a great way to learn. ...
- Drawing lessons to help you build your skills. Developing your eye through careful observation is an important part of learning to draw. ...
- Go from sketch to digital painting. French art nouveau and comic artist Lois van Baarle walks you through the stages of creating a digital painting.
- Experiment with brushes. Download and install brushes from artist Kyle T. Webster, and get step-by-step instructions on how to adjust them before beginning your experimentation.
- Create a comic book panel. See artist Chad Lewis go from reference sketch to colored comic book panel in this quick guide.
- Study character illustration. Sit down with illustrator and designer Logan Faerber as he draws and colors character illustrations while answering questions from the Behance community.
How to Sketch anime characters?
Anime delinquent feminine character one eyebrow raised drawing. For this expression draw one eye squinted with the eyebrow over that eye decrease down in a reversed curve. Draw the second eye barely wider and with the eyebrow over that eye raised. Draw the mouth in a kind of “crooked” smile with the enamel exhibiting.
How can I teach myself to draw anime?
Beginner Guide to Drawing Anime & MangaMake Light Line Drawings First. ... Use Guide/Construction Lines. ... Plan Out Your Drawing & Draw Larger to Smaller. ... Keep Different Parts of Your Drawing in the Same Stages of Completion. ... Draw Things That Are Hidden. ... Do Drawing Exercises. ... Study the Anime Style. ... Check for Mistakes.
What is the best way to learn drawing anime?
10 Things You Need to Know to Be a Better Manga ArtistStudy Real Anatomy. Just like with any figure drawing, knowing a body's anatomy is vital. ... Find Reference Images. ... Use Guidelines. ... Don't Copy. ... Be Open to Criticism. ... Be Skeptical of Praise from Family and Friends. ... Avoid Shortcuts. ... Draw Different Kinds of Characters.More items...•
How do I learn to draw characters?
Character Drawing: 10 Beginner Tips To Take It To The Next Level. Great characters make great stories. ... Know Your Character's Story. ... Use Other Character Drawings As References. ... Give The Pencil The Power. ... Divide Your Character Into 3 Different Sections. ... Mix And Match Your Shapes. ... Try The Silhouette Test. ... Show All Their Sides.More items...
Is it hard to draw anime characters?
At first, anime may seem like an easy drawing style, but it is not as easy as it looks; anime drawing is rather hard. Anime is hard to draw because it requires the artist to have proper knowledge about anatomy, perspective, value, and many other drawing fundamentals, which aren't easy to master.
What is the best anime drawing app?
Chalk. Ibis Paint. Medi Bang Paint. CLIP STUDIO PRO. Jump paint. Draw Anime & Manga. Differences between Anime and Manga.
How can I practice anime?
11 Tips To Get Better At Drawing Anime – Step By Step GuideGet Into A Drawing Routine.Learn Basic Anatomy.Learn To Draw In Perspective.Learn About Value (Light and Dark)Practice Mindfully.Learn From The Pros By Using References.Learn About Composition.Study Different Drawing Styles.More items...
How do you practice character art?
6 Character Design TipsKnow your target audience. The project's demographic will help determine the simplicity or complexity of the character design. ... Practice world-building. ... Understand shape language. ... Explore the character's personality. ... Experiment with color.Keep it simple.
How can I get really good at art?
PRACTICE, PRACTICE, PRACTICE: Draw something every day, even if it's just a doodle. Keep all your artwork even if you don't like it so you can see the improvement over time. DON'T COMPARE: Looking at other artists for inspiration is great, but don't compare your work to others and let it get you down.
How do you make Naruto?
0:038:38How to Draw Naruto- Simple Video Lesson - YouTubeYouTubeStart of suggested clipEnd of suggested clipHey there today i'm going to show you how to draw naruto. So we'll start with the eyes as usual. SoMoreHey there today i'm going to show you how to draw naruto. So we'll start with the eyes as usual. So on the sides.
Why is anime style so hard?
Yes, it is all done with simple lines and shapes, but it is done in a smart way that takes some time to understand. While other parts of anime character like the hair or chin may appear simple, some of the other parts are totally not, like the clothes, which tend to be more detailed, and in some cases, really detailed.
How long does it take to learn drawing anime?
How Long Does It Take To Learn To Draw Anime? You can learn to draw anime well in one year, but it commonly takes between three to four years of proper training to be proficient at drawing manga. Depending on how deep you want to go with the manga drawing style, it can take even more.
Is anime harder than realism?
Realism. “Anime isn't a good way to show skill, because it's a lot easier than realism is.”
How to draw anime head?
1. Draw an oval and divide it into 4 sections. This will be the basic outline of your anime character’s head. The proportions don’t have to be exact, but make the oval narrower at the bottom since that will be the chin. Once you’ve drawn the oval, draw a horizontal line through the center of it. Then, draw a vertical line through the center ...
How to draw a short hair character?
However, if your character’s hair is going to be short, draw a narrow oval on each side of the head. Have the top of the ears line up with the horizontal line running through the center of the face, and have the bottoms line up with the bottom of the nose. Then, draw the flaps of the ear inside each oval.
How to draw a torso in a cartoon?
For the torso, draw a quadrilateral (a 4-sided shape) that’s wider at the top and narrower at the bottom. Eventually, the wide corners at the top will become your character’s shoulders.
How to get a good manga?
Come up with a story first. Then, you'll need the ability to draw out that story. If you need any more help , you can go to any book store and find manga to give you a look on how a good story is written out. Or, borrow some manga from your library. Keep practicing, as it can take time to get all the pieces sorted.
How to draw hands well?
Community Answer. The best trick for drawing hands well is to study your own hands first. Notice the shape, color, texture, angles, etc. Draw your hand in dozens of different positions and in different lighting. This isn't a shortcut, per se, but it's an exercise that will improve your drawing.
How to draw a stick figure?
Make the hands about 1/5 the length of the arm, and make the feet about 1/6 the length of the legs. To get the proportions right, make your stick-figure outline about 7 times as tall as your character’s head. Have the arm lines start about 1/5 of the way down the line you draw for the torso.
How to see the nose in a drawing?
The nose will overlap with the vertical line you drew. To see it better, make it darker than the vertical line, or erase the vertical line around the nose.
What to add to anime drawing?
Add clothing to your anime drawing to give your character personality .
What is the best thing about anime character design?
Though you may never have heard of a ninja skateboarder or a singing surfer, one of the best things about anime character design is that there are no rules! Feel free to combine different character types and styles to create a character that represents you and your interests.
What is Sensei's course?
Skillshare instructor Sensei’s course is a great masterclass in anime faces. If you’re learning how to draw anime for beginners, Sensei’s advice will help you understand the fundamentals of anime characters and draw them with ease.
Why is anime so popular?
Part of what makes anime so popular is that characters are known for having loud expressions and emotions. To help convey these sentiments through your anime character’s face, follow along as artist Enrique Plazola teaches you how to draw anime eyes in four different styles!
What is the best thing about digitizing anime?
One of the best things about digitizing your anime drawings is that you have limitless options for posing and positioning your characters. Character designer and animator McCoy Buck shows you how to do exactly that using digitized vector points for reference.
Why are proportions important in anime?
Anime drawing and character design is unique in that it allows for open-ended creativity while still remaining within standard design principles, like proportions.
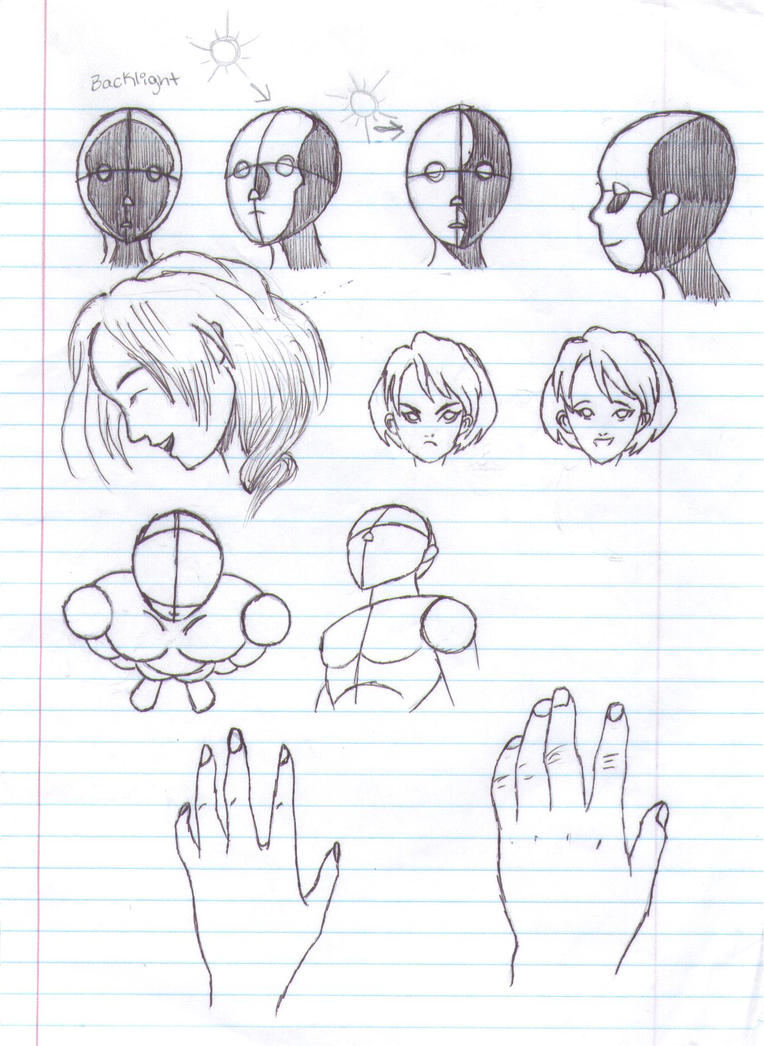
How to take guesswork out of drawing hands?
Take the guesswork out of drawing hands by breaking them down into simpler, more familiar shapes.
How to draw an angry villain?
For the angry looking villain draw the top eyelids lowered and the bottom eyelids raised (in reversed curves). Draw the pupils and irises small with no shadows and small reflections same as the previous example.
How to draw a smiling face?
For a smiling face draw the eyes slightly narrower with, reverse the curves of the bottom eyelids from their normal state and draw the mouth slightly wider.
How to draw a delinquent face?
You can draw the “delinquent” face similar to the “tough girl” but draw the bottom eyelids almost straight and the irises (with everything inside them) much smaller. Draw the top of the irises covered by the top eyelids and leave some space between them and the bottom eyelids.
How to draw a daydream expression?
For the daydreaming expression draw the eye/eyes to one side of the face with both the top and the bottom eyelids slightly raised. You can also draw slightly raised eyebrows
What are the three basic shapes of an anime face?
When drawing the outer shape of an anime face in the front view it may be helpful to think of it as being composed of three basic shapes as shown above (circle, quadrilateral and triangle ).
Why do you draw hair over one eye?
A good hairstyle for this type of character can be the “hair over one eye” to reinforce the idea of “hiding” and shyness. But in case you want to draw a different hairstyle both eyes are show in the example below.
What do you draw for crazy expressions?
For the crazy expression draw the eyes slightly wider than normal with small irises/pupils/highlights and no shadows.
How to draw a neck?
The neck is fairly straightforward: just draw a line from the center of the clavicles towards the ears, and fill the rest as a simple column. As for the back, don't forget about the shoulder blades.
What are anime bodies?
An anime body can be reduced to simple forms, like spheres and ellipsoids. They introduce another level of proportions, although they're much looser and easier to keep right. It's important to remember that although they look like circles and ellipses in your drawing, they're actually 3D objects, and they are subject to perspective.
Why is the torso the simplest to draw?
The torso is the simplest to draw because it has big, clear muscle masses, and it doesn't change shape too much.
Where is the body divided in anime?
Most of the time, an anime character's body can be divided into halves right at the crotch level. Sometimes, the lower half is made longer to make the legs longer or the torso more robust, but it's rarely shorter (A).
Why are breasts so tricky to draw?
Step 8. Breasts can be tricky to draw, because they're not really what they seem . They're soft masses, affected greatly by gravity, not simply firm balls attached to the chest. They don't really have one solid shape—it changes all the time with the pose.
Where should the head be placed in a game?
Draw the head now. It should be placed close to the main line of action. Its size will help us work out the other proportions.
Is there a right or wrong proportion in anime?
However, while there are no right and wrong proportions, there are intentional and unintentional ones.
How many shapes can anime head be broken down into?
In the above example you can see how an anime style head can be broken down into three simple shapes. The same can often be done with other parts of the body and various other objects. You don’t need to actually draw all of these out every time you want to draw something but its a good example for why learning to draw basic shapes can be so useful.
How to see mistakes in drawing?
If you are having trouble spotting your mistakes turn your drawing upside down or hold it up to a mirror. This will give you a fresh “perspective” making it easier to see them.
How to be a beginner artist?
As a beginner artist you can really benefit from some fairly simple exercises of drawing lines and basic geometric shapes. These exercises will help steady your hand and train you to see (and avoid) common mistakes.
How to keep different parts of your drawing in the same state of completion?
Keep Different Parts of Your Drawing in the Same Stages of Completion. Drawing consistency example with anime eyes. Try and keep the various objects in your drawing in roughly the same state of completion. If for example you are drawing eyes than draw the outer shape of each eye and then draw the shape of each iris.
How to draw a symmetrical face?
Use guide lines to help yourself draw. For example if you want to draw a symmetrical head/face from the front view you can first draw a horizontal line though the middle of where you want to draw the face. This line will help you make sure that both halves of the face are even in width. You can then draw a horizontal line (or several lines) to help you make sure that both eyes and both ears are on the same level.
What to do if your shapes don't come out?
Don’t worry if your shapes don’t come out right, simply try and improve on the next shape .
Is it a good idea to draw things that are hidden by something else?
It’s sometimes a good idea to draw things that are hidden by something else .
How to draw a trapezoid?
If you draw a trapezoid with an inclined line, then draw the finger joints, starting with the thumb, then the index finger, and the middle finger. I drew lines here instead of rectangles to represent the finger part. We can't see the rest of the fingers from this view. So we're not gonna draw them.
How to draw sadder?
To make the expression sadder, bring the eyebrows are closer to the eyes. And if you wanted even sadder, ring to islets down and draw the eyebrows are closer to the eyes. Draw these lines here to show how the eyelid is slightly closer. He will draw a mad face.
Popular Posts:
- 1. a hat in time hat anime
- 2. how to make a picture look like anime
- 3. a cute anime determination face
- 4. how to draw a human body anime
- 5. a crying anime eye
- 6. a lazy vampire guy with a ghost girl companion anime
- 7. could we see a return of bleach anime
- 8. is truth the strongest anime character
- 9. does leonardo dicaprio watch anime
- 10. will dragon ball super anime continue