
0:01
8:54
This artwork was created for a draw this in your own style. Challenge for an artist on instagram byMoreThis artwork was created for a draw this in your own style. Challenge for an artist on instagram by the name of comfyu. U. After finding the references for drawing.
How do I make my anime look like drawing?
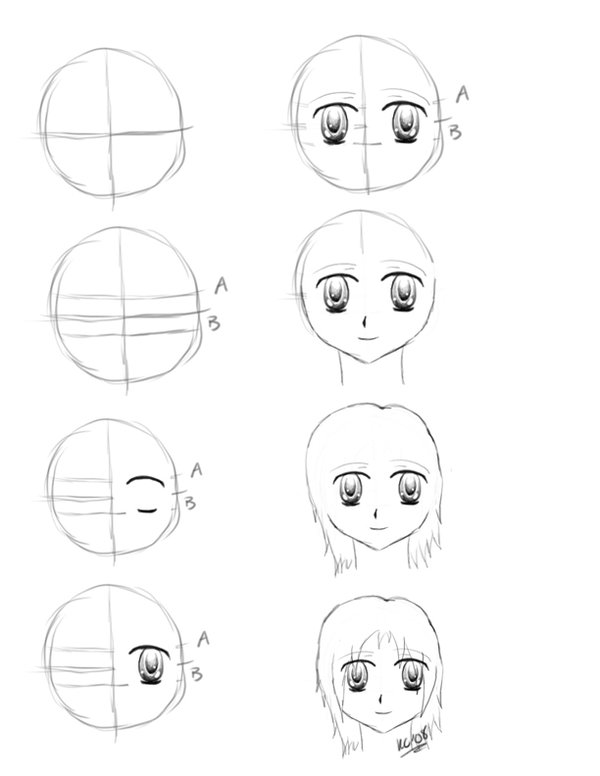
5 Simple Steps to Drawing AnimeStep 1: Create the Basic Structure of the Face.Step 2: Add Facial Features.Step 3: Draw the Hair.Step 4: Add the Body.Step 5: Add Details and Ink the Drawing.
Is drawing anime harder than realistic?
Anime art vs. “Anime isn't a good way to show skill, because it's a lot easier than realism is.”
What do anime artists use to draw?
Manga artists use Clip Studio Paint for drawing, paneling, and layering their drawings and Photoshop, PaintTool SAI, and Corel Painter for editing, cleaning, coloring, and formatting. Manga artists access this software using a drawing tablet.
How do you do semi realistic anime?
0:058:03My Secret to Drawing Semi Realism! - YouTubeYouTubeStart of suggested clipEnd of suggested clipSo let's start sketching the first thing i do when i sketch is to lay out the silhouette. So what iMoreSo let's start sketching the first thing i do when i sketch is to lay out the silhouette. So what i did was i made a rough sketch of his whole body before going into the details.
Is anime accepted in art school?
Art schools do not consider anime to be a distinct form of art, and they do not encourage their students to pursue it.
How long does it take to be able to draw anime?
On average, learning how to draw anime well takes two to three years. How fast you can learn to draw anime varies depending on the number of hours you practice daily and your training approach. If you draw one hour a day, it can take three years, but it can take one year if you draw 3 hours a day.
Why is anime called anime?
The dispute typically begins here: the word “anime” (shortened from “animēshon“) is the Japanese pronunciation of the word “animation.” In Japan, the word is often used as a blanket term for all animated content no matter where it's from.
What is the best app to draw anime?
Chalk. Ibis Paint. Medi Bang Paint. CLIP STUDIO PRO. Jump paint. Draw Anime & Manga. Differences between Anime and Manga.
What colored pencils are best for anime?
Prismacolor Pencils The Prismacolor colored pencils are also a staple for manga art. These pencils come in richly-pigmented specialty colors that are made especially for manga artists. You can easily make skin tones in all kinds of shades with colors like Cream, Cloud Blue, Chartreuse, and Pale Vermillion.
How do you draw realistically?
Drawing Realistically: 7 Tips for Teaching YourselfMaster Shading. ... Learn to Draw Eyes. ... Start with Objects, Not Scenes. ... Draw Upside Down. ... Use Tracing Paper to Understand Your Lines. ... Use the Grid Method to Break Your Image Into Chunks. ... Grab a Ruler to Make Sure Everything is in Proportion.
How can I make my art more realistic?
Tips to Improve Your Realistic DrawingKnow and prepare your art supplies. ... Always start with a light initial sketch, focusing on largest shapes first. ... Keep in mind that in realism, there are no visible lines. ... Create gradual, smooth transitions between your different values.More items...•
How do you draw a 18 wheeler?
0:106:36How To Draw An 18- Wheeler Transport Truck - YouTubeYouTubeStart of suggested clipEnd of suggested clipWe're going to start off with some basic shapes mostly rectangles and then a triangle.MoreWe're going to start off with some basic shapes mostly rectangles and then a triangle.
How to draw anime characters?
While artists have varying preferences about how to structure an anime character’s head and face, they all start with the same basic principle: First draw a circle, and then draw a horizontal line and vertical line directly ...
How to draw anime girl eyes?
Start by sketching a curved upper eyelid, then draw a short line extending down from the outer corner of the eye. Leave the inner corner of the eye open for a softer look. Then, add a circle in the middle of the eye as the iris. Draw a smaller circle—the pupil—in the middle of the iris.
How long should an anime character's legs be?
The legs of an anime character should be approximately as long as the top half of the character, from the top of the head to the waist. Finally, add in the arms. A good rule of thumb is to align the elbow with the character’s waist, and then extend the rest of the arm (including the hand) to about mid-thigh.
How to make a reflection in the eye?
Leave the inner corner of the eye open for a softer look. Then, add a circle in the middle of the eye as the iris. Draw a smaller circle—the pupil—in the middle of the iris. To create primary and secondary light reflections, add in one or two additional circles within the iris.
What pen do you use to highlight a character?
While you will mostly ink with a black pen, it can also be helpful to have a white jelly pen on hand—you can use this to add highlights, like the reflection points in the character’s eyes. You may also choose to add additional colors with colored pencils or medium of your choice.
What is the difference between a character's nose and mouth?
The character’s nose and mouth will typically be much smaller and simpler than the eyes. The nose, for instance, may just be two small lines that represent the nostrils. Similarly, the mouth may be a simple curved line.
How to draw a realistic eye?
1. Take your ruler, and draw two lines. These lines will be the overall size of your eye. It really depends on how big you want to make your eye, but the one we'll be drawing takes up a good portion of the paper. (We'll erase these lines later, so sketch them lightly!)
How to draw a banana eye?
This is your eye's iris. In the center, draw a small circle as your pupil, and colour it black with your pencil. The circle need not be perfect.
Step 1 – Drawing A Semi-Realistic Looking Anime Head

Anime characters generally have fairly round faces. The bottom portion of an anime face is commonly drawn with two major sets of lines, one going down from the top of the head to around the mouth area and one more from there to the chin. The chin itself tends to be drawn either completely pointy or with a tiny curve. For a more r…
Step 2 – Drawing The Eyes
- Position the eyes the same as you would for more traditional looking anime characters (as suggested in other tutorials here on AnimeOutline). To do this by draw a horizontal line through the middle of the face and draw the eyes below that line. Space the eyes so that you can fit another eye between them. Draw the eyes vertically narrower than common anime eyes but larg…
Step 3 – Drawing A Semi-Realistic Nose
- While traditional anime noses are often just draw with a dot (in the front view) for a more realistic looking style you can draw a nose that is a lot closer in shape and proportions to a real one. Position the nose as you would for a traditional looking anime character with the bottom of the nose being between the chin and the horizontal halfway point through the face. (again same as …
Step 4 – Drawing The Ears
- Draw the ears pretty much as you would with most other anime styles. Draw the top of the ears to align with the top of the eyes and the bottom of the ears to align with the bottom of the nose. For detailed examples of drawing anime ears check: How to Draw Anime and Manga Ears Please note that the ears in this tutorial will eventually be fully covered by the hair and erased for the final ste…
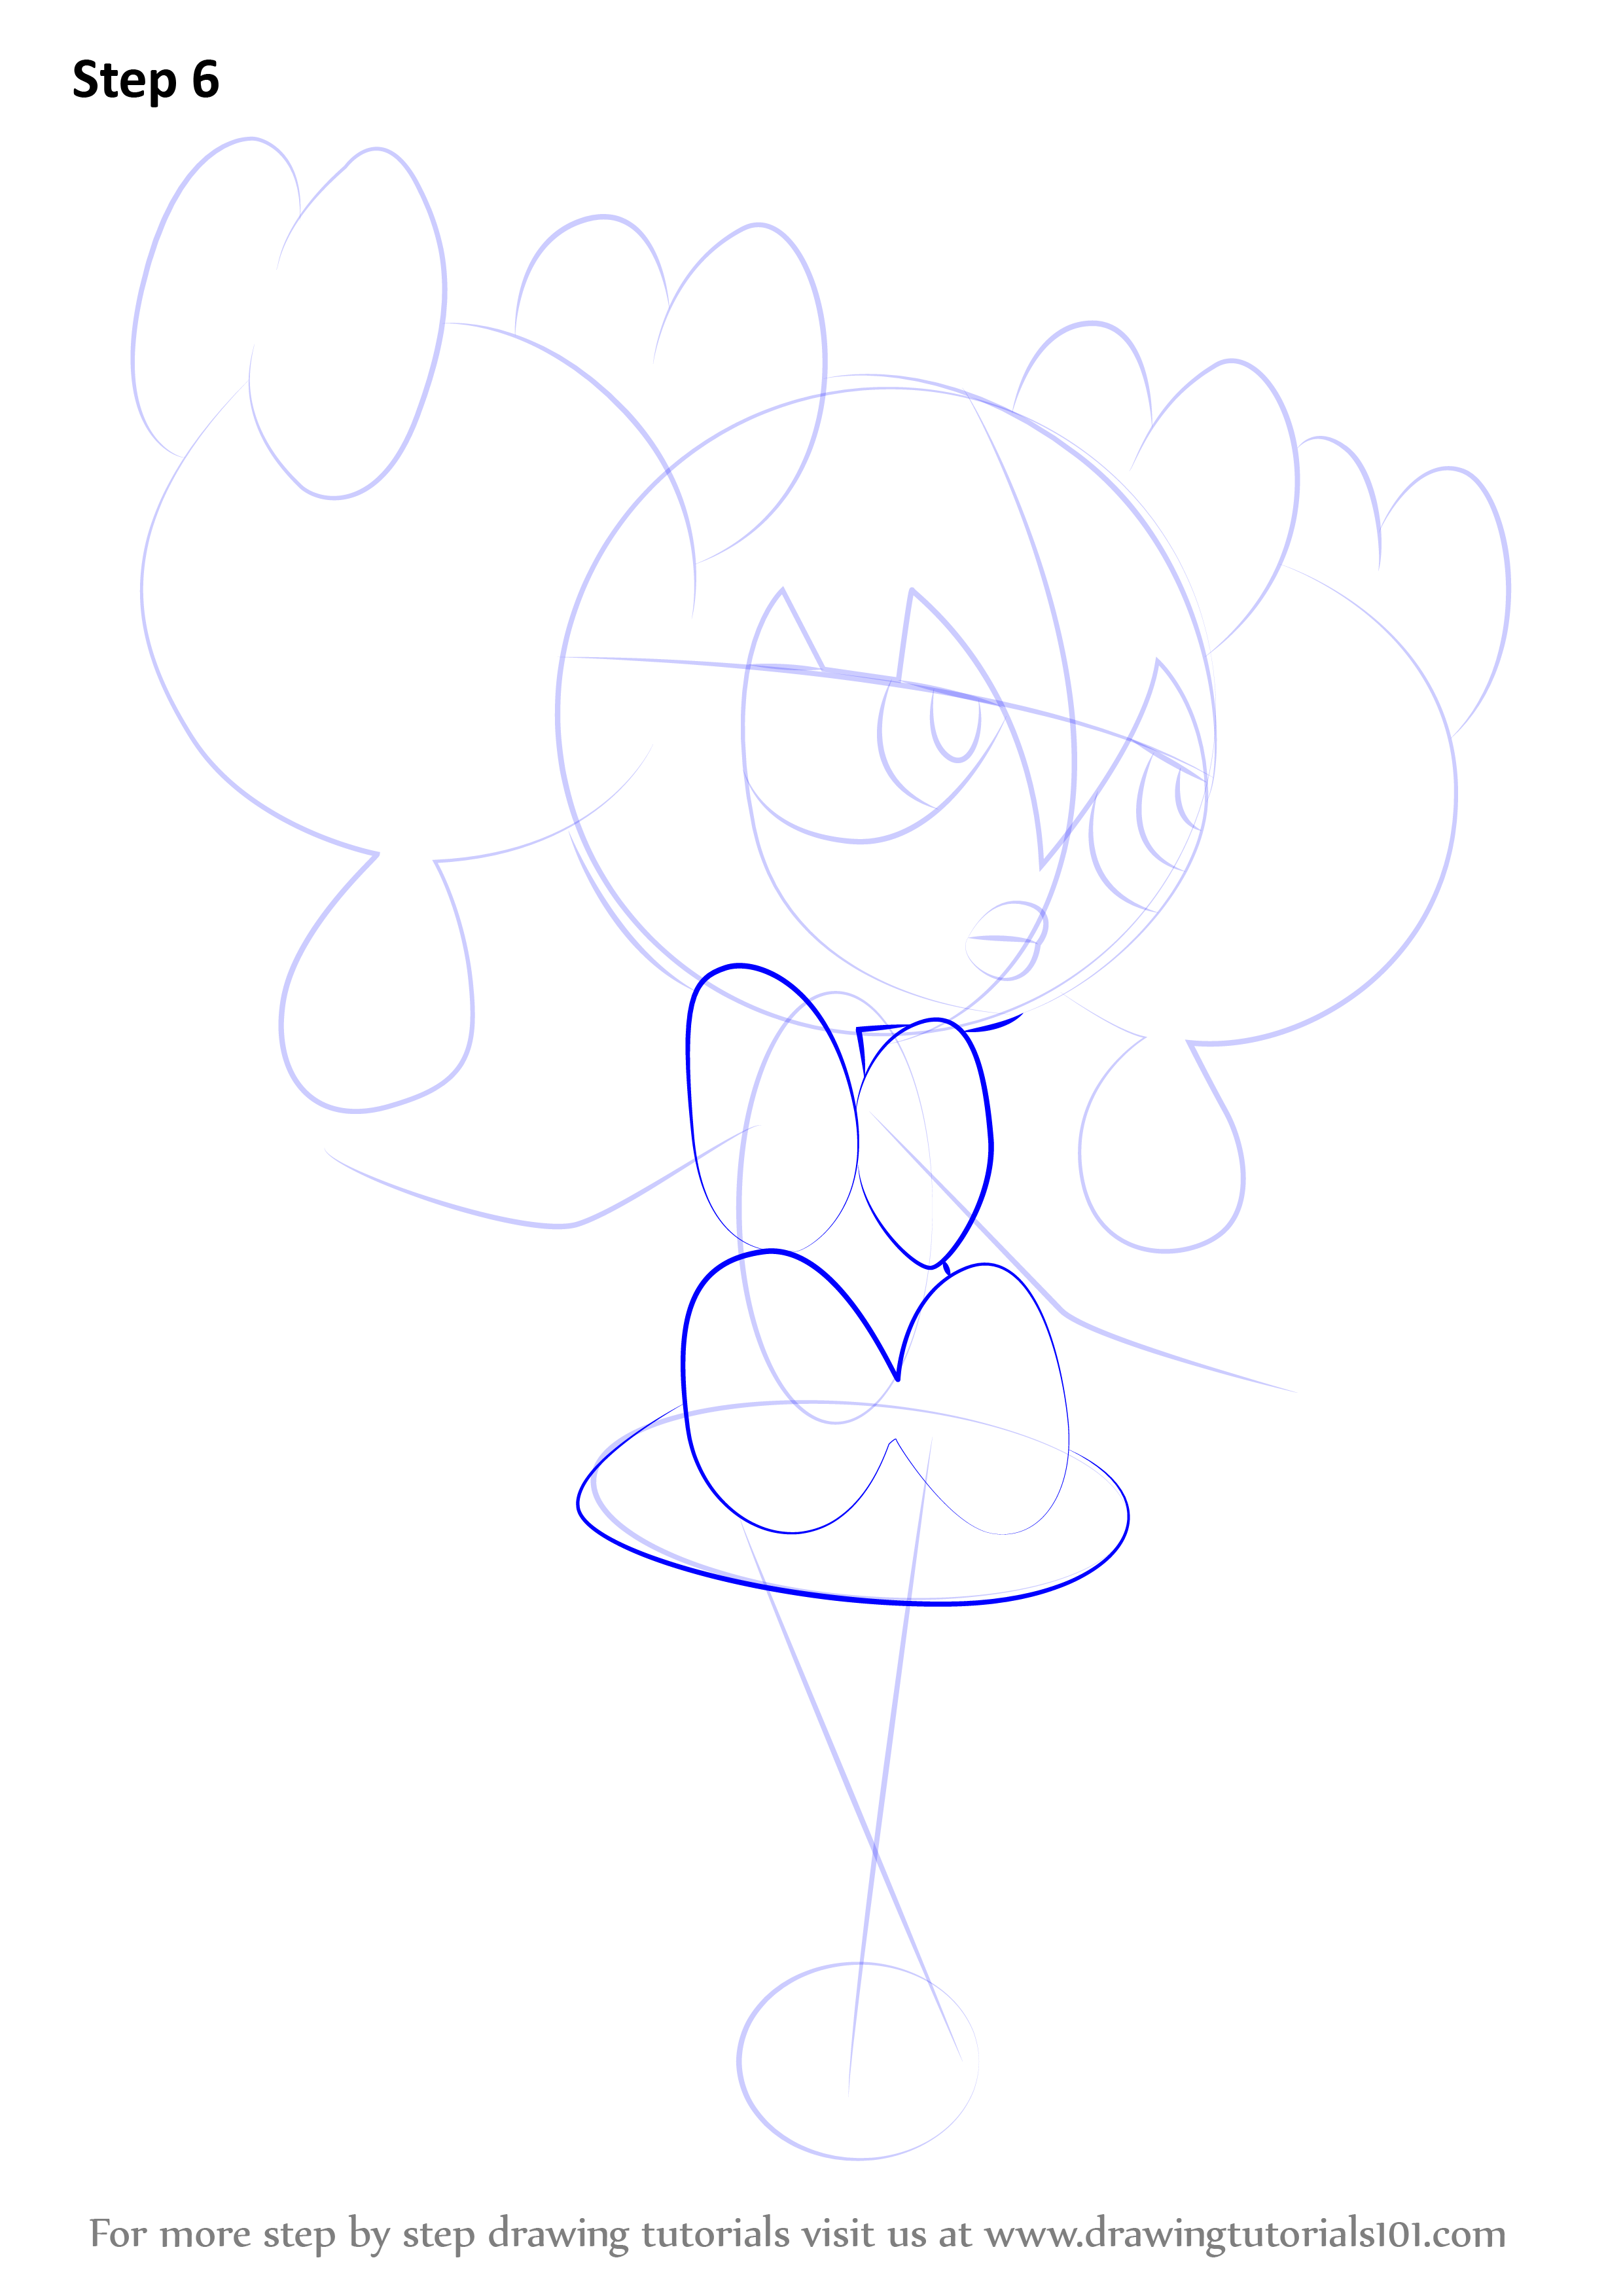
Step 6 – Drawing Semi-Realistic Anime Hair
- Anime hair is generally drawn in pointy clumps. For more realistic looking hair you can still view it as a set of clumps but without the pointy ends. Instead leave the end of the clump “open” and draw some lines into these openings to give an appearance of hair strands. This will create a hair that is still fairly easy to draw but looks more realistic. To better understand how to draw the hai…
Step 7 – Cleaning Up The Drawing
- For this short step you can simply erase the parts of the head and face that are covered by the hair. Once you are done you should have a clean line with all of the facial features in their places.
Step 8 – Drawing The Small Details of The Eyes
- After you have the basic line drawing of the face you can go ahead and add in the small details of the eyes. For a step by step breakdown of drawing anime eyes see: How to Draw Female Anime Eyes Tutorial While the eyes in that tutorial are slightly different from those in this example pretty much the same drawing steps still apply. Simply tweak them to look more like the the ones in th…
Step 9 – Finishing The Drawing by Applying Shading
- To finish the drawing you can add some very basic shading. For very generalized shading with no one clear light source shade the areas most likely to have shadows. These shadows will usually be: 1. Cast by the hair on the forehead area 2. Around the eyelids 3. Bottom of the nose 4. Upper area of the neck (cast by the head) 5. Inner/Background area of the hair For shading an anime ch…
Conclusion
- It can be a little bit tricky to find the right balance between anime and realism when trying to draw a semi-realistic looking anime character. While this tutorial offers some guide lines there is no one set way to draw these types of characters. You can experiment for yourself by adding more realistic or more stylized facial features and see what kind of a results you come up with. For dr…
Popular Posts:
- 1. must watch chinese anime
- 2. how to draw anime comic book
- 3. a jinn anime
- 4. where to download anime series
- 5. how is japanese anime made
- 6. how to get a champion in anime fighting simulator
- 7. where can i watch the millionaire detective anime
- 8. how to keep a mummy anime
- 9. what's the most popular anime on netflix
- 10. do american girl watch anime