How do you draw anime faces for beginners?
Sketch in a neck by extending straight vertical lines on each side of the face from the jawline. The neck should be narrow, so make sure the lines you draw are closer to the chin. Draw the tip of the nose where the vertical and horizontal lines intersect. Draw the eyes below the guideline you drew in step three.
How do you draw an anime face perfectly?
To draw an anime or manga-style face, start by sketching the basic head shape. Draw a circle, then make a vertical guideline down the middle of it. Sketch a horizontal guideline about one-third of the way up from the bottom of the circle to mark the level where the eyes will go.
How do you draw an easy anime?
Learn how to draw anime characters in this step-by-step guide.Step 1: Draw the Head.Step 3: Draw Anime Mouth.Step 4: Add the Final Touches.Step 1: Outline the Face.Step 2: Add the Facial Features.Step 3: Finish With the Hair.Step 1: Draw the Face and Neck.Step 2: Add the Eyes, Nose, and Mouth.More items...•
Why can't I draw anime face?
If you are struggling with drawing Anime then it can have two big reasons. Either you didn´t learn the fundamentals of drawing and your drawings look off or you are being too hard on yourself. With the right exercises and time, everyone can learn how to draw!
How do you make an anime smile?
2:3138:54HOW TO DRAW SMILING HAPPY EXPRESSIONS (Real Time)YouTubeStart of suggested clipEnd of suggested clipThis will be doing the same sort of thing but just a little bit wider. And sweeping down to theMoreThis will be doing the same sort of thing but just a little bit wider. And sweeping down to the outside edge a bit more. And then i'm just going to come down. Here bring in that shape.
How do I look like an anime girl?
3:576:52How To Look Like An Anime Character - YouTubeYouTubeStart of suggested clipEnd of suggested clipLook more cute and anime is to wear hair accessories. Like little balls or pants will really elevateMoreLook more cute and anime is to wear hair accessories. Like little balls or pants will really elevate. Your hairstyle.
How do I make an anime character?
8 Steps To Create an anime character online for freeChoose the artistic style you like. ... Choose a skin tone. ... Choose the eye. ... Add tear and eyebrow. ... Choose the nose & mouth shape. ... Change the hairstyle. ... Add gesture and accessories. ... Add texts to express yourself.
How do you draw like a pro anime?
It's a good idea to portray the character in the act of doing something that most defines them.Sketch a Wireframe. ... Correct Proportions. ... Outline the Shapes to Create a Skin Layer. ... Draw Facial Proportions. ... Add Clothing, Decoration, and Hair. ... Tidy Your Outlines and Ink Your Drawing. ... Refine Shading and Color.More items...•
How do you make Naruto?
0:038:38How to Draw Naruto- Simple Video Lesson - YouTubeYouTubeStart of suggested clipEnd of suggested clipHey there today i'm going to show you how to draw naruto. So we'll start with the eyes as usual. SoMoreHey there today i'm going to show you how to draw naruto. So we'll start with the eyes as usual. So on the sides.
Why do my anime drawings look weird?
Poor Line Quality. Probably the most common mistake for beginner artists is line quality. The first mistake is drawing a line by making a series of small strokes. Not only does this make drawing much slower but you also tend to get uneven looking lines or lines that looks like scratches.
What makes a drawing anime?
It's a style of cartoon art that originates from Japan, where the key factors to defining the style mostly lie in the character's facial features and facial structure, though other areas to consider are the hair, head size, figure height and elongated anatomy.
How do you draw anime faces on sketches?
2:2316:43How to Draw Faces for Beginners | Anime Manga Drawing TutorialYouTubeStart of suggested clipEnd of suggested clipBut I try to keep the eyebrows. Within that space not going over that line but going above it andMoreBut I try to keep the eyebrows. Within that space not going over that line but going above it and then the eyes again will go in the line that goes across in the middle that I call the eye. Line.
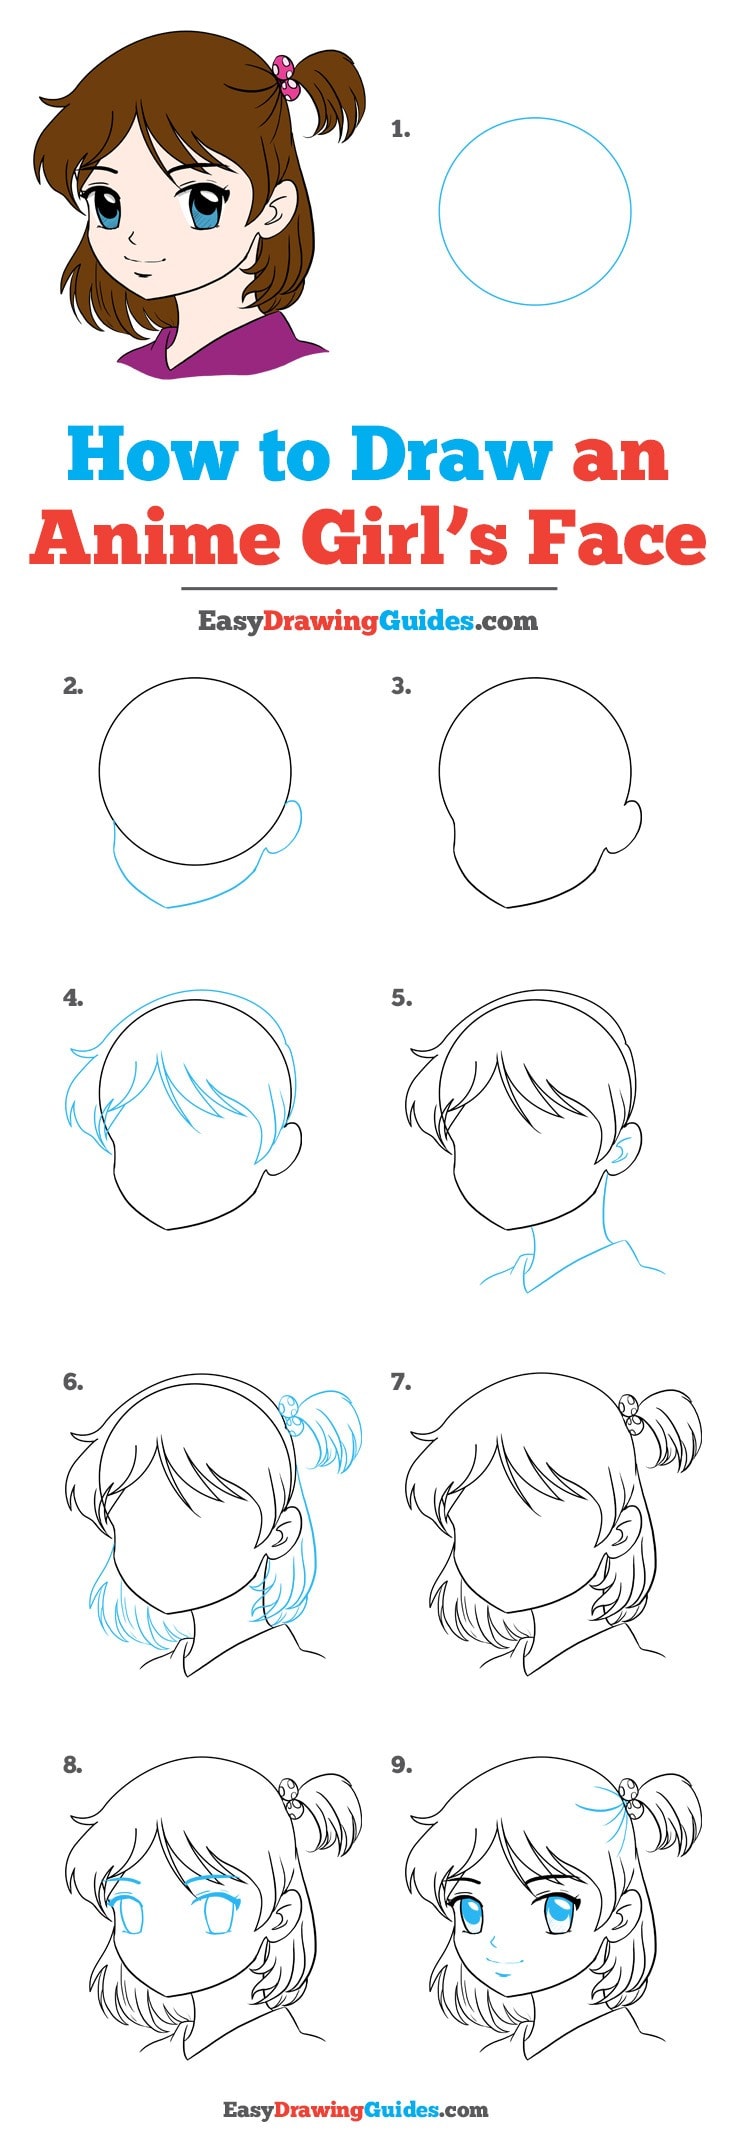
Step 1: DRAW a CIRCLE
This circle will be the fundamental element for today's guide. It will serve as a proportion for the face and hair and everything.
Step 2: DRAW THE REST OF YOUR FACE
After you draw the circle, draw two lines both pointing inwards at a tiny degree, and connect them like in the picture. Draw another line straight through to the chin.
Step 3: DRAW THE MOUTH
Draw the mouth. It can be closed, opened, teeth gritted, frowning, whatever. You have to draw the mouth so that the line going straight through the head would be in the middle.
Step 4: DRAW THE EYES AND NOSE
Again, you can do anything with the eyes. You have to draw the eyes above the bottom part of the circle. The nose would be where the bottom part of the circle meets with the vertical line.
Step 5: DRAW THE HAIR
I decided to put the anime girl's hair into a ponytail (you'll see later), but honestly it doesn't matter. You can do any type of hairstyle you want. I put her hair in a blue bow.
Step 6: DRAW ON THE NECK
This is an optional, but I did it. Draw the neck. It can't be too wide, or too thing. After you finish the neck, branch it off to opposite directions to make the shoulders.
Step 7: TRACE THE PICTURE WITH a SHARPIE
I used a Sharpie pen because I work best with those, but using a thin Sharpie marker could work too. Then erase all the pencil marks.
How to draw an anime mouth?
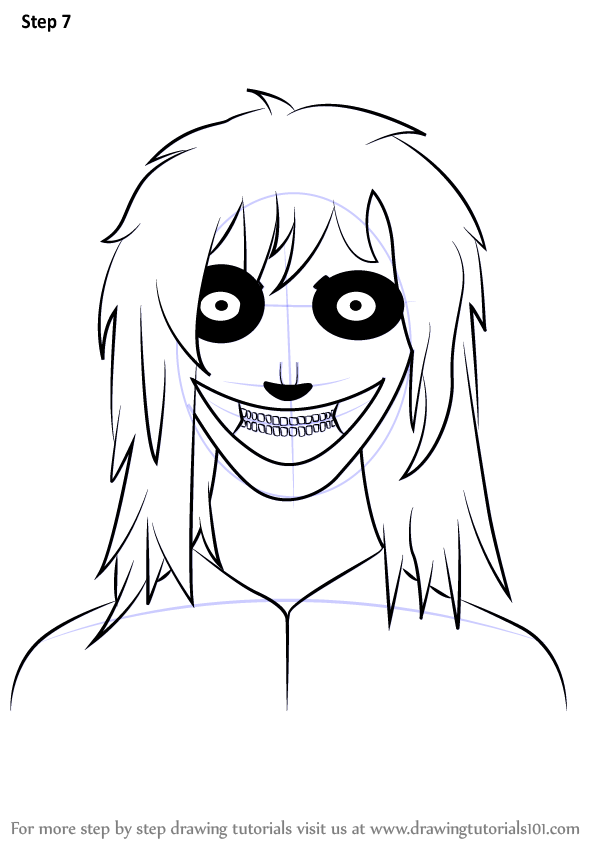
Anime mouths are usually drawn without lips but you can add them if you want a more realistic looking mouth. Position the mouth with the bottom lip halfway between the bottom of the nose and the bottom of the chin. Draw the mouth itself as a curve with a break in the middle where the lines curve slightly downwards.
How to draw realistic anime eyes?
To do this by draw a horizontal line through the middle of the face and draw the eyes below that line. Space the eyes so that you can fit another eye between them.
How many lines are there in anime?
Realistic anime head drawing. Anime characters generally have fairly round faces. The bottom portion of an anime face is commonly drawn with two major sets of lines, one going down from the top of the head to around the mouth area and one more from there to the chin.
How to draw hair?
To better understand how to draw the hair it can also be very helpful to think of it as being split into tree parts (as shown in the example above): 1 Red – Front Hair 2 Green – Side Hair 3 Blue – Back/Top Hair
Is it hard to draw anime?
Drawing a realistic looking anime face is a little more challenging than drawing a “standard” anime or manga style face. While the actual drawing process itself is not much more difficult the challenge comes in balancing between semi-realistic facial features and maintaining an anime look.
Step 1: Draw the Face
Grab your pencil and draw a curve with a point at the end of it. Make sure that both sides of the face are symmetrical.
Step 2: Draw the Neck
The neck is very simple to draw. It's just two curved " l's " back to back.
Step 4: Draw the Tiny Nose
The nose is another simple step! It's just a tiny flick or dot if you want it to be.
Step 5: Add the Mouth
You can show many expressions with the mouth, so it's up to you to decide what she doing with her mouth. I'm going to make her excited because everyone loves a happy anime character!
Step 6: Now for the Glamorous Hair!
This step is also one of my favourite steps because I love drawing hair! It can show a lot about your character.
Step 7: Draw Blush and Eyebrows on Your Character's Face
All you need to do is draw two squiggles. One at one side of the face, one at the other. This will make your anime character cute! I didn't want to draw eyebrows because I thought it had enough expression. You could add eyebrows if you want.
Step 8: Finish With Some Colour
You don't have to add colour but you can if you want to. I personally don't like colouring, mainly because I'm not good at it!
How to draw anime characters?
While artists have varying preferences about how to structure an anime character’s head and face, they all start with the same basic principle: First draw a circle, and then draw a horizontal line and vertical line directly ...
How to draw anime girl eyes?
Start by sketching a curved upper eyelid, then draw a short line extending down from the outer corner of the eye. Leave the inner corner of the eye open for a softer look. Then, add a circle in the middle of the eye as the iris. Draw a smaller circle—the pupil—in the middle of the iris.
How long should an anime character's legs be?
The legs of an anime character should be approximately as long as the top half of the character, from the top of the head to the waist. Finally, add in the arms. A good rule of thumb is to align the elbow with the character’s waist, and then extend the rest of the arm (including the hand) to about mid-thigh.
How to make a reflection in the eye?
Leave the inner corner of the eye open for a softer look. Then, add a circle in the middle of the eye as the iris. Draw a smaller circle—the pupil—in the middle of the iris. To create primary and secondary light reflections, add in one or two additional circles within the iris.
What is the difference between a character's nose and mouth?
The character’s nose and mouth will typically be much smaller and simpler than the eyes. The nose, for instance, may just be two small lines that represent the nostrils. Similarly, the mouth may be a simple curved line.
What pen do you use to highlight a character?
While you will mostly ink with a black pen, it can also be helpful to have a white jelly pen on hand—you can use this to add highlights, like the reflection points in the character’s eyes. You may also choose to add additional colors with colored pencils or medium of your choice.
Popular Posts:
- 1. do you love mom and hit anime uncensored
- 2. why is anime attractive
- 3. what if zootopia was an anime 4k
- 4. do all g14 have anime matrix
- 5. how many episodes will tower of god anime have
- 6. do romeo and juliet get married in the anime
- 7. where to watch hero return anime
- 8. how to draw anime hair step by step easy
- 9. how to draw lips in anime
- 10. me anime alexis garcilazo letra