
Drawing Ruffles and Frills
- Step 1. Before adding to the basic shape, you'll need to know how to draw the additions that you may want to use in the...
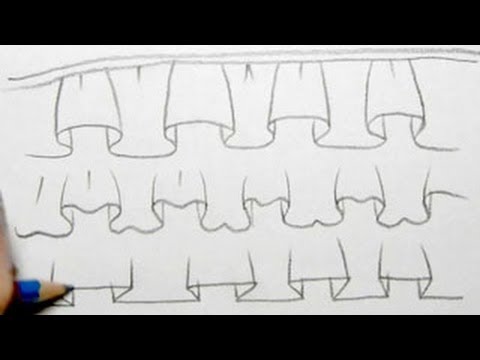
- Step 2. Underneath your line, and following its curve, add a wiggly line with similar shape to the one shown below.
- Step 3. Add further lines to act as the fabric that forms the ruffles pointing upwards.

4:49
7:48
Some will have big part on the bottom small part on top or a small part on the bottom big part onMoreSome will have big part on the bottom small part on top or a small part on the bottom big part on top some will like stick up here some will be lower just try to make it like really random.
How do you make ruffles look frilly?
Using straight connecting lines from the points of the lower ruffles toward the original curved line completes the frill look. Erase any superfluous lines, such as those areas in the original curve which overlap the 'tops' of the ruffles. Below are examples of other ideas and ruffle shapes for you to consider.
How do you make a ruffled skirt?
First, draw a curved line. Underneath your line, and following its curve, add a wiggly line with similar shape to the one shown below. Add further lines to act as the fabric that forms the ruffles pointing upwards.
How do you ruffle a curved line?
Using straight connecting lines from the points of the lower ruffles toward the original curved line completes the frill look. Erase any superfluous lines, such as those areas in the original curve which overlap the 'tops' of the ruffles. Below are examples of other ideas and ruffle shapes for you to consider. 4. Drawing Buttons
How to draw clothes?
Step 1. When drawing clothing, it's best to start with the basic shapes and the anatomy of the design, as this will give you something to build on. To make sure your basic shape is symmetrical, you can draw half, duplicate and then flip it horizontally to create the other half. Even if your planned design isn't symmetrical, ...
What is a fold in fabric?
The fabric here is folded to fall in various directions, showing a great example of how lighting works with the various shadows and highlights within the shapes. These folds are more likely to be seen in an unmade bed than clothing, but could easily be incorporated into a more intricate design, such as a fantasy gown or wedding dress.

Popular Posts:
- 1. can you watch anime on tubi
- 2. did the lodoss anime finish the story
- 3. do schools in japan have anime as a subject
- 4. can you download off of kiss anime
- 5. what is anime a part of
- 6. how to chromecast anime
- 7. what is anime meaning
- 8. will kurama die in boruto anime
- 9. a.i.c.o dubbed anime list
- 10. how to draw black anime characters