How do you draw anime hair easy?
4:4819:20One thing you also want to make sure that you're not doing is drawing the hair right on top of theMoreOne thing you also want to make sure that you're not doing is drawing the hair right on top of the head uh this can cause the hair to look super flat. And kind of really ugly.
How do guys draw anime hair for beginners?
Start the drawing with an outline of the head and the hairline.Step 1 – Draw the Front of the Medium Long Hair. Anime medium long male hair front drawing. ... Step 2 – Draw the Sides of the Medium Long Hair. ... Step 3 – Draw the Top/Back of the Medium Long Hair. ... Step 4 – Finish the Line Drawing. ... Step 5 – Add Some Shading.
How do you draw anime hairstyles?
Draw an outline of the head using a pencil, this will only serve as your guide in drawing the hair. Draw the hairline. Imagine a long hair style you want and to which direction the hair strands flow. Try drawing simple long slanted and curved lines of the hairstyle you want.
How do you draw anime hair from any angle?
0:082:08Let's start by drawing an example of a hairstyle from the front view but first I've sketched outMoreLet's start by drawing an example of a hairstyle from the front view but first I've sketched out some head guides to draw the heroine if you'd like to do the same do so now draw on the bangs.
How do you make an anime smile?
2:3138:54This will be doing the same sort of thing but just a little bit wider. And sweeping down to theMoreThis will be doing the same sort of thing but just a little bit wider. And sweeping down to the outside edge a bit more. And then i'm just going to come down. Here bring in that shape.
How do you color anime hair?
0:132:39The first step is to select the solid color of your preference. And use the bucket tool to fill theMoreThe first step is to select the solid color of your preference. And use the bucket tool to fill the entire area of the hair. This would be your base.
Why is drawing hair so hard?
Hair is very difficult to draw, because what we see is different than what we know. You can't simply draw all the hairs in the form of lines, because that's not what we see when we look at hair. What we see must be simplified to lines and shades, and there are many ways to do it.
What do anime hair colors mean?
Meaning, in most cases, the color of an anime character's hair does not reflect some natural hair color or a racial stereotype – instead, it is supposed to be a hint towards their personality and their role in the plot.
How do you cut anime bangs?
0:113:02So what you're going to want to do is just start by parting the bangs here in the front. And thenMoreSo what you're going to want to do is just start by parting the bangs here in the front. And then parting the sides. So I'll just go ahead and put this behind my ears and I'll clip it into place.
How do you draw anime girl hair?
Drawing Neatly Combed Anime HairDraw the head and hairline. ... Draw the side sections of the hair with steady cures somewhat hugging the shape of the face. ... Add some small hair clumps for the bottom background hair.Finally you can add a little clump of hair hanging down from the middle of the front section of the hair.
How do you make a cartoon hair?
0:0012:46Begin. So when it comes to drawing hair there's two really really important things to keep in mind.MoreBegin. So when it comes to drawing hair there's two really really important things to keep in mind. So the first thing to keep in mind is the crown of the hair or the hair world.
How do you make a cartoon ponytail?
3:018:19So right here we're going to draw where she ties off the ponytail. So curve like that. And maybeMoreSo right here we're going to draw where she ties off the ponytail. So curve like that. And maybe some ribbons that come out if you want it like that and let's draw the big ponytail.
How to draw a hairstyle?
Step 1. Draw the "helmet" to mark the distance from the head. Straight hair usually is not very voluminous, so you don't have to add a lot of distance. Advertisement.
How to make hair more detailed?
If you want to make the hair more detailed, you can add lines following the rhythm. Be careful when drawing these lines inside the wavy strands, though—they may look too heavy with long lines inside. Instead, try to pick your pen/pencil up from time to time to make the lines less continuous.
What is accentuation in hair?
Accentuate the edges to create some contrast between the outline of the hair and the detailing lines.
Why is hair so complex to draw?
Hair is a very complex subject to draw, because it's like a substance that can take many shapes and forms. Because of this, manga artists have developed a special method of simplifying hair. In manga or anime, you draw hair as a mass or a cloth. This way it can be drawn quickly, with exaggerated shading that conceals the lack of detail.
What happens if you draw additional lines between them?
If you draw additional lines between them, you'll create nice, thick strands.
Where to mark hair ties?
Mark the hair ties on the sides.
Where to draw secondary rhythm lines?
Draw some secondary rhythm lines inside the main outline.
How to draw anime girl hair?
To draw anime girl’s hair, first gain a basic understanding of where the head is beneath the hair, then draw a detailed sketch as an underdrawing, then draw final line art on top of the sketch, and finally finish the drawing with basic shading.
How to draw a bald person?
In step 1: identify the location of the head. You can even draw a bald character before you map hair onto their head. Step 2: in the underdrawing stage I am focused on shapes, (overall shape of the hair), and lines leading to the tips of the hair in different areas. Step 3: here is the final step for this example.
What is the difference between anime and manga?
Although anime usually refers to animated, and manga usually refers to drawn (printed) art , the general style and approach to drawing is the same.
What is line control in drawing?
Regardless of the drawing instrument, line control is a combination of input from the brain and muscle memory of the arm and hand.
Is underdrawing step 1 and 2 the same?
So here is the underdrawing step. We identified it earlier as step 2. However, as you get better, you will inevitably complete step 1 and step 2 at the same time.
Is it okay to step away from underdrawing?
As you can see I changed the design a lot. It is okay to step away from the underdrawing sketch if you feel like it will improve your art. The sketch underneath is just there as a guide.
How to draw anime male hair?
Anime male hair front drawing. Draw the front of the hair in fairly large clumps that start from around the top of the head and go down well past the hairline. Make the clump/clumps in the middle slightly longer than the sides.
Where do you draw the hair?
Draw the front section of the hair with fairly small clumps that start around the middle tip of the hairline and go downwards to the sides.
How to draw front hair?
Draw the “front hair” in medium sized clumps that are all sort of “swept” to one side. At the same time try and draw each individual clump pointing in a slightly different direction so that the hair looks more natural.
Why is my anime hair drawn in clumps?
The reason for this is that short hairs can’t reach far enough to join into as a big a clump.
What is medium length hair?
The medium length hair (or some variation of it) is probably one of the most generic hairstyles in anime and manga. Very common to the “average guy” protagonists. Before drawing the hair draw an outline of the head along with the hairline.
How to draw a medium long man?
Anime medium long male hair front drawing. Begin the drawing of the actual hair by adding the part that goes down the middle of the face. It can start from about the top of the head and go down to around the tip of the nose (if it was shown).
How to draw a buzz cut?
The front off the “buzz cut” will be part of the hairline . Draw it with with just two large curves that create a bottom pointing tip slightly below the top of the head.
How to Draw Anime and Manga Hair
First start with the basics of drawing hair. The simple short hairs for anime can be drawn in three simple steps.
Drawing Different Styles of Anime Hairstyles for Female
Here are some different illustrations showing how to drawings anime and manga hairstyles for a female character. Different hairstyles have different approaches to draw and given below are some of the popular anime hairstyles examples.
Conclusion
There can be a many different styles of hair which you can draw. Some of them are covered in the above Illustration. You can use the above illustration and can combine it to form a new type of hairstyle which Suits your character.
How to draw anime characters?
While artists have varying preferences about how to structure an anime character’s head and face, they all start with the same basic principle: First draw a circle, and then draw a horizontal line and vertical line directly ...
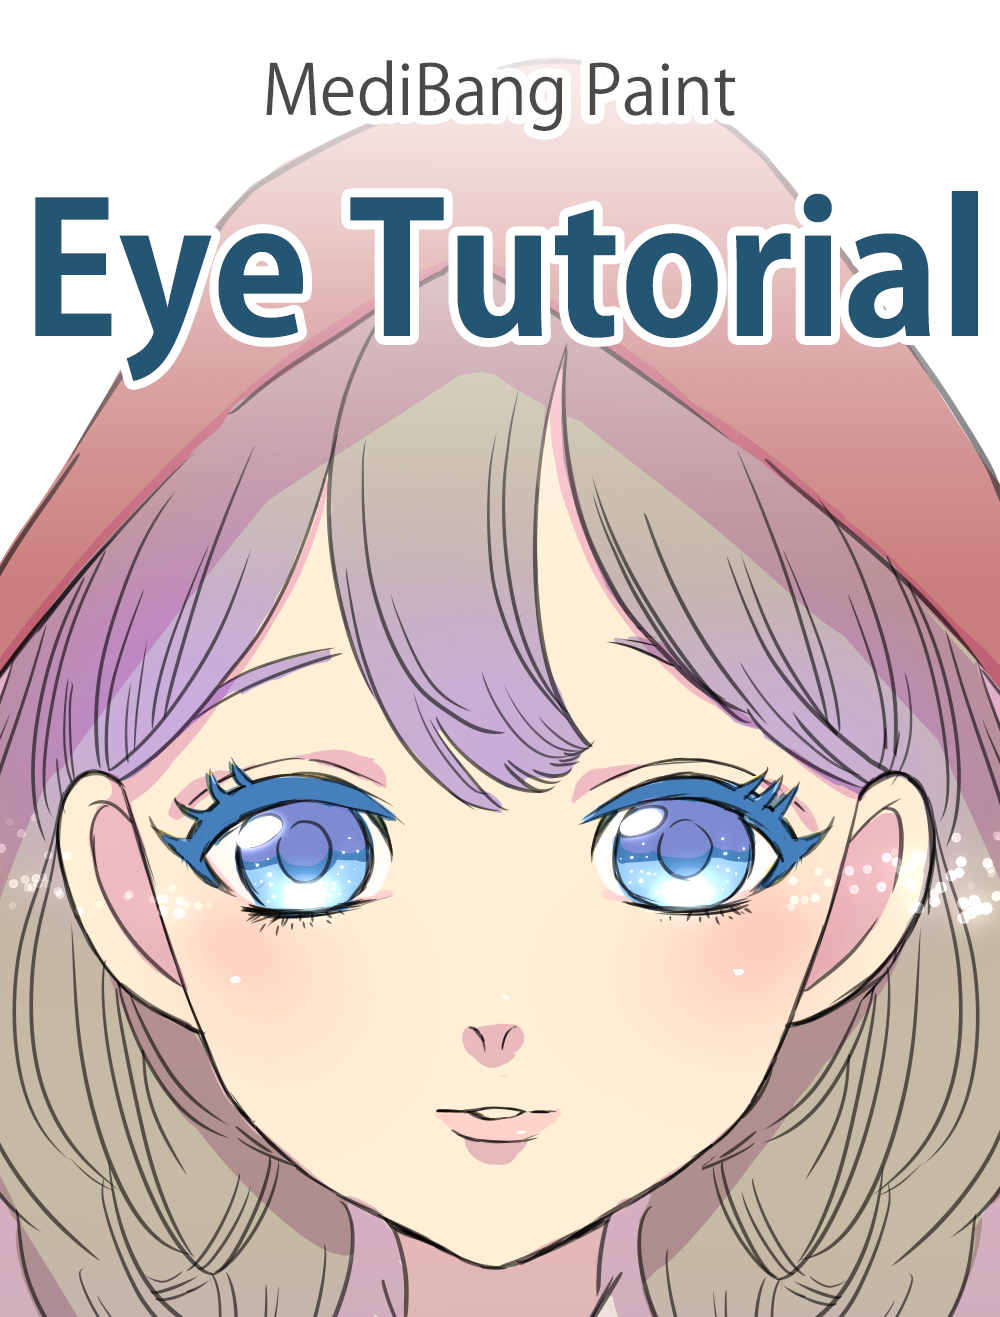
How to draw anime girl eyes?
Start by sketching a curved upper eyelid, then draw a short line extending down from the outer corner of the eye. Leave the inner corner of the eye open for a softer look. Then, add a circle in the middle of the eye as the iris. Draw a smaller circle—the pupil—in the middle of the iris.
What is the focal point of anime?
When drawing anime characters, the eyes are typically a focal point, while the nose and mouth remain simple.
How long should an anime character's legs be?
The legs of an anime character should be approximately as long as the top half of the character, from the top of the head to the waist. Finally, add in the arms. A good rule of thumb is to align the elbow with the character’s waist, and then extend the rest of the arm (including the hand) to about mid-thigh.
How do anime faces start?
The basic anatomy of an anime face starts with a circle with a vertical line and horizontal line directly through the center.
How to make a reflection in the eye?
Leave the inner corner of the eye open for a softer look. Then, add a circle in the middle of the eye as the iris. Draw a smaller circle—the pupil—in the middle of the iris. To create primary and secondary light reflections, add in one or two additional circles within the iris.
What pen do you use to highlight a character?
While you will mostly ink with a black pen, it can also be helpful to have a white jelly pen on hand—you can use this to add highlights, like the reflection points in the character’s eyes. You may also choose to add additional colors with colored pencils or medium of your choice.
Drawing Anime Girl Hair Step-By-Step – Example 1
Drawing Anime Girl Hair Step-By-Step – Example 2
- In step 1: identify the location of the head. You can even draw a bald character before you map hair onto their head. Step 2: in the underdrawing stage I am focused on shapes, (overall shape of the hair), and lines leading to the tips of the hair in different areas. Step 3: here is the final step for this example. Final line art is drawn over the u...
Drawing Anime Girl Hair Step-By-Step – Example 3
- Step 1: Again, I identified the outline of the head so we can see how the hair maps onto it with this particular hairstyle. Step 2: Here is the underdrawing for this example. You can see that I am deciding on the overall shape out the outline. Try to finalize the silhouette of the hair in this stage if you can, and leave the details to step 3. Step 3: Here you can see the overall shape is the sam…
Drawing Anime Girl Hair Step-By-Step – Example 4
- So here is the underdrawing step. We identified it earlier as step 2. However, as you get better, you will inevitably complete step 1 and step 2 at the same time. You will draw the underdrawing of the hair and identify where the head shape is as you do so. You can also try a final line art variation where you use a heavier line weight for the outline and thinner lines for definition inside the hair …
Drawing Anime Girl Hair Step-By-Step – Example 5
- Here, let’s go back to step 1, and identify where the structure of the head is before we draw in the hair. We are coming back to this because I want to highlight that this step is extremely important. It can happen in your mind or on canvas, but it really does need to happen. You should understand where the hair maps on top of the head before going further. Step 2 and Step 3: in this example, …
Drawing Anime Girl Hair Step-By-Step – Example 6: Asuka from Evangelion
- In this image, I am again showing the outline of the head for reference. And here is the actual underdrawing sketch for this piece. You can see that a lot of scratchy indecisive lines come through. It was okay for me to do that at this stage because I knew I would replace these lines with better final line art. In this step, I worried little about how the lines look, instead I spent mos…
How to Draw Anime Girl Hair For Beginners – Final Thoughts
- Practice, practice, practice! Drawing an anime girl’s hair is not an easy thing to draw. Getting better at drawing anime hair should consist of both learning through tutorials and practicing what you learned through drawing. Draw every day and draw lots of hair. Find anime and manga artists who inspire you most and try to study their art and draw studies from their work. By the way, ther…
Popular Posts:
- 1. a letter to momo anime review
- 2. is orange on netflix anime
- 3. a scratch mercutio anime
- 4. what anime has the most nudity
- 5. is yarichin b club anime cancelled
- 6. where can i watch anime for free safely
- 7. what anime charater do i look like
- 8. how to chromecast anime
- 9. did julia betray spike in the anime
- 10. how to draw a anime puppy