
0:02
9:03
First you have to drug the ground where the character is going to stand on. Then we draw a straightMoreFirst you have to drug the ground where the character is going to stand on. Then we draw a straight line. This is where the the the character is going to be and then one line on top of the head.
How to draw anime for beginners?
Beginner Guide to Drawing Anime & Manga
- Make Light Line Drawings First. Draw using light lines first and then trace over them with darker lines once you are sure that everything is in the right place.
- Use Guide/Construction Lines. Use guide lines to help yourself draw. ...
- Plan Out Your Drawing & Draw Larger to Smaller. Estimate your proportions before you start drawing. ...
- Keep Different Parts of Your Drawing in the Same Stages of Completion. Try and keep the various objects in your drawing in roughly the same state of completion. ...
- Draw Things That Are Hidden. It’s sometimes a good idea to draw things that are hidden by something else. ...
- Do Drawing Exercises. As a beginner artist you can really benefit from some fairly simple exercises of drawing lines and basic geometric shapes.
- Study the Anime Style. To make art that looks like anime and manga you have to understand their defining characteristics. ...
- Check for Mistakes. If you are having trouble spotting your mistakes turn your drawing upside down or hold it up to a mirror.
How to draw anime step by step?
How to Draw an Anime Character Drawing Close Up
- Sketch a big circle.
- Sketch the face, neck and the shoulder.
- Add the guidelines for the face.
- Draw the basic outline of the face and the ears.
- Add the eyes, nose, and mouth.
- ... (more items)
How to draw a body easy male?
Sketch the male figure by using the shapes as a guide. Also study about the human anatomy. Draw the outline over the sketch. Erase and remove the sketch marks. Add shading color or tones. Sketch the wire frame of the human body with these basic shapes and lines.
How to drawing tutorials?
“The midfielders also need to draw out an opposition defender to then put the pass through. I do see this performance as an improvement if we can only carry on certain moves and approaches for the whole game. “It was the choice of defending deeper that cost us because that was a choice. When we attacked Barcelona, we caused them a lot of problems.”

How do you draw a full body male?
0:4213:19How to Draw the Male Body at 3 Different Angles - YouTubeYouTubeStart of suggested clipEnd of suggested clipRight people how to draw the male human body we're going to three different angles. And the firstMoreRight people how to draw the male human body we're going to three different angles. And the first one's gonna be front facing. That's coming nice and symmetric.
How do men draw anime muscles?
How to Draw Anime Muscular Male Body Step by StepStep 1 – Draw the Outline of the Body. ... Step 2 – Position the Collar Bones. ... Step 3 – Draw the Chest Muscles. ... Step 4 – Draw the Outline of the Abs. ... Step 5 – Draw the Individual Abs. ... Step 6 – Draw the Shoulder Muscles. ... Step 7 – Draw the Neck Muscles. ... Step 8 – Draw the Side Muscles.More items...
How do you draw anime boy body with clothes?
0:1810:42How to Draw Manga Boy Outfits! - YouTubeYouTubeStart of suggested clipEnd of suggested clipFirst we have the casual outfit i start by drawing two triangle like shapes for the. Collar then iMoreFirst we have the casual outfit i start by drawing two triangle like shapes for the. Collar then i draw two. Lines i draw another two lines for the detail. And then the bottom of the shirt.
How do you draw a full body of someone?
0:3611:41HOW TO DRAW BODIES | Drawing Tutorial - YouTubeYouTubeStart of suggested clipEnd of suggested clipSo for the head i'm just drawing an oval shape with two lines of symmetry. One going horizontally.MoreSo for the head i'm just drawing an oval shape with two lines of symmetry. One going horizontally. And one vertically. And i'm not gonna go in depth with how i draw head and how i draw the face.
How do you draw anime with ABS?
0:4710:32【How to draw abs】Male Manga Body Tutorial - YouTubeYouTubeStart of suggested clipEnd of suggested clipStarting at the clavicle. The larger you make the circle the larger the upper body will get later inMoreStarting at the clavicle. The larger you make the circle the larger the upper body will get later in the process. So you want to set your goals in the beginning. Then add two curved lines.
How do u draw abs?
Step-by-Step Instructions for Drawing AbsDraw a long, curved line. ... Draw a second curved line alongside the first, outlining the remaining pectoral muscle. ... Draw a long curved line descending from one of the pecs. ... Draw an inverted "Y" shaped line just below the pecs.
How do you get an anime body?
0:0715:30Want A Superhero Anime Body? DO THIS!! - YouTubeYouTubeStart of suggested clipEnd of suggested clipChoose your aesthetic. Like what type of body you're trying to go for you're trying to be bigger areMoreChoose your aesthetic. Like what type of body you're trying to go for you're trying to be bigger are you trying to smaller.
How do you draw anime trousers?
6:099:55How to Draw Manga/Anime Clothes and Folds - YouTubeYouTubeStart of suggested clipEnd of suggested clipSo let's draw the outside of the pants. And just like the sleeves. I'm gonna end it with two foldsMoreSo let's draw the outside of the pants. And just like the sleeves. I'm gonna end it with two folds at the bottom. Same for the inner part curve the lines and connect it to the guideline for the shoe.
How do you draw Goku in Dragon Ball?
0:019:19How to Draw Goku from Dragon Ball - Step by Step Video - YouTubeYouTubeStart of suggested clipEnd of suggested clipSo we're going to do is going to start in the middle at the eyes. We do the little wrinkling inMoreSo we're going to do is going to start in the middle at the eyes. We do the little wrinkling in between his eyes so it's going to be a little slight upward curve in the middle.
How do you draw two people kissing?
3:1716:17How to Draw People Kissing [Pose] - YouTubeYouTubeStart of suggested clipEnd of suggested clipHis head upwards. To meet her kiss. And then the line that separates. Her body from his is comingMoreHis head upwards. To meet her kiss. And then the line that separates. Her body from his is coming right off of the elbow down here now he also is going to be bringing.
How do you draw a realistic person in Illustrator?
0:2310:47Adobe Illustrator Tutorial - How To Draw Face Portraits (Kobe Bryant)YouTubeStart of suggested clipEnd of suggested clipLet's start by creating a canvas of 1080 by 1080 pixel and import our sketch. Now let's turn ourMoreLet's start by creating a canvas of 1080 by 1080 pixel and import our sketch. Now let's turn our sketch into a template and lock its layer. And then creating a layer above it and name it. Outline.
How do you make a mouth?
1:0132:37How to Draw + Shade Lips in Pencil - YouTubeYouTubeStart of suggested clipEnd of suggested clipThis method is different from my original triangle method it's a lot more simple just start with a.MoreThis method is different from my original triangle method it's a lot more simple just start with a. Line it can curve up down or even look like a wave.
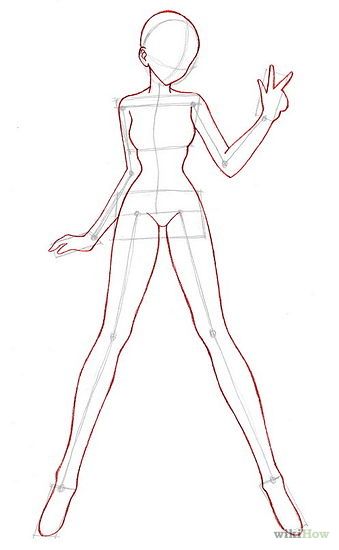
How to draw a body in front view?
To help you can start your drawing by first making a vertical line through what will later be the middle of the body.
How to make anime boy look younger?
Step 1 – Anime Boy’s Body Proportions Breakdown. To make a character look younger you will usually want to draw them more slender than their older counterpart. Muscular characters will automatically tend to look older. A good way to measure the body is by using the head.
How old is an anime boy?
Anime boy full body drawing step by step. The boy in this tutorial can be anywhere from 10-15 years old. Depending on the artists style sometimes older anime characters can be drawn to still look fairly young. Generally the more stylized the characters the younger they tend to look (Chibi for example).
What is the side view of an anime boy?
Anime boy body side view drawing. The side view of the body can actually be more challenging to draw than the front view. In the side view various parts of the body curve in slightly different directions as indicated in the above example.
How to color a drawing?
To color the drawing you can simply fill in each area with the appropriate color (be sure to leave the reflections white if coloring on paper). Start with the larger areas and work your way down to the smallest.
Where are the shadows in anime?
In this case the shadows will be on the neck from the head and on the arms and legs from the sleeves of the shirt and the shorts.
Where does the hand go when attaching to the arm?
Arm Proportions. The part where the hand is attached to the arm will go down to about the horizontal halfway point of the body. Please also keep in mind that the arms in this example are held out slightly to the sides so these joins will be a little lower down if the arms area held right up against the body.
How to draw a male anime face?
Male anime character face drawing step by step. Draw the basic shape of the head starting with a vertical line to help you make sure both halves are even. Position the facial features as described earlier. Draw the hair after placing all of the facial features.
How to draw a male protagonist?
To draw a male “protagonist” character with their normal expressions draw the eyebrows in their natural position and draw the eyes with fairly large pupils/irises. If you want a friendly looking character draw the mouth with a light smile.
What is the concerned expression in anime?
The concerned or “thinking” expression is one that the “intellectual” character is likely to make. Anime intellectual male character concerned face drawing. For the concerned expression draw the eyebrows lower down and closer together with some wrinkles in between them.
What is an anime intellectual?
Anime intellectual guy face drawing. The “intellectual” character type in anime and manga does not necessarily mean a shy or weak male character. On the contrary quite often these characters can be both physically though and intelligent. Often these tend to be the school council president or some type of leader.
What is an anime guy?
Anime guy face drawing. The “average guy” character is usually meant to be someone the viewer can relate to or cheer for. These are often the protagonists of anime shows and manga or the lead male character if the protagonist is a female. Somewhat messy medium length hair is very common for these types of characters.
What are the characteristics of anime?
Before going into drawing specific character archetypes it’s a good idea to first analyze the characteristic features of male anime faces. While there is quite a bit of variation in the anime and manga style generally all anime characters tend to have large eyes, small noses amd simplified mouths with no lips.
What is a happy face in anime?
Anime guy happy face drawing. A happy smile can be one of the expressions this type of character is likely to have. Usually this is a look the main male character can give to a character they like such as the female protagonist. Anime male character happy face drawing.
How to draw anime body?
To draw an anime body, start by drawing a stick figure with small circles at the joints and triangles for the hands and feet. Then, draw the head, neck, and torso with a waistline on top of the stick figure outline. Finish the body by drawing the limbs, using the joints to guide you.
How to draw a chin in a circle?
1. Draw a head at the top of your paper. Place a circle near the top center of the page so there’s enough room to add hair later on. Put the point of the chin slightly outside the bottom edge of the circle since the jaw will come lower down.
How to draw a mitten?
Once you reach the point where the body is it’s narrowest, put circles inside the tubes you’re drawing for the arms to mark the elbows. Continue extending the tubes down to the bottom of the hourglass and sketch small circles for the wrists. Draw mitten shapes for the hands attached to the ends of the arms.
How to draw a sprite?
1. Make an oval with a pointed bottom near the top of your paper for the head. Place the oval in the top middle of your paper so you have enough room to add hair later on. Draw angled lines down from either side of the oval that extend down to form the jaw line.
How to draw an hourglass?
Sketch an hourglass shape with 2 circles in it for the torso. Draw the top line of the hourglass shape slightly below the chin to form the shoulders. Draw curved lines going toward the center line, and flare out the bottom of the hourglass shape so it’s slightly wider than the shoulders for the hips.
How to draw muscular male anime?
Draw the outline of the body as follows: Make a vertical line through the middle of the drawing area to help see if both sides of the body will be of relatively equal width. Draw a hint of the head (or the entire head if it’s easier for you). Add the neck going down from the bottom of the ears.
How to draw a trapezius?
Draw a hint of the head (or the entire head if it’s easier for you). Add the neck going down from the bottom of the ears. You can draw it just a tiny bit wider towards the bottom. Going downwards from the neck in light curves draw the trapezius muscles.
How to draw a sprite?
Draw the outline of the body as follows: 1 Make a vertical line through the middle of the drawing area to help see if both sides of the body will be of relatively equal width. 2 Draw a hint of the head (or the entire head if it’s easier for you). 3 Add the neck going down from the bottom of the ears. You can draw it just a tiny bit wider towards the bottom. 4 Going downwards from the neck in light curves draw the trapezius muscles. 5 Down from the trapezius draw the shoulders with just one curve each. 6 Add a hint of the arms. Make them fairly thick as this is a muscular character. 7 Down from the arms draw the body getting narrower and then doing a sort of “wave shape” around the waist area where it gets wider and then narrower again. 8 From the waist area the body will get wider again as it transitions into the hip/leg areas.
How does the body get wider?
Down from the arms draw the body getting narrower and then doing a sort of “wave shape” around the waist area where it gets wider and then narrower again. From the waist area the body will get wider again as it transitions into the hip/leg areas.
Can you draw anime characters on paper?
It’s important to note this as sometimes anime characters can be drawn with very exaggerated proportions to look absolutely huge. If drawing on paper it’s recommended that you make light lines up until the final step of the tutorial. This will make it easier to erase any potential mistakes.
How to draw a boy's collar?
Step 1: Start by drawing the shirt’s collar directly below the boy’s neck. The middle of the collar is similar to a wide letter X. The sides of the collar are made up of two curved lines. Don’t make the collar too big. Wrap the sides of the shape around the neck. The bottom tips should overlap the collarbone a bit.
How to draw a shirt for kids?
In the beginning stages, don’t press down too hard. For every step, sketch lightly at first so that it’s easy to erase if you make a mistake. Step 1: Start by drawing the shirt’s collar directly below the boy’s neck.
How to draw a face?
Position the facial features as follows: 1 Eyes – Draw a horizontal line halfway through the head and draw the eyes below that (far enough apart that you can fit another eye between them) 2 Eyebrows – Draw the eyebrows slightly above the eyes (about the height of the eyes themselves or slightly less). 3 Nose – Draw the nose halfway between the horizontal middle line through the face and the bottom of the chin 4 Ears – Draw the ears between the top of the eyes and the bottom of the nose 5 Mouth – Draw the bottom lip halfway between the bottom of the nose and the chin and the top lip slightly above that
How to draw a serious facial expression?
For a serious facial expression draw the inner tips of the eyebrows lowered as well as the eyebrows as a whole lower down. Draw the eyes slightly squinted and draw the mouth with the outer edges curving downwards.
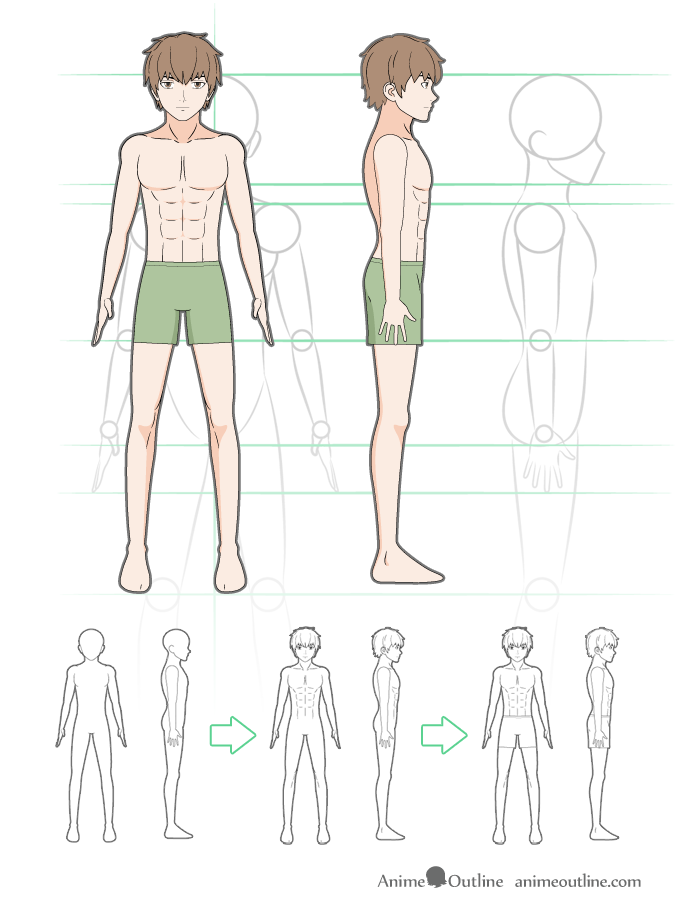
Step 2 – Clean Up Your Drawing
- Once you have sketched out the proportions clean up the sketch so that you have an outline drawing of the body.
Step 3 – Draw The Details
- Onto the cleaned up drawing of the body add the details such as the hair and facial features. For a character like the one in this example that is not overly muscular but still fairly fit you can just add some hints of the chest and stomach muscles. For more help on drawing these see: 1. How to Draw Male Anime Eyes 2. How to Draw Anime & Manga Male & Female Hair For drawing muscul…
Step 5 – Add Colour and Shading
- To color and shade our character you can use what is known as “Cel Shading”. Shading with no gradients commonly used in anime. We will shade the character according to normal lighting conditions (outside during daytime or inside in a well lit room). The main light source will be above and in front of the character. This means the main shadow will be below such as the shadow on …
Conclusion
- Once you have finished the shading you are done with the tutorial. If you are also looking for help on drawing the female body in the anime style you can check out the How to Draw an Anime Girl Body Step by Step Tutorial. For drawing a younger male character you can see: How to Draw an Anime Boy Full Body Step by Step
Step 1 – Anime Boy’S Body Proportions Breakdown

To make a character look younger you will usually want to draw them more slender than their older counterpart. Muscular characters will automatically tend to look older. A good way to measure the body is by using the head. Anime characters tend to have bigger heads compared to their bodies than real people (younger ch…
Step 2 – Drawing The Body
- Star the drawing from the head and work your way down. Start with a light line drawing of the entire shape of the body without any of the smaller details. For drawing the head and hands you can see: 1. 8 Step Anime Boy’s Head & Face Drawing Tutorial 2. How to Draw Anime and Manga Hands Step by Step
Step 3 – Drawing The Face
- Draw the facial features before you draw the hair (including the parts that will be covered by hair). The reason you want to do this is to avoid mistakes. For a more detailed explanation on why you want to draw this way you can see: Beginner Guide to Drawing Anime & Manga For a detailed step by step guide to drawing an anime boy’s face you can again see: 8 Step Anime Boy’s Head & Fac…
Step 4 – Drawing The Hair
- For this particular hairstyle draw the to part of the hair following the shape of the top of the head but some distance away as hair has volume. Draw the ends of the hair branching out into clumps of various sizes that curve in slightly different directions. For more on drawing hair you can see: How to Draw Anime & Manga Male & Female Hair
Step 6 – Drawing The Details
- Eye Details
Draw the inner details of the eyes such as the pupils and reflections. You can also draw a hint of the eyelids slightly above the eyes. For some detailed tutorials on drawing the eyes you can see: 1. How to Draw Male Anime & Manga Eyes 2. How to Draw Anime Eyes and Eye Expressions - Shirt Details & Folds
You can add a few lines at the bottom of the t-shirt to show the folds. You can also draw some thinner lines towards the ends of the sleeves as there will usually be some stitches there.
Step 7 – Coloring
- To color the drawing you can simply fill in each area with the appropriate color (be sure to leave the reflections white if coloring on paper). Start with the larger areas and work your way down to the smallest. For an explanation of different color combinations you can see: Beginner Guide to Picking Colors When Drawing Anime & Manga For a step by step coloring tutorial you can see: H…
Step 8 – Shading & Finishing The Drawing
- For some basic anime style shading you can add shadows in the commonly shaded areas. In most common lighting conditions the light is coming from above so the shadows will be cast downwards. In this case the shadows will be on the neck from the head and on the arms and legs from the sleeves of the shirt and the shorts. On the face there will be some shadows as follows: …
Conclusion
- This tutorial covered a lot of information on drawing a young male anime character. Though it provides a good basis for drawing these types of characters please remember that this is just one example. You can experiment for yourself to try and create a different looking character. For drawing a slightly older male character you can see: How to Draw an Anime Guy Body Step By St…
Popular Posts:
- 1. why is there filler in anime
- 2. can t decide meme anime
- 3. where to watch parasyte anime
- 4. what chapter of bleach does the anime end
- 5. can i monetize anime raction videos
- 6. what happens to gon after the anime
- 7. how to animate an anime
- 8. who started anime
- 9. how anime make money
- 10. what are free websites to watch anime