- Make an oval with a pointed bottom near the top of your paper for the head. ...
- Extend a vertical line that’s 6 ½ times taller than the head down the page. ...
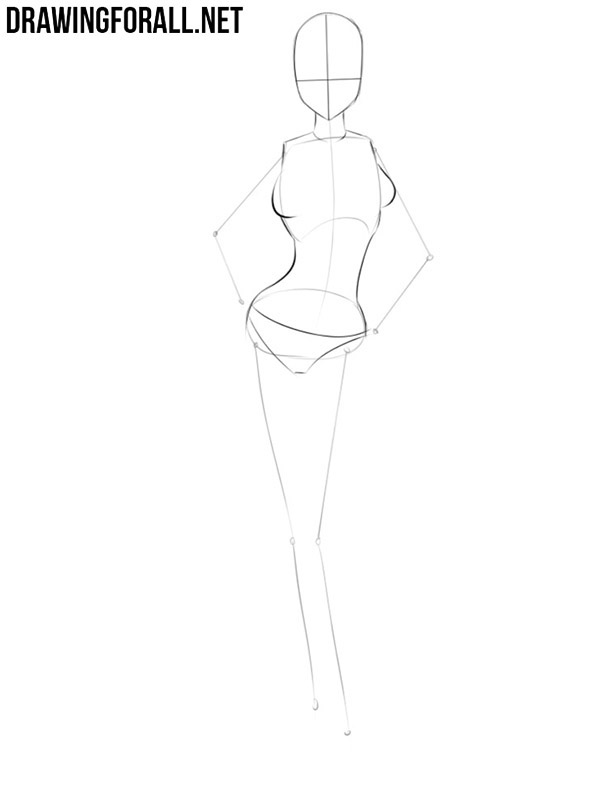
- Sketch in a rectangular shape for the torso. Draw a horizontal line below the chin on your character’s head to mark the tops of their shoulders.
- Draw the arms coming off the shoulders. Start by drawing tubes that extend down from the shoulder until they reach halfway down the torso.
- Add legs on the bottom of the torso so they’re half of the figure’s height. ...
- Erase all of your guidelines so you only see the outline of your anime figure. ...
- Sketch in facial features and muscles to add details. Draw rounded rectangular shapes your slightly lower than the center of the head for your character's eyes.
- Draw clothes on your figure. Anime characters wear a variety of different clothes, so choose a style that fits best with your character.

6:26
11:00
This. So it's like a rectangle shape. And we can add in the thumb. And for fingers if you're justMoreThis. So it's like a rectangle shape. And we can add in the thumb. And for fingers if you're just drawing a closed. Hand think of a mitten. And then divide the fingers.
What are the steps to drawing anime?
The shape of the lower part of the face is as follows:
- Two downwards lines slightly angled inwards (towards middle of face)
- A pair of light curves
- Two more downwards lines that face more inwards than previous pair
- Small curve for the chin
How to draw a cute anime Guy?
Steps Download Article
- Sample anime boy.
- Use a pencil and draw a stick figure. Draw an egg shape for the head and then draw the rest of the body using lines.
- Add some form to your stick figure. Add circles where there are joints and form the body by adding more lines.
- Draw the face in a sweeping motion. You can choose any expression for your anime boy, but...
How do you draw yourself in anime?
Beginner Guide to Drawing Anime & Manga
- Make Light Line Drawings First. Draw using light lines first and then trace over them with darker lines once you are sure that everything is in the right place.
- Use Guide/Construction Lines. Use guide lines to help yourself draw. ...
- Plan Out Your Drawing & Draw Larger to Smaller. Estimate your proportions before you start drawing. ...
- Keep Different Parts of Your Drawing in the Same Stages of Completion. Try and keep the various objects in your drawing in roughly the same state of completion. ...
- Draw Things That Are Hidden. It’s sometimes a good idea to draw things that are hidden by something else. ...
- Do Drawing Exercises. As a beginner artist you can really benefit from some fairly simple exercises of drawing lines and basic geometric shapes.
- Study the Anime Style. To make art that looks like anime and manga you have to understand their defining characteristics. ...
- Check for Mistakes. If you are having trouble spotting your mistakes turn your drawing upside down or hold it up to a mirror.
How to draw yourself as an anime character?
How to Draw an Anime Character Step 1: Draw the Head. Step 3: Draw Anime Mouth. Step 4: Add the Final Touches. Step 1: Outline the Face.

How do you draw anime art for beginners?
5 Simple Steps to Drawing AnimeStep 1: Create the Basic Structure of the Face. First, you will create the general composition of the character's face. ... Step 2: Add Facial Features. ... Step 3: Draw the Hair. ... Step 4: Add the Body. ... Step 5: Add Details and Ink the Drawing.
How do you get an anime body?
0:0715:30Want A Superhero Anime Body? DO THIS!! - YouTubeYouTubeStart of suggested clipEnd of suggested clipChoose your aesthetic. Like what type of body you're trying to go for you're trying to be bigger areMoreChoose your aesthetic. Like what type of body you're trying to go for you're trying to be bigger are you trying to smaller.
How do you make anime faces?
0:532:49Easiest Way to Draw Anime Faces | ANIME FACE ANATOMY - YouTubeYouTubeStart of suggested clipEnd of suggested clipAcross draw a diagonal. Line then connect it to the chin. Using a curvy. Line for the jawline. SoMoreAcross draw a diagonal. Line then connect it to the chin. Using a curvy. Line for the jawline. So draw the eyes in the middle.
How do you make anime feet?
0:5824:56How To Draw SIMPLE FEET IN ANIME MANGA with ... - YouTubeYouTubeStart of suggested clipEnd of suggested clipThis leg is coming down doing its own thing you get to about where the ankle is and you need to getMoreThis leg is coming down doing its own thing you get to about where the ankle is and you need to get a foot on there well the basic shapes I use are to start with the heel.
Who is the strongest anime character?
The 12 Strongest Anime Characters of All Time1 Saitama (One Punch Man)2 Son Goku (Dragon Ball) ... 3 Giorno Giovanna (JoJo's Bizarre Adventure) ... 4 Anos Voldigoad (The Misfit of Demon King Academy) ... 5 Tetsuo Shima (Akira) ... 6 Muzan Kibutsuji (Demon Slayer) ... 7 Kaguya Otsutsuki (Naruto) ... 8 Yhwach (Bleach) ... More items...•
How do I get a body like a Deku?
2:1110:09I Trained Like "Deku" for 30 Days - YouTubeYouTubeStart of suggested clipEnd of suggested clipTen minutes of Sprint's day three for the deputy. Workout. So we are on day 4 of the workout. And IMoreTen minutes of Sprint's day three for the deputy. Workout. So we are on day 4 of the workout. And I have to run three miles. Today three miles baby let it go let's go tomorrow is my day off.
How can I draw better anime?
11 Tips To Get Better At Drawing Anime – Step By Step GuideGet Into A Drawing Routine.Learn Basic Anatomy.Learn To Draw In Perspective.Learn About Value (Light and Dark)Practice Mindfully.Learn From The Pros By Using References.Learn About Composition.Study Different Drawing Styles.More items...
How do I look like an anime girl?
3:576:52How To Look Like An Anime Character - YouTubeYouTubeStart of suggested clipEnd of suggested clipLook more cute and anime is to wear hair accessories. Like little balls or pants will really elevateMoreLook more cute and anime is to wear hair accessories. Like little balls or pants will really elevate. Your hairstyle.
Why is anime called anime?
The dispute typically begins here: the word “anime” (shortened from “animēshon“) is the Japanese pronunciation of the word “animation.” In Japan, the word is often used as a blanket term for all animated content no matter where it's from.
How do you make anime hands?
1:5225:33How To Draw HANDS - EASY SIMPLE BASIC SHAPES IN ANIME MANGAYouTubeStart of suggested clipEnd of suggested clipI like to start off with some basic things. Look at the hand hello there and you'll notice forMoreI like to start off with some basic things. Look at the hand hello there and you'll notice for there's this whole palm area and that could kind of be described as a kind of squarish circle.How To Draw HANDS - EASY SIMPLE BASIC SHAPES IN ANIME MANGAhttps://www.youtube.com › watchhttps://www.youtube.com › watchSearch for: How do you make anime hands?
How do you draw a superhero foot?
2:278:39How to Draw Superhero Legs - YouTubeYouTubeStart of suggested clipEnd of suggested clipCylinder or just a cone rather to represent the lower leg. And have them curved. And then anotherMoreCylinder or just a cone rather to represent the lower leg. And have them curved. And then another guideline for the ankles.How to Draw Superhero Legs - YouTubehttps://www.youtube.com › watchhttps://www.youtube.com › watchSearch for: How do you draw a superhero foot?
How do you draw a front sneaker?
5:3214:49How to Draw Manga Shoes Sneakers - YouTubeYouTubeStart of suggested clipEnd of suggested clipAnd I'm just going to start with the top of the shoe. And then you kind of draw these linesMoreAnd I'm just going to start with the top of the shoe. And then you kind of draw these lines spreading outwards a bit because in this view the shoe is a bit foreshortened.How to Draw Manga Shoes Sneakers - YouTubehttps://www.youtube.com › watchhttps://www.youtube.com › watchSearch for: How do you draw a front sneaker?
How to draw anime head?
1. Draw an oval and divide it into 4 sections. This will be the basic outline of your anime character’s head. The proportions don’t have to be exact, but make the oval narrower at the bottom since that will be the chin. Once you’ve drawn the oval, draw a horizontal line through the center of it. Then, draw a vertical line through the center ...
How to draw a nose in anime?
To draw your character’s nose, draw a short, simple vertical line along the center of the face at the halfway point between the horizontal line and the chin.
How to draw hands well?
Community Answer. The best trick for drawing hands well is to study your own hands first. Notice the shape, color, texture, angles, etc. Draw your hand in dozens of different positions and in different lighting. This isn't a shortcut, per se, but it's an exercise that will improve your drawing.
How to draw a stick figure?
Make the hands about 1/5 the length of the arm, and make the feet about 1/6 the length of the legs. To get the proportions right, make your stick-figure outline about 7 times as tall as your character’s head. Have the arm lines start about 1/5 of the way down the line you draw for the torso.
How to draw a short hair character?
However, if your character’s hair is going to be short, draw a narrow oval on each side of the head. Have the top of the ears line up with the horizontal line running through the center of the face, and have the bottoms line up with the bottom of the nose. Then, draw the flaps of the ear inside each oval.
How to make your character's nose bigger?
Make the line longer if you want your character’s nose to be big. Make the nose the smallest feature on your character’s face. The nose will overlap with the vertical line you drew. To see it better, make it darker than the vertical line, or erase the vertical line around the nose.
Can anime characters draw hair?
The hairstyle you choose for your character is up to you, but generally, anime hair features pointed ends and distinct sections. You can draw a short, buzzed hairstyle, a medium-length style, or long, flowy hair. Whichever hairstyle you choose, avoid drawing individual strands of hair.
How to draw anime characters?
While artists have varying preferences about how to structure an anime character’s head and face, they all start with the same basic principle: First draw a circle, and then draw a horizontal line and vertical line directly ...
How to draw anime girl eyes?
Start by sketching a curved upper eyelid, then draw a short line extending down from the outer corner of the eye. Leave the inner corner of the eye open for a softer look. Then, add a circle in the middle of the eye as the iris. Draw a smaller circle—the pupil—in the middle of the iris.
How long should an anime character's legs be?
The legs of an anime character should be approximately as long as the top half of the character, from the top of the head to the waist. Finally, add in the arms. A good rule of thumb is to align the elbow with the character’s waist, and then extend the rest of the arm (including the hand) to about mid-thigh.
How to make a reflection in the eye?
Leave the inner corner of the eye open for a softer look. Then, add a circle in the middle of the eye as the iris. Draw a smaller circle—the pupil—in the middle of the iris. To create primary and secondary light reflections, add in one or two additional circles within the iris.
What is the difference between a character's nose and mouth?
The character’s nose and mouth will typically be much smaller and simpler than the eyes. The nose, for instance, may just be two small lines that represent the nostrils. Similarly, the mouth may be a simple curved line.
What pen do you use to highlight a character?
While you will mostly ink with a black pen, it can also be helpful to have a white jelly pen on hand—you can use this to add highlights, like the reflection points in the character’s eyes. You may also choose to add additional colors with colored pencils or medium of your choice.
What are the basic shapes of anime characters?
Drawing anime characters is fascinating and looks pretty hard—but, interestingly, all your favorite characters (from simple to extremely complicated) are born out of basic shapes like circles, squares, triangles, and so on.
Why is it important to give anime characters the right body structure?
However, giving them the right body structure enhances their personalities, and viewers can relate to them more as you convey the characters' thoughts and emotions through their physique.
What anime has the colors of the water tribe?
Ren Tsuruga and Shoutarou Fuwa in the anime Skip Beat! An exemplary use of colors is shown in Avatar: The Last Airbender, where the characters from different nations are shown with their respective colors. Water Tribe is shown in blue, Fire Nation has a red color, the Earth Kingdom is green, and Air Nomad is Yellow.
What anime is Yuno from?
An example in the image above is Yuno from the anime Black Clover (the manga artist is Yuki Tabata). Yuno is serious, handsome, and sophisticated. He also has the power of the wind. All these attributes are clearly identifiable in this drawing.
Why is shading important in drawing?
Shading is important—it gives your drawing a real-life look. It enhances the two-dimensional object and creates a sense of three-dimensionality. To perfect your shading skills, first look at how objects of different sizes and surfaces reflect light.
What does it mean to draw in perspective?
And perspective drawing is a method of enhancing the 2D object to give it a look of three-dimensionality. A great example is a cube, as shown above. Though all the sides are equal, they appear smaller from a distance.
How to use color effectively?
To use color effectively, you should be aware of simple theories like warm, cool, and complementary colors. Each color helps depict specific situations—for example, white is a symbol of peace. You can draw characters in white clothes if they are supposed to be plain and simplistic.
How to draw anime body?
To draw an anime body, start by drawing a stick figure with small circles at the joints and triangles for the hands and feet. Then, draw the head, neck, and torso with a waistline on top of the stick figure outline. Finish the body by drawing the limbs, using the joints to guide you.
How to draw a sprite?
1. Make an oval with a pointed bottom near the top of your paper for the head. Place the oval in the top middle of your paper so you have enough room to add hair later on. Draw angled lines down from either side of the oval that extend down to form the jaw line.
How to draw a mitten?
Once you reach the point where the body is it’s narrowest, put circles inside the tubes you’re drawing for the arms to mark the elbows. Continue extending the tubes down to the bottom of the hourglass and sketch small circles for the wrists. Draw mitten shapes for the hands attached to the ends of the arms.
How to draw a chin in a circle?
1. Draw a head at the top of your paper. Place a circle near the top center of the page so there’s enough room to add hair later on. Put the point of the chin slightly outside the bottom edge of the circle since the jaw will come lower down.
How to draw an hourglass?
Sketch an hourglass shape with 2 circles in it for the torso. Draw the top line of the hourglass shape slightly below the chin to form the shoulders. Draw curved lines going toward the center line, and flare out the bottom of the hourglass shape so it’s slightly wider than the shoulders for the hips.

Popular Posts:
- 1. how many people watch anime in america
- 2. when is twisted wonderland anime coming out
- 3. how to edit anime in picsart
- 4. what are anime
- 5. can't wait to see gladion in the anime
- 6. did anime end yet
- 7. does funimation only have dubbed anime
- 8. do you prefer manga or anime
- 9. do i need to watch the entire pokemon anime
- 10. is crunchyroll removing anime