
Drawing Female Anime Eyes
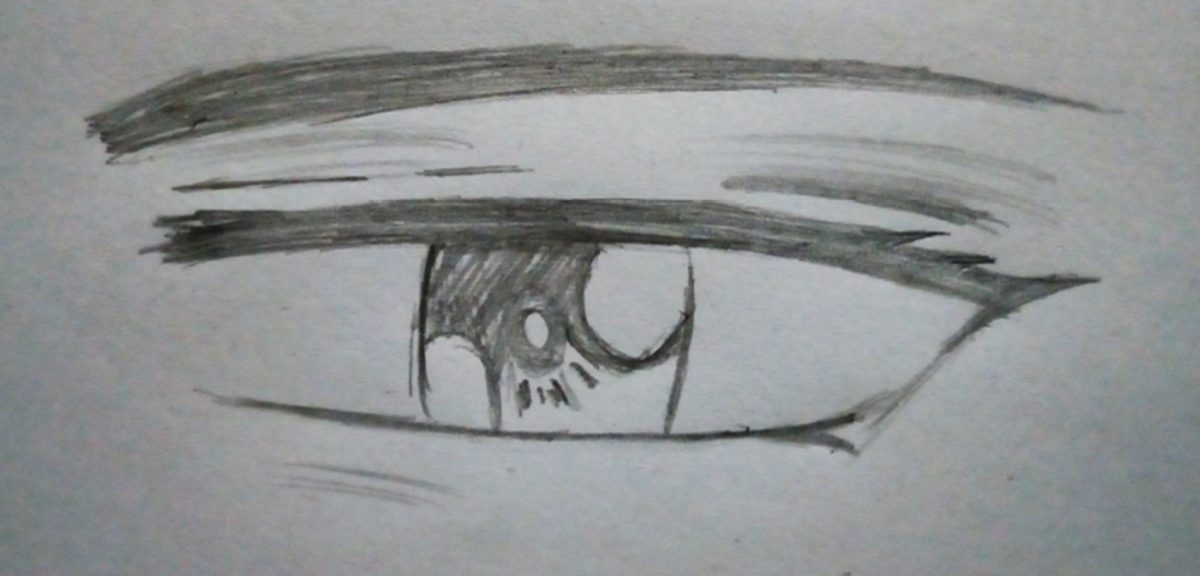
- Draw the upper and lower lash lines. First, draw a downward curving line for the upper lash line. Add a curved tail...
- Sketch an oval between the lash lines. Make the top and bottom of the oval overlap with the lash lines so the top and...
- Draw a small circle near the top of the oval. Place the circle off to one side. ... Make the...
Full Answer
How to draw anime for beginners?
Beginner Guide to Drawing Anime & Manga
- Make Light Line Drawings First. Draw using light lines first and then trace over them with darker lines once you are sure that everything is in the right place.
- Use Guide/Construction Lines. Use guide lines to help yourself draw. ...
- Plan Out Your Drawing & Draw Larger to Smaller. Estimate your proportions before you start drawing. ...
- Keep Different Parts of Your Drawing in the Same Stages of Completion. Try and keep the various objects in your drawing in roughly the same state of completion. ...
- Draw Things That Are Hidden. It’s sometimes a good idea to draw things that are hidden by something else. ...
- Do Drawing Exercises. As a beginner artist you can really benefit from some fairly simple exercises of drawing lines and basic geometric shapes.
- Study the Anime Style. To make art that looks like anime and manga you have to understand their defining characteristics. ...
- Check for Mistakes. If you are having trouble spotting your mistakes turn your drawing upside down or hold it up to a mirror.
How to draw different types of anime eyes?
For a serious looking anime character you can draw the eyes vertically narrower with the top eyelids and eyebrows lowering down towards the middle of the face. If you want a character have crazy or scared looking eyes draw them wide open with small irises and small pupils. Leave white space between the irises and the eyelids/eyelashes.
How to draw eyes for beginners?
How do you draw an eye?
- Step 1: Outline. Okay, to start, draw the basic almond-shaped outline of the eye. Try to make the inner corner (next to…
- Step 2: Inner Circle. Now draw the inner circle of the eye.
How to sketch eyes correctly in 9 simple steps?
How to Draw an Eye in 9 Easy to Follow Steps
- TRACING THE MAIN VOLUME The first step will be to draw the main volumes of the eye. ...
- DRAWING THE EYELIDS The next step will be to draw the upper and lower eyelids. ...
- DRAWING IRIS This part is quite easy, just draw the iris as you can see in the image above.
- DRAWING THE PUPIL The pupil will be the next step in our drawing. ...
How to draw anime eyes?
How to make an anime character open their eyes wide?
How to draw a light source?
How to draw a sprite?
Where should the circles go in the iris?
Do anime characters have colorful eyes?
Is WikiHow a copyright?
See more
About this website
How do you draw anime eyes Wikihow?
To draw serious anime eyes, first draw a horizontal line with a slight curve. Draw a short line coming down off of one end at a 45-degree angle to finish the top of the eye. Then, draw a short horizontal line centered under the first line to make the bottom of the eye.
How do you make anime eyes step by step?
How to Draw Female Anime Eyes TutorialStep 1 – Draw the Outer Shape of the Eye. ... Step 2 – Draw the Shape of the Iris. ... Step 3 – Draw the Pupil. ... Step 4 – Indicate Dark Area at Top of Iris. ... Step 5 – Draw the Primary Reflection. ... Step 6 – Draw the Secondary Reflection. ... Step 7 – Shade The Different Area of the Eye.More items...
How can I get anime eyes naturally?
Brush on eyeshadow around your eyes....Create a pale outline of the inner eye.The waterline of an eyelid is the hairless area that touches the other eyelid when you close your eyes.Some makeup brands make "Big Eye" eyeliner products specifically for this purpose.You may use an eyeliner pencil or liquid eyeliner.
How do you draw anime eyes equally?
To start off, just draw one eye, and then measure the width of that eye. Remember that there is one eye spacing in the middle of the head between the two eyes, so add a space equal to the first eye and then add in then begin to draw the second eye using the same width again.
How do you do Ibispaint eyes?
1:206:17[Tutorial] How to color eyes on IbisPaint X || Voice over + Eng SubYouTubeStart of suggested clipEnd of suggested clipLike this add a new layer and turn clicking again click blue and choose multiply use space color toMoreLike this add a new layer and turn clicking again click blue and choose multiply use space color to draw to. Hold you can reposition it or use tool to make it rounder use the brighter.
How do you draw manhwa eyes?
0:4216:11How to Draw Eyes for Beginners | Anime Manga Drawing TutorialYouTubeStart of suggested clipEnd of suggested clipAnd this line here is the guideline that just helps us with the head if this was say the skull. AndMoreAnd this line here is the guideline that just helps us with the head if this was say the skull. And then we do the lines for the jaw to have that oval shape. For the head.
How do I look like an anime?
1:066:52How To Look Like An Anime Character - YouTubeYouTubeStart of suggested clipEnd of suggested clipSo if you've been wanting to try some circle lenses then i think it's a good idea if you wanna. LookMoreSo if you've been wanting to try some circle lenses then i think it's a good idea if you wanna. Look more anime because it will give you like the big eyes.
How do I make myself look like anime?
03A step-by-step breakdown of this process has been provided below (pictures included)Step 1Download the Snapchat App. ... Step 2Open Snapchat App on your mobile device. ... Step 3Search for the Anime Style Filter on Snapchat. ... Step 4Turn Yourself into an Animated Character. ... Step 5Upload your anime filter-ed video to TikTok.
How do you make anime eyelashes?
0:366:51HOW I DRAW POPPIN EYELASHES - YouTubeYouTubeStart of suggested clipEnd of suggested clipSo first things first we are starting out with the bottom lashes. I don't know why I guess I justMoreSo first things first we are starting out with the bottom lashes. I don't know why I guess I just decided to do the bottom lashes first but basically I just do nice little flick motions with my wrist.
How do you make a real eye sketch?
1:1010:06How to Draw a Realistic Eye - YouTubeYouTubeStart of suggested clipEnd of suggested clipAnd don't forget about the crease over the upper. Eyelids. A people needs to be closer to theMoreAnd don't forget about the crease over the upper. Eyelids. A people needs to be closer to the applets. And of course the highlight.
How do you draw a 3/4 eye?
1:1620:51How to Draw Eyes from Different Angles, Pt. 3: 3/4 View - YouTubeYouTubeStart of suggested clipEnd of suggested clipAnd now we're going to start drawing the eyelid shapes. So usually the eye that is closest to us isMoreAnd now we're going to start drawing the eyelid shapes. So usually the eye that is closest to us is going to have more of an arch. Towards the inner part of the eye as we're looking at it.
How do you make Naruto?
0:038:38How to Draw Naruto- Simple Video Lesson - YouTubeYouTubeStart of suggested clipEnd of suggested clipHey there today i'm going to show you how to draw naruto. So we'll start with the eyes as usual. SoMoreHey there today i'm going to show you how to draw naruto. So we'll start with the eyes as usual. So on the sides.
How to draw a bigger pupil?
Variation: You can draw a bigger pupil if you want the eye to look bigger and wider. Just make the oval about 1/2 the size of the iris (instead of 1/4th) and overlap it with both of the small circles you drew before. The circles should be in front of the oval. ...
How to draw a C shaped eyeliner?
First, draw a downward curving line for the upper lash line. Add a curved tail at one end (draw it on the end that's going to be the outer corner of the eye), going down and back toward the other end of the line, so the upper lash line is C-shaped.
How to make an oval eye?
Make the top and bottom of the oval overlap with the lash lines so the top and bottom are hidden. Make the width at the widest part of the oval the same as the length of the lower lash line. This will be the iris of the eye. ...
What are the features of anime?
Learn more... One of the most recognizable features of anime is the eyes. They’re big, they’re expressive, and they’re often exaggerated to show emotion. Anime eyes are only made up of a few basic shapes and they don’t have a lot of detail, so they’re actually pretty simple to draw.
What are anime eyes?
There are different types of anime eyes, however, they all have a shape to them that makes it identified as anime eyes. Search for anime images so you can get an example of what they look like, and use it as a reference. Use a fairly light color to sketch, as you are probably going to outline it in a dark color, and it will contrast.
How to color the eye?
Use layer 2 to color in the skin surrounding the eye. Then, use layer 3 to color in the white part of the eye. Use a slightly blue gray to color the shadow the top eyelid casts down. ...
How many layers to draw on computer?
If you do not know what layers are, it is a tool found on many illustrative programs. They can help make outlining and drawing on the computer easier. Set up about 4 layers (you can add more later).
How to draw a V?
Sketch 2 lines in which the position is similar to the letter “V”. Draw the upper part of the eyes. Draw the lower line of the eyes. Add an oblong or a circle inside the eye area. Add more details to the eye such as the pupil as shown in the picture. Draw the eyebrow of the same length as the upper line of the eyes.
How to make a shadow color?
First use a base color, and then use a darker color around the edge and in the shadow; the top right/left, (or wherever the direction the light is coming from, see example). You can choose to blend it in, or not. Then, take a lighter version or the base color and apply it diagonally from the shadow. ...
Can you draw anime eyes on paper?
You can also just find another tutorial. Anime eyes are really easy to draw on pencil/paper once you get the gist of how to do it, and then it's all up to you to add your creative touch and make them in your own style. Thanks! Yes No.
How to draw anime head?
1. Draw an oval and divide it into 4 sections. This will be the basic outline of your anime character’s head. The proportions don’t have to be exact, but make the oval narrower at the bottom since that will be the chin. Once you’ve drawn the oval, draw a horizontal line through the center of it. Then, draw a vertical line through the center ...
How to draw a nose in anime?
To draw your character’s nose, draw a short, simple vertical line along the center of the face at the halfway point between the horizontal line and the chin.
How to draw hands well?
Community Answer. The best trick for drawing hands well is to study your own hands first. Notice the shape, color, texture, angles, etc. Draw your hand in dozens of different positions and in different lighting. This isn't a shortcut, per se, but it's an exercise that will improve your drawing.
How to draw a stick figure?
Make the hands about 1/5 the length of the arm, and make the feet about 1/6 the length of the legs. To get the proportions right, make your stick-figure outline about 7 times as tall as your character’s head. Have the arm lines start about 1/5 of the way down the line you draw for the torso.
How to draw a short hair character?
However, if your character’s hair is going to be short, draw a narrow oval on each side of the head. Have the top of the ears line up with the horizontal line running through the center of the face, and have the bottoms line up with the bottom of the nose. Then, draw the flaps of the ear inside each oval.
How to make your character's nose bigger?
Make the line longer if you want your character’s nose to be big. Make the nose the smallest feature on your character’s face. The nose will overlap with the vertical line you drew. To see it better, make it darker than the vertical line, or erase the vertical line around the nose.
Can anime characters draw hair?
The hairstyle you choose for your character is up to you, but generally, anime hair features pointed ends and distinct sections. You can draw a short, buzzed hairstyle, a medium-length style, or long, flowy hair. Whichever hairstyle you choose, avoid drawing individual strands of hair.
How to draw the rest of the face?
How do I draw the rest of the face, such as the ears, nose, and mouth? Anime drawings often focus on the eyes, so the rest of the face doesn't need to be as complex. Draw a simple upside-down triangle without the base for the nose, and a wide "U" for the mouth. Cover the ears with the hair.
Can you draw anime?
Drawing anything perfectly takes practice and people that draw anime well are no exception. If you want to learn to draw anime well, start off easy and start getting harder as you master the level and continue to practice. Thanks! Yes No.
How to draw an eye shape?
1. Draw a light horizontal guideline across. Draw an almond shape with one corner tapering downwards. 2. Draw another almond shape of the same size. The space between these eye shapes is equal to the length of one almond shape. 3. Erase the guidelines and draw a circle inside each of the eye shapes.
How to draw anime lashes?
1. Draw two slightly squished oblongs. 2. Instead of drawing the eyelashes hair by hair, anime lashes can be drawn by one very thick arc. Follow the guidelines to make the upper lash line and the thinner lower lashline. 3. Erase the guidelines and draw oblongs for the iris. They can be unevenly shaped.
How to make a round eye lash?
Start by pressing firmly with your pencil then slowly release the pressure as you curve it towards the tip. The lower lashes should be thinner and shorter than the upper eyelash. To create the round catchlights in the eyes, use correction fluid or white paint to make the dot.
How to add highlights to eyelashes?
To add highlights, use a kneaded or putty eraser. Shape the eraser thinly to easily erase thin lines above the upper lashline, lower eyelid, above the waterline, outside the tear duct, inside the lower part of the pupil and inside the eyeball. Draw the lashes. Draw eyelashes from the root (eyelid).
How to draw a chin?
Place a horizontal mark for the chin underneath the circle. Find the distance from the center of the circle to the line you drew for the nose. Measure down from the bottom of the circle (or the nose line) to the distance you just found and make a small horizontal mark on the vertical center line.
How to make a simple nose in anime?
If you want to make a simple nose, just put a dot on the point where the nose guide line and the vertical center line intersect.
How to draw a sprite?
1. Place ears on the sides of the head between the eye and nose lines. The top and bottom of each ear will line up with the eye and nose lines you drew earlier. Sketch oblong C-shapes between the guide lines for your ears so they connect to the sides of the circle and jawline.
How to draw a boy's neck?
When you’re drawing a young boy or girl character, make the neck lines closer to the chin that the sides of the jaw. Hold your drawing out in front of you to see if the neck looks too long or short while you’re drawing it. Erase or extend the lines further depending on how it looks to you.
How to draw a jaw in a sandbox?
Outline the jaw for your character. Start on either the left or right side of the circle at its widest point. Draw a line from the side of the circle that’s slightly angled toward the vertical center line. Continue drawing the line until you reach the mark you made for the nose.
How to draw a circle on paper?
1. Draw a circle on your paper with a vertical line running through the middle. Use a pencil so you’re able to erase your lines if you make a mistake. Lightly draw the circle in the center of a piece of paper so you have room to add features to it.
How to make a female neck?
For a female character, place the lines for the neck closer to the chin so it’s narrower. Make straight vertical lines extending from the jaw on each side of the face to make the neck. Younger manga or anime characters will have a narrow neck since they aren’t as muscular or defined.
How to get anime eyes?
Article Summary X. To get anime eyes, apply a concealer or foundation around your eyes that is lighter than your skin tone so you have a base to work with . Next, add eye primer to help keep your makeup in place and make the look more long-lasting.
How to make anime eyes look cute?
Brush on eyeshadow around your eyes. While you may use any color, softer, lighter shades are recommended to accentuate the cute appearance of most female anime eyes. If you decide to use pale eyeshadow, blend in a tinge of brown over it to make it stand apart from the white eyeliner you'll be applying later.
How to make your eyelashes longer in anime?
Put on black mascara. Use a "volumizing" and lengthening mascara to make your eyelashes full and long. The outer lashes often appear thicker than the inner ones in anime, so concentrate on these. There are two main approaches you can use to different effect.
How to apply mascara on eyelashes?
Apply several coats thickly across the eyelashes for a bold, dramatic effect. This option is not recommended if you have a mascara that clumps together. Apply one coat using three brush strokes, across the outer, middle, and inner sections of your lashes. Repeat as needed until you achieve the desired effect. ...
How to make your eyes look bigger?
On the outer eye corner, extend the eyeliner past the waterline by 1–2 centimeters (0.4–0.8 inches) to make your eye appear slightly larger. Optionally, create a small wing at the corner.
How to draw a V shape?
Create a pale outline of the inner eye. Use white or pale eyeliner to draw a V shape through the tear duct area of your eyes, at the inner corner. Extend this outline slightly onto the waterline of each eye, but not more than 1/3 of the way across your eyelid.
How to get rid of dark circles under eyes?
Apply concealer and foundation. Use these products to conceal dark circles under your eyes, and to give you an even skin tone base to work with. Select a foundation lighter than your skin tone. ...
What does it mean to draw anime eyes?
A basic understanding of the anatomy of the eye. Knowing common elements that make most eyes look like anime eyes. A step-by-step approach to drawing anime eyes while implementing these common elements. A quick note, before going further, I will use the term anime to mean both anime and manga for simplicity.
What is the degree of realism in anime?
Degrees of realism and stylization. In anime and manga, eyes are drawn in various degrees of stylization. Human anatomy in anime is stylized often to the point of being unrealistic, yet still very recognizable as the anime counterpart of the real world person the artwork is describing. This is an important point.
What is the drop shadow on the upper eyelid?
A drop shadow from the upper eyelid covers the iris and the sclera one third or sometimes half of the way down. (Confused about what iris and sclera are? Scroll up to the anatomy section of this article, or click here to be taken there).
What is the upper eyelid crease?
Upper eyelid crease. – The upper eyelid crease is a horizontal indent formed above the upper eyelid that appears in some people. Notably, it is prominently indicated in most anime eye drawings, and stylized into a curved line. It helps situate the anime eye drawing so it is a good idea to take notice of it.
What is the iris in the eye?
– the iris is a ring shaped membrane, with an adjustable circular opening (pupil) in the center. The iris is what people talk about when they talk about eye color. (Some people confuse it with the pupil, so here is a tip to remember it better: eye color = iris color)
What are highlights in anime?
Highlights from at least 2 light sources. White or bright circles or ovals appearing in stylized anime eyes are representative of highlights on the surface of the eye. Note here that usually one highlight is dominant and is depicted larger, and the second subordinate and depicted smaller.
What is the stylizer called in anime?
Fortunately, we all have a stylizer machine called the brain! In anime, there is a spectrum of on one end, very large anime looking eyes, and some on the other end, that are pretty realistic with some stylization flare. I tend to like something in the middle, although a lot depends on the artwork itself.
How to draw anime eyes?
To draw serious anime eyes, first draw a horizontal line with a slight curve. Draw a short line coming down off of one end at a 45-degree angle to finish the top of the eye. Then, draw a short horizontal line centered under the first line to make the bottom of the eye. Draw an oval between the two lines to make the iris.
How to make an anime character open their eyes wide?
Widen the eyes to create a look of surprise. Draw the upper eyelids higher and the lower eyelids lower than normal so there are gaps between both the tops and bottoms of the pupils and the eyelids. This will make it look like your anime character is opening their eyes wide in shock.
How to draw a light source?
If you want the light source to be on the left in your drawing, draw the big circle on the left side of the iris and the small circle on the right. If the light is on the right, swap the circles. For lighting that’s above the eye, draw the big circle at the top of the iris and the small circle at the bottom.
How to draw a sprite?
Draw a downward curving line for the upper eyelid. Make the length of the line as wide as you want the eye to be. Make the line thick near the middle, and then have it get gradually thinner the closer it gets to the ends. 2. Sketch a horizontal line that curves up at the ends for the lower eyelid.
Where should the circles go in the iris?
If the light is to the left of the eye, draw the big circle on the left side of the iris and the small circle on the right. If the light is to the right, do the opposite.
Do anime characters have colorful eyes?
Community Answer. In anime, characters often have colorful eyes depending on the art style. If you want to draw in a specific art style (eg: Black Butler), then pay attention to how dark or light the eyes are and how many highlights you should add.
Is WikiHow a copyright?
All rights reserved. wikiHow, Inc. is the copyright holder of this image under U.S. and international copyright laws. This image is <b>not</b> licensed under the Creative Commons license applied to text content and some other images posted to the wikiHow website.

Popular Posts:
- 1. a hot night with my boss anime
- 2. is hatsune miku getting an anime
- 3. how to get wraith anime loading screen
- 4. is castlevania a good anime
- 5. where to find devil fruit in anime fighting simulator
- 6. which anime character likes you quiz
- 7. where to read manga anime
- 8. cómo dibujar cabello de anime
- 9. how to draw anime eys
- 10. how do you get dubbed anime on crunchyroll