
1:52
3:52
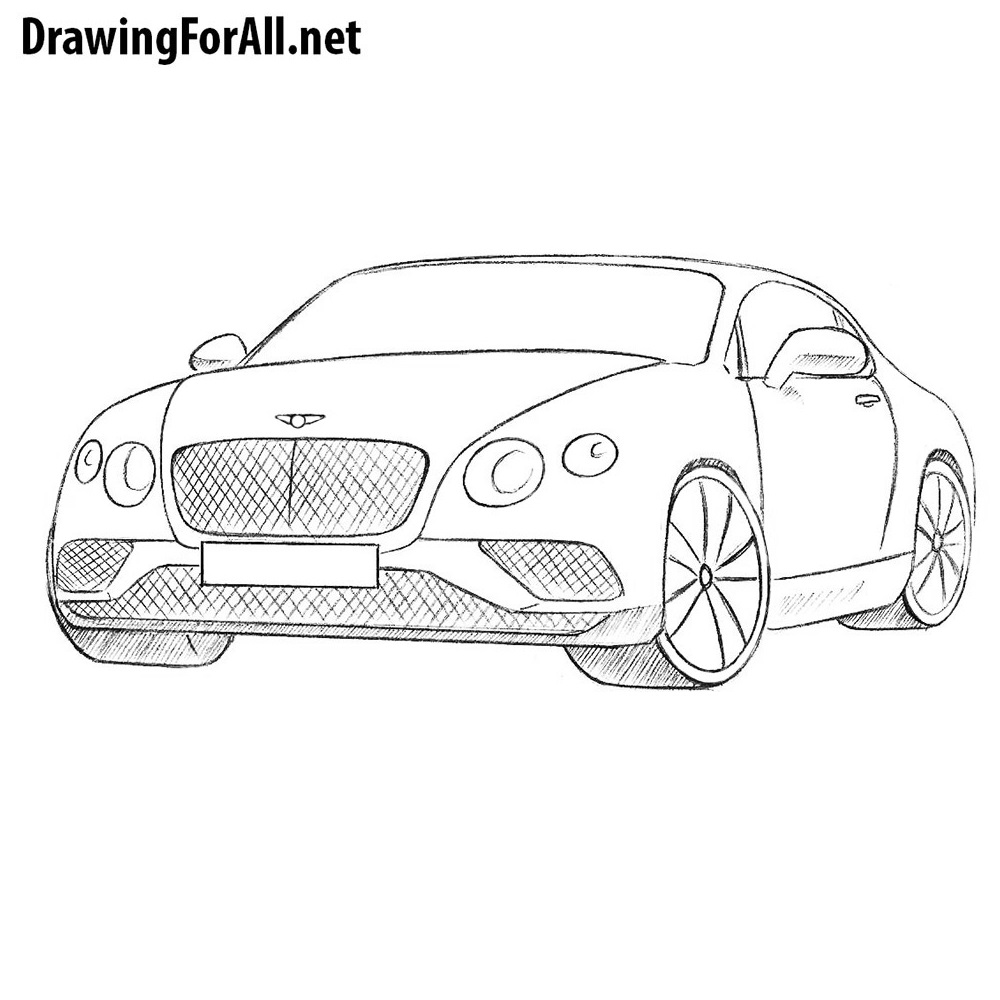
Draw on a wheel. And then drawing a car. Door now that i'm looking at it we're forgetting one moreMoreDraw on a wheel. And then drawing a car. Door now that i'm looking at it we're forgetting one more important part of the car which is the back of it. So i'm going to add a license plate.
How do you draw a cartoon car?
If you’re looking to draw a cartoon car for a home-made card, some art to post on the fridge, or just for fun, don’t worry—it’s easy! Start by lightly sketching out the basic shape of either a rounded or boxy car with a pencil. Then, add details like windows and bumpers, darken the lines you want to keep, and erase the rest.
How to draw an anime character?
When drawing an anime character’s body, the arms should reach approximately mid-thigh. No matter what kind of body style you’re drawing, following these guidelines will ensure that you create proportional anatomy. At this point, you will have a full-body sketch of your anime character.
How do I draw an ocean design on a cartoon car?
Draw two ovals and put them together. Also, use different strokes when you are drawing the upper and lower part of the seat. Thanks! How do I draw an ocean design on the outside of a cartoon car? Try drawing thick, wavy lines colored in blue to look like waves. Thanks! Should I erase the lines? You can use an eraser to remove them if you'd like.
How do I get better at anime drawing?
This is a simple anime drawing, so if you want to expand your horizons further you should first master this and then go on to drawing humans and complete scenes. Practice makes perfect, and the more you practice the basics, the better your complex drawings will be.
How do you make an anime cat?
0:117:56How to draw an anime cat - YouTubeYouTubeStart of suggested clipEnd of suggested clipEyes which are really big. And then a very small nose and mouth for the face. So i had my cute.MoreEyes which are really big. And then a very small nose and mouth for the face. So i had my cute. Little mouth there which i tell the kids it's kind of like a w that got sat on just really tiny.
How do you draw a 3d shape car?
0:303:00Simple Steps on How to Draw a 3D Car - YouTubeYouTubeStart of suggested clipEnd of suggested clipSo first start with a circle up. Front. So oval shape. And i'm going to draw. Another circle rightMoreSo first start with a circle up. Front. So oval shape. And i'm going to draw. Another circle right next to it much larger. And then i'm going to add another circle to it at the back.
How do you draw a line on a car?
0:0325:13How to Draw a Car [Part 1: Lines] - YouTubeYouTubeStart of suggested clipEnd of suggested clipAbout three inches by three inches on on all sides doesn't have to be that size you could make itMoreAbout three inches by three inches on on all sides doesn't have to be that size you could make it larger or smaller just as long as they're perfect squares.
How do you draw a easy car step by step?
How to Draw a Car — Let's get started!Draw two small circles on the lower portion of your paper. ... Step 2 — Draw the Wheels of the Car. ... Step 3 — Attach the Bumpers to the Wheels. ... Step 4 — Outline the Body of the Car. ... Step 5 — Draw the Front Door Window. ... Step 6 — Next, Draw the Rear Door Window.More items...
How do you draw a Lamborghini?
9:2412:59How To Draw A Lamborghini Huracan (Front View) - YouTubeYouTubeStart of suggested clipEnd of suggested clipSo let's first draw a curve or a straight line diagonal line both sides. Then at the top we're goingMoreSo let's first draw a curve or a straight line diagonal line both sides. Then at the top we're going to draw a small little arrow.
How do you draw a 3 D truck?
0:191:53How to Draw a 3D Truck - YouTubeYouTubeStart of suggested clipEnd of suggested clipI'm just making it's sort of foreshortened. Back here's the wind screen. And here's the front wheelsMoreI'm just making it's sort of foreshortened. Back here's the wind screen. And here's the front wheels okay and um the grille you might have a little thing across it like that.
How do you draw a Ferrari car?
0:103:53How to Draw a Car: Ferrari - Fine Art-Tips - YouTubeYouTubeStart of suggested clipEnd of suggested clipIf you do the offender right the tire is going to be easy because it follows the same shape. Let'sMoreIf you do the offender right the tire is going to be easy because it follows the same shape. Let's do the front tire with a classical star shaped wheel offer.
How do you draw a Hot Wheel car?
6:1714:30How To Draw A Hot Rod (for kids!) - YouTubeYouTubeStart of suggested clipEnd of suggested clipSo we're going to draw the bottom bottom of the car. And i'm just going to draw a line in between.MoreSo we're going to draw the bottom bottom of the car. And i'm just going to draw a line in between. In between the wheels and you could use a ruler if you want to but i'm not going to.
How do you sketch a car like a pro?
1:5321:06How to draw ANY car in 3 simple steps - TRY THIS - YouTubeYouTubeStart of suggested clipEnd of suggested clipFor you to get started with this the whole point of the sketch monkey is to get people to sketch.MoreFor you to get started with this the whole point of the sketch monkey is to get people to sketch. And enjoy sketching specifically car design all right three key lines we have the baseline.
How do you draw a Mclaren car?
0:0013:11How To Draw A McLaren 720s (Front View) - YouTubeYouTubeStart of suggested clipEnd of suggested clipAnd we'll draw them over here close to the edge of the paper. And we want to draw the same length.MoreAnd we'll draw them over here close to the edge of the paper. And we want to draw the same length. Straight line over here on this side. And we want them to be. The same height too up and down.
How do you draw a realistic car?
1:4322:59Porsche Drawing - How to Draw a Realistic Car - YouTubeYouTubeStart of suggested clipEnd of suggested clipWorks is we create a grid on our photo reference. And in this case i created a grid using photoshopMoreWorks is we create a grid on our photo reference. And in this case i created a grid using photoshop over the top of my photo. Reference. Then i created a proportional grid on the drawing. Paper.
How do you make Naruto?
0:038:38How to Draw Naruto- Simple Video Lesson - YouTubeYouTubeStart of suggested clipEnd of suggested clipHey there today i'm going to show you how to draw naruto. So we'll start with the eyes as usual. SoMoreHey there today i'm going to show you how to draw naruto. So we'll start with the eyes as usual. So on the sides.
Let's draw a car sensuously with a silhouette with a border
To draw a machine like a car, it is necessary to repeat precise work using a ruler and graphic tools, so I think that many people dislike drawing a car and are not good at it. Therefore, in this TIPS, we will introduce the idea of drawing a car sensuously without using rigid functions such as a ruler and 3D.
How to draw and settings
When drawing, switch to white, and when erasing, switch to a transparent color to shape it.
Draw a car 1 Draw a rough exterior
Prepare a layer with a black border and draw it. I will draw a fictitious car by referring to some pictures of retro and cute classic cars. I somehow draw the body of the car. I feel like [painting] rather than [drawing]. It's just painted, so it's not as stiff as a ruler or shape tool. It's like sketching.
Draw a car 2 Draw a tire
Under the exterior layer, make a layer with a border in the same way and draw the tire. You can draw with stretch without worrying about the overlap of lines.
Draw a car 4 Draw the exterior
Design a car by drawing unevenness due to the engine, tires, etc. on the basic body. Since it can be drawn as if clay is served, it is easy to grasp the three-dimensional effect that is difficult to capture in a three-dimensional view.
Draw a car 5 Draw a front grill
Create a vector layer with a border and use the curve tool to draw the mesh of the front grill. The grill is composed of three layers: outer frame, vertical, and horizontal. The grill is thickened by copying the vertical and horizontal layers to finish and then shifting the position a little. This is a daunting task when drawing with a line drawing, but it can be done quickly and easily with a bordered vector layer..
Draw a car 6 Draw a tire 1
I will add tires with a vector layer. Tires are made up of multiple concentric circles, After drawing one circle, copy and paste it to reduce it from the center, and draw the lines on top of each other. Please see my previous TIPS and video for details on how to draw concentric circles with vector layers.
What is the sill line on a car?
The sill line refers to the bottom edge of the car. From a side-view angle, it is a relatively straight line across the page, drawn whatever distance from the ground suits your car. Mark your wheel cutouts at this point. Image by Jay Shuster.
What is a greenhouse in a car?
The greenhouse refers to the roof, windshield, and side and rear windows of the car. Also known as the upper, the greenhouse is another chance to align your angles with the desired attitude of the car. 6. Carve out a shape for your window glass and add an A pillar.
Who is the designer of the rough and ready drawing style?
In this second art lesson, designer Jay Shuster lays out a guide to the rough-and-ready drawing style that car designers use. Follow along with Shuster’s step-by-step drawing instructions to get your own results in minutes. Image by Jay Shuster. 1.
How to draw a car body?
1. Draw a narrow rectangle lightly in pencil for the car body. Use a light touch so you can easily erase lines and round off corners later as needed. This starting rectangle represents the basic outline of the body of your car, so make it as long and wide as you’d like the body of the finished car to be.
How to make a cartoon car face?
Instead of a normal-sized headlight, make the front light extra big if you want to give your cartoon car a face! Draw a smaller circle inside it for the eyeball, a horizontal line inside it for the eyelid, and a horizontal line above it for the eyebrow. You can also easily turn the front bumper into a mouth.
How to make a car a little less boxy?
If you want the car to be a little less boxy, make the top horizontal line a little shorter than the bottom horizontal line, and angle the vertical lines slightly inward.
How to make a car look in motion?
If you want your car to appear to be in motion, draw some wispy lines or a rounded cloud shape coming out of the tailpipe. 9.
What does a half circle on a car's wheel represent?
Half circles just above the wheels to represent the wheel wells. 2 doors that are primarily rectangular in shape, with small rounded rectangles for door handles. A mix of rounded rectangles and circles to represent the steering wheel and seats visible through the window. 10.
What does the gap between the half circles on a car represent?
The small gap between the half circles represents the window frame and roof of the car. If you want to create 2 side windows instead of just a single window, draw 2 closely-spaced vertical lines that split the inner half circle into 2 pieces. These lines represent the door frame between the windows.
Step 1 – Draw the Wheels
Start the drawing of the car with the wheels. For this particular example draw them far enough apart so that you can fit two more wheels and some extra space in between.
Step 2 – Draw the Outer Shape of the Car
Now draw the outer shape of the car but leave some areas at the top and bottom ends open for the bumpers. Make the wider bottom section slightly taller than the top.
Step 3 – Draw the Front & Back Bumpers
Draw the bumpers as as pretty much just two rectangles with rounded corners at each of the bottom ends of the car.
Step 4 – Draw the Rear View Mirror
Draw the rear view mirror towards the front of the car around the bottom of the windshield.
Step 5 – Draw the Outline of the Doors
Now draw the outer shape of the doors/windows. They should pretty much follow the outline of the car but be slightly smaller.
Step 6 – Draw the Splits Between the Doors & Windows
Through the middle of the door/window shape draw a vertical line to split the doors. Next draw another horizontal line between the top and bottom section of the car to show the windows.
Step 7 – Draw the Divider Between the Windows
Now draw two more lines around the the vertical split in the doors to add the divider between the windows.
How to draw a cat?
1. Draw a circle for the head. It doesn't have to be perfectly shaped; this is just the initial sketch. For the body, draw a “teardrop” shape because the head will cover it - just end where the neck of the cat is .
How to draw a teddy bear?
Add the tail and paws. Make a curved shape for the tail, connecting at the lower left end part of the “teardrop” body. Draw circles around the end of the oval front legs for the paws (only two for the front legs) ...
What is the difference between anime and manga?
CasMangaArt. Community Answer. Anime refers to animated shows/movies, while manga is the comic/drawn version. To make an animation in this style would be anime, and it would require all the usual skills used for animation.
How to draw a teardrop?
2. Add the legs. Make two oval shapes in the right side of the “teardrop” body shape (follow the tutorial's illustration if you have problems positioning the legs). These will be the two front legs. Then draw two circles, one next to the left front leg and the other between the two front legs. The only visible parts of the back two legs will be ...
Can you make a chibi head round?
Put a slight curve at the top of the head instead, and then make the head slightly fatter. If you aren't doing chibi style, then you wouldn't even try to make it round. Thanks!
How to draw anime characters?
While artists have varying preferences about how to structure an anime character’s head and face, they all start with the same basic principle: First draw a circle, and then draw a horizontal line and vertical line directly ...
How to draw anime girl eyes?
Start by sketching a curved upper eyelid, then draw a short line extending down from the outer corner of the eye. Leave the inner corner of the eye open for a softer look. Then, add a circle in the middle of the eye as the iris. Draw a smaller circle—the pupil—in the middle of the iris.
How long should an anime character's legs be?
The legs of an anime character should be approximately as long as the top half of the character, from the top of the head to the waist. Finally, add in the arms. A good rule of thumb is to align the elbow with the character’s waist, and then extend the rest of the arm (including the hand) to about mid-thigh.
What pen do you use to highlight a character?
While you will mostly ink with a black pen, it can also be helpful to have a white jelly pen on hand—you can use this to add highlights, like the reflection points in the character’s eyes. You may also choose to add additional colors with colored pencils or medium of your choice.
What is the difference between a character's nose and mouth?
The character’s nose and mouth will typically be much smaller and simpler than the eyes. The nose, for instance, may just be two small lines that represent the nostrils. Similarly, the mouth may be a simple curved line.
How to make a reflection in the eye?
Leave the inner corner of the eye open for a softer look. Then, add a circle in the middle of the eye as the iris. Draw a smaller circle—the pupil—in the middle of the iris. To create primary and secondary light reflections, add in one or two additional circles within the iris.

Popular Posts:
- 1. where to watch anime hentai
- 2. how to finish an anime fast
- 3. what anime is appropriate for 13 year olds
- 4. what volume does the promised neverland anime end
- 5. how to download raw anime episodes
- 6. do you buy merch at anime nyc stands
- 7. how to get laid at anime conventions
- 8. how to watch dr stone anime
- 9. a will eternal anime episodes
- 10. can you watch things on anime planet