How do you draw an anime body?
This article has been viewed 765,734 times. To draw an anime body, start by drawing a stick figure with small circles at the joints and triangles for the hands and feet. Then, draw the head, neck, and torso with a waistline on top of the stick figure outline. Finish the body by drawing the limbs, using the joints to guide you.
How to draw anime eyes at an angle?
When drawing anime eyes at an angle draw everything as though it’s been vertically compressed (more so the more the eyes are angled). In addition to this the distance between the eyes drawn at an angle should be narrower than the width of the eye that is closer to the viewer.
How to draw an anime girl’s shoulders?
Your anime girl’s shoulders should be about 1 ½ times wider than the head. Draw small circles on the top corners of the hourglass shape if you want to visualize the shoulder joints better.
How to draw an anime running pose?
Drawing a Running Pose. 1 Step 1 – Draw the Torso. Anime running pose torso drawing. In this particular pose the torso will be drawn at about 3/4 angle. As this is a female ... 2 Step 2 – Draw the Head. 3 Step 3 – Draw the Legs. 4 Step 4 – Draw the Arms. 5 Step 5 – Draw the Neck. More items

How do you draw an anime body from any angle?
0:0624:59How To Draw HIGH ANGLE PERSPECTIVE ... - YouTubeYouTubeStart of suggested clipEnd of suggested clipThis is going to be much easier to do because the lead element of your characters. Again is going toMoreThis is going to be much easier to do because the lead element of your characters. Again is going to usually be the head. Start with the head build the body underneath it and have it for shorten.
How do you draw different positions in anime?
1:594:16EASIEST WAY TO DRAW ANIME POSES - YouTubeYouTubeStart of suggested clipEnd of suggested clipOkay let's try some sitting pose. First we draw the head. Then draw an oval to represent the bodyMoreOkay let's try some sitting pose. First we draw the head. Then draw an oval to represent the body since the character is sitting on the floor. We would be looking at her from above.
How do you draw anime body structure?
5:0846:01DRAWING FULL BODY PROPORTIONS FOR WOMEN IN ...YouTubeStart of suggested clipEnd of suggested clipIs going to be just a relatively straight line that falls off the outside of the circle sweeps. EverMoreIs going to be just a relatively straight line that falls off the outside of the circle sweeps. Ever so slightly in and once it gets level with the bottom of the circle.
How do you draw anime face angles?
0:008:26How to Draw Different HEAD ANGLES - YouTubeYouTubeStart of suggested clipEnd of suggested clipDifferent anime angles to start off they're really just a few things you need to know the eyes areMoreDifferent anime angles to start off they're really just a few things you need to know the eyes are one eye apart the lower you draw the eyes the younger they becomes of course i'll.
How can I draw my body posture?
0:0010:42HOW TO DRAW POSES- Half Body & Sitting Poses | Drawing TutorialYouTubeStart of suggested clipEnd of suggested clipAnd then I'm just adding those kind of trapeze shapes for the chest. And hips here the proportionsMoreAnd then I'm just adding those kind of trapeze shapes for the chest. And hips here the proportions are definitely the key to a good sketch. So if you're not very familiar with anatomy.
How do you draw better poses?
6:5810:02HOW TO DRAW ANY POSE (Beginner to Pro) - YouTubeYouTubeStart of suggested clipEnd of suggested clipFocus on the general shapes simpler forms first where it's more forgiving here i really don't have aMoreFocus on the general shapes simpler forms first where it's more forgiving here i really don't have a whole lot going on in terms of details.
How do you make anime feet?
Draw the overall shape of the back of the foot with that in mind. Draw a curved shape on each side of the back of the foot above the heel to indicate the bones. Be sure to draw the bottom of the heel with a light curve. Next draw the front part of the foot (it will be partially covered by the back of the foot).
How do you make an anime smile?
2:3138:54HOW TO DRAW SMILING HAPPY EXPRESSIONS (Real Time)YouTubeStart of suggested clipEnd of suggested clipThis will be doing the same sort of thing but just a little bit wider. And sweeping down to theMoreThis will be doing the same sort of thing but just a little bit wider. And sweeping down to the outside edge a bit more. And then i'm just going to come down. Here bring in that shape.
How do you make Naruto?
0:038:38How to Draw Naruto- Simple Video Lesson - YouTubeYouTubeStart of suggested clipEnd of suggested clipHey there today i'm going to show you how to draw naruto. So we'll start with the eyes as usual. SoMoreHey there today i'm going to show you how to draw naruto. So we'll start with the eyes as usual. So on the sides.
How to draw a torso in anime?
Step 1 – Draw the Torso. Anime throwing pose torso drawing. Draw the torso almost horizontal to the ground with a slight backwards bend. It will also have a bit of a twist that you can show by making it wider at the top and narrower towards the the middle curving inwards on both ends but more so at the back.
How to do a forward food bend?
Make the forward food bent with it’s knee pointing forward and draw the back leg stretching out backwards. Draw the toes on both feet pointing down like a ballet dancer.
What is the back leg bent in yoga?
Similar to the running pose the front leg will be bent pointing forward with the back leg being straight and on the same angle as the rest of the body.
What is an anime aiming pose?
Anime aiming pose drawing step by step. This pose is of a character aiming a gun. It can be common for a scenes like special forces storming a building. In this case the gun is a fairly large rifle but a similar pose can also work for a hand gun. You would simply need to change the position of the arms.
What does lifting eyebrows and bottom eyelids mean?
Although I typically don't draw strong facial expressions, here is a rough representation. Lifting of eyebrows and bottom eyelids usually indicate a happy or laughing emotion (1). The opposite applies to angry or sad emotions, which usually entails the lowering of eyebrows and even some protruding muscles between eyebrows for portraying extra lividness! (2). Personally neutral expressions such as curiosity or attention is what I opt for for more elegant or relaxed portraits.
What is the position of the ear?
Clearly, the ear sits between the eyes and nose, and will be higher or lower depending on the head’s angle. As the head tilts up, ears become lower than the eyes, and as the head tilts down, the eyes become higher than the eyes, for example.
What are the three parts of the ear?
An ear can be complicated to draw at first glance. It’s easier to remember the general look of an ear by splitting it into three parts: Pink - outer part of ear. Blue - the y-shaped anti-helix. Yellow green - tragus, small piece of skin in front of ear canal. The placement of the ear is at a slight angle.
How many sections of a head can be split into?
This method is a baseline to a typical head and does not serve as a concrete rule to varying head shapes and proportions! First of all, this method suggests that a head can be split into three sections: the distance between the brow, tip of nose and chin are equal. The mouth is right between the nose and chin.
Why align the eyes at the first horizontal line of the Rule of Thirds?
This is why aligning the eyes at the first horizontal line of the rule of thirds can do justice to a portrait.
What are some examples of poses with props?
Below are examples of poses with props such as single flower stems and drinks. Even without props, in half body or full figure portraits, the hands and arms play important roles in achieving expressive poses that convey certain attitudes. >>> Portraits with figures looking away from ‘camera’.
Where is the mouth on a loomis head?
The mouth is right between the nose and chin. It is important to take note that the top half of the head is not a sphere, but rather a sphere with its sides chopped off. Now let’s take a look at the loomis head method from different angles. From other angles, the loomis head takes into account foreshadowing, meaning facial features such as ...
Why do anime eyes look curved?
Anime eyes bottom up view. When drawing the eyes from the bottom up view draw the top of the eyes more curved. The reason for this is that when looking at the eyes from this angle the eyelids will become more hidden behinds the curvature of the eyelids.
How to draw anime eyes at an angle?
When drawing anime eyes at an angle draw everything as though it’s been vertically compressed (more so the more the eyes are angled). In addition to this the distance between the eyes drawn at an angle should be narrower than the width of the eye that is closer to the viewer. The farther away eye should be even narrower than ...
Why is the farther away eye narrower?
The farther away eye should be even narrower than that (it should also be smaller). One reason for this is the curve of the head. Another reason for this is that due to perspective the farther away objects are drawn smaller that objects of the same size that are closer to the viewer. For more on perspective see: ...
When drawing the eyes from the top down view, what is the flatter?
The reason for this is that the eyelids will be more visible from this angle and will appear to cover more of the eyes.
How many heads are there in the shoulders?
The shoulders is the width of 3 heads; the center of the human figure (the upper thighs) is the width of two heads; the feet standing together are the width of 1 head. Now we will examine proportions even further according to age & gender: As you can see, each proportion is labeled.
How to determine body proportions?
Body proportions are determined by height and sometimes age & gender. The simplest way to do this is by dividing each segment of the body by the length of the head. We will examine this below:
What are the joints of the body?
Joints - The joints of the body are drawn as circles or you may draw them as spheres. The following circle pairs should be the same size: shoulders/hips (large), elbows/knees (medium), and wrists/ankles (smallest). Hands & Feet - The hands are more triangular in shape and the feet are also triangular with the heels being round.
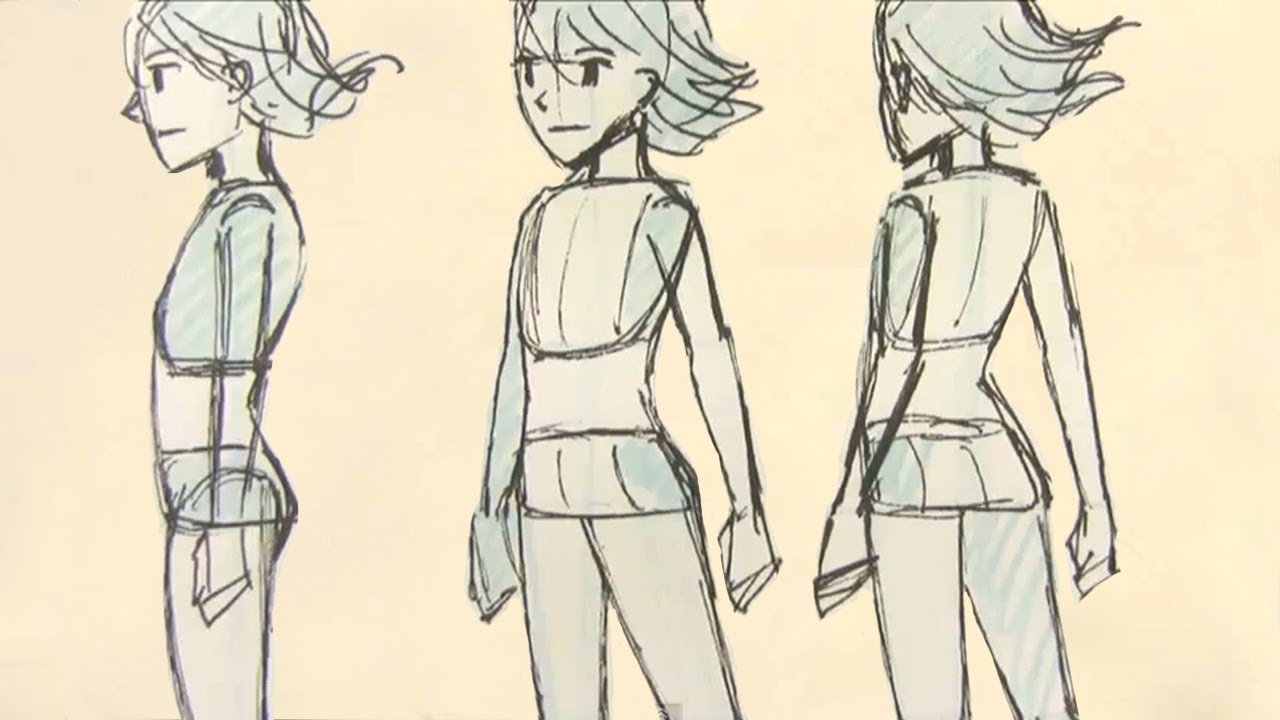
What is the shape of the chest and pelvis?
Body- The chest & pelvis are drawn as trapezoids. As you can examine, the trapezoids are at an angle in ¾ view. In the side view the shapes are narrower than the other views and the overall frame is an ‘S’ shape as indicated by the red curve. In other words, the back is swayed & is not parallel like the other angles.
What is the difference between the upper arms and legs?
The upper arms & legs are straighter & parallel whereas the lower arms & legs have slight curves. Head - The head uses circles and elliptical/oval shapes. The front view oval is slightly longer than the back view. The heads in ¾ and side view resemble ice cream cones with a circle and triangle attached.
Is the trapezoid a female or male figure?
The angles of the trapezoid are not as distinct as the female figure. The shape above is wider (indicating broad shoulders) and the shape below is not as wide as the top (indicating narrow hips). The joints are larger and the overall shape of the hands and feet are also larger compared to the females.

Introduction
Anatomy
Hair
Facial Expressions
Poses and Props
Composition
Painting Portrait Demonstration
- First, make a sketch (for me, my first sketch will be my final line art). I use dae pen 4 for sketching, which can be downloaded here. Today, I decided to just go with a typical school girl for an anime styled / semi-realistic bust up portrait! Next, block in the base colours using a solid opacity pen or brush. I wanted a more watercoloury and sket...
Thank You !
Popular Posts:
- 1. what anime is light from
- 2. are there any good mecha anime
- 3. how to draw an anime character face
- 4. how to get a anime boyfriend
- 5. a brandon to the past things wrong with pokemon anime
- 6. a polar bear in love anime
- 7. how to draw anime face and body
- 8. when is anime legends coming out fortnite
- 9. what if adventure time was an anime
- 10. are there gambling anime