
3:15
11:40
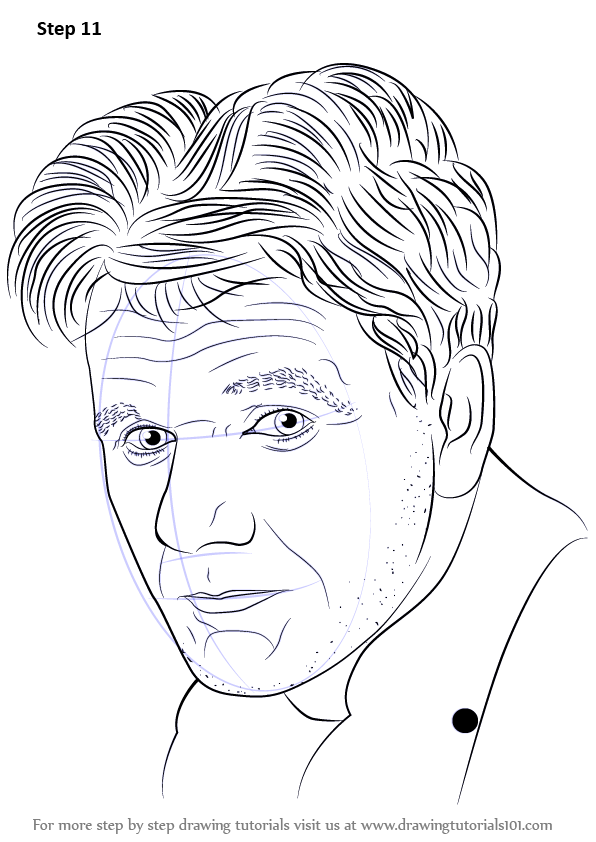
And anime noses are you know drawn really simply you know very simple ver very small. So I try toMoreAnd anime noses are you know drawn really simply you know very simple ver very small. So I try to shade it. As if it's kind of real. The shadowing down here. Alright let's move down to the lip.
How to draw anime head?
How to draw a nose in anime?
How to draw hands well?
How to draw a stick figure?
How to draw a short hair character?
How to make your character's nose bigger?
Can anime characters draw hair?
See more
About this website

How do you draw anime face for beginners?
Outline the jaw for your character. Draw a line from the side of the circle that's slightly angled toward the vertical centerline. Continue drawing the line until you reach the mark you made for the nose. Once the angled line crosses the nose guideline, continue drawing it toward the mark you made for the chin.
How do I make my anime look like drawing?
5 Simple Steps to Drawing AnimeStep 1: Create the Basic Structure of the Face.Step 2: Add Facial Features.Step 3: Draw the Hair.Step 4: Add the Body.Step 5: Add Details and Ink the Drawing.
How can I turn myself into an anime character?
03A step-by-step breakdown of this process has been provided below (pictures included)Step 1Download the Snapchat App. ... Step 2Open Snapchat App on your mobile device. ... Step 3Search for the Anime Style Filter on Snapchat. ... Step 4Turn Yourself into an Animated Character. ... Step 5Upload your anime filter-ed video to TikTok.
How do you draw anime faces better?
17:2022:42MAPPING THE FACE FOR ANIME & MANGA - YouTubeYouTubeStart of suggested clipEnd of suggested clipAnd just put some features on each V's. Okay so as we jump into some time-lapse part of this you'llMoreAnd just put some features on each V's. Okay so as we jump into some time-lapse part of this you'll notice what what I'm really doing is working from those loosely mapped areas including the brow line
What is the best anime drawing app?
Chalk. Ibis Paint. Medi Bang Paint. CLIP STUDIO PRO. Jump paint. Draw Anime & Manga. Differences between Anime and Manga.
How long does it take to learn to draw anime?
On average, learning how to draw anime well takes two to three years. How fast you can learn to draw anime varies depending on the number of hours you practice daily and your training approach. If you draw one hour a day, it can take three years, but it can take one year if you draw 3 hours a day.
What does Waifu stand for?
Waifu is a term for a fictional character, usually in anime or related media, that someone has great, and sometimes romantic, affection for.
How do I look like an anime girl?
3:576:52How To Look Like An Anime Character - YouTubeYouTubeStart of suggested clipEnd of suggested clipLook more cute and anime is to wear hair accessories. Like little balls or pants will really elevateMoreLook more cute and anime is to wear hair accessories. Like little balls or pants will really elevate. Your hairstyle.
Is there an app that turns you into an anime character?
So it should come as no surprise that a smartphone app called TwinFACE, now available on the Google Play store, is designed to transform your selfie into an anime character.
How do you make an anime smile?
2:3138:54HOW TO DRAW SMILING HAPPY EXPRESSIONS (Real Time)YouTubeStart of suggested clipEnd of suggested clipThis will be doing the same sort of thing but just a little bit wider. And sweeping down to theMoreThis will be doing the same sort of thing but just a little bit wider. And sweeping down to the outside edge a bit more. And then i'm just going to come down. Here bring in that shape.
How do you add anime blush?
A “striped” anime blush is made with just a few line strokes and is fairly easy to draw. Simply make two sets of angled lines around the cheek areas. For a nicer looking blush make the outer stripes a bit shorter and the inner stripes a bit longer. Aim for a combined shape that can fit inside a stretched oval.
How do you make anime faces unique?
0:0015:21Tutorial: Drawing Unique Face Shapes - YouTubeYouTubeStart of suggested clipEnd of suggested clipThe cheekbones. And the jaw line and more specifically the cheekbones and the jaw lines. Really doMoreThe cheekbones. And the jaw line and more specifically the cheekbones and the jaw lines. Really do define a lot of the facial shape.
How to draw anime head?
1. Draw an oval and divide it into 4 sections. This will be the basic outline of your anime character’s head. The proportions don’t have to be exact, but make the oval narrower at the bottom since that will be the chin. Once you’ve drawn the oval, draw a horizontal line through the center of it. Then, draw a vertical line through the center ...
How to draw a nose in anime?
To draw your character’s nose, draw a short, simple vertical line along the center of the face at the halfway point between the horizontal line and the chin.
How to draw hands well?
Community Answer. The best trick for drawing hands well is to study your own hands first. Notice the shape, color, texture, angles, etc. Draw your hand in dozens of different positions and in different lighting. This isn't a shortcut, per se, but it's an exercise that will improve your drawing.
How to draw a stick figure?
Make the hands about 1/5 the length of the arm, and make the feet about 1/6 the length of the legs. To get the proportions right, make your stick-figure outline about 7 times as tall as your character’s head. Have the arm lines start about 1/5 of the way down the line you draw for the torso.
How to draw a short hair character?
However, if your character’s hair is going to be short, draw a narrow oval on each side of the head. Have the top of the ears line up with the horizontal line running through the center of the face, and have the bottoms line up with the bottom of the nose. Then, draw the flaps of the ear inside each oval.
How to make your character's nose bigger?
Make the line longer if you want your character’s nose to be big. Make the nose the smallest feature on your character’s face. The nose will overlap with the vertical line you drew. To see it better, make it darker than the vertical line, or erase the vertical line around the nose.
Can anime characters draw hair?
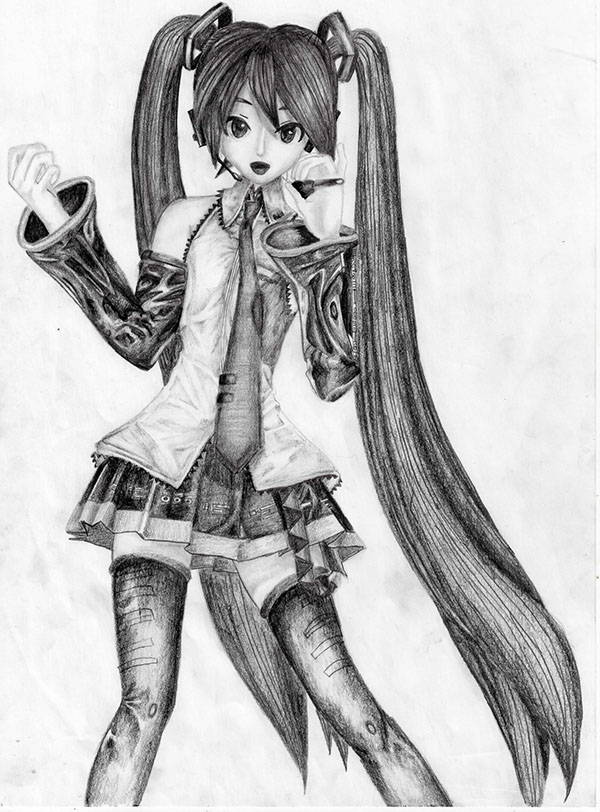
The hairstyle you choose for your character is up to you, but generally, anime hair features pointed ends and distinct sections. You can draw a short, buzzed hairstyle, a medium-length style, or long, flowy hair. Whichever hairstyle you choose, avoid drawing individual strands of hair.
How to draw anime characters?
While artists have varying preferences about how to structure an anime character’s head and face, they all start with the same basic principle: First draw a circle, and then draw a horizontal line and vertical line directly ...
How to draw anime girl eyes?
Start by sketching a curved upper eyelid, then draw a short line extending down from the outer corner of the eye. Leave the inner corner of the eye open for a softer look. Then, add a circle in the middle of the eye as the iris. Draw a smaller circle—the pupil—in the middle of the iris.
How long should an anime character's legs be?
The legs of an anime character should be approximately as long as the top half of the character, from the top of the head to the waist. Finally, add in the arms. A good rule of thumb is to align the elbow with the character’s waist, and then extend the rest of the arm (including the hand) to about mid-thigh.
How to make a reflection in the eye?
Leave the inner corner of the eye open for a softer look. Then, add a circle in the middle of the eye as the iris. Draw a smaller circle—the pupil—in the middle of the iris. To create primary and secondary light reflections, add in one or two additional circles within the iris.
What pen do you use to highlight a character?
While you will mostly ink with a black pen, it can also be helpful to have a white jelly pen on hand—you can use this to add highlights, like the reflection points in the character’s eyes. You may also choose to add additional colors with colored pencils or medium of your choice.
What is the difference between a character's nose and mouth?
The character’s nose and mouth will typically be much smaller and simpler than the eyes. The nose, for instance, may just be two small lines that represent the nostrils. Similarly, the mouth may be a simple curved line.
How It Works
Add as many pictures as you see fit. Pictures of the anime may help as well.
The perfect gift
Birthdays, Christmas, or any special occasion, Anime Portraits has the perfect gift for Anime lovers everywhere!
Don't miss your chance
We only have a limited amount of order slots every week. Order now to secure a spot for yourself and your loved ones!
Our Story
One day my friend and I were watching our favorite Anime, Attack on Titan. We talked about how cool it would be to see ourselves as a titan. The next day he showed me a drawing of me as a Titan. It was both hilarious and amazing. I realized how amazing this would be if weebs everywhere could see themselves within their favorite Animes.
How to draw anime head?
1. Draw an oval and divide it into 4 sections. This will be the basic outline of your anime character’s head. The proportions don’t have to be exact, but make the oval narrower at the bottom since that will be the chin. Once you’ve drawn the oval, draw a horizontal line through the center of it. Then, draw a vertical line through the center ...
How to draw a nose in anime?
To draw your character’s nose, draw a short, simple vertical line along the center of the face at the halfway point between the horizontal line and the chin.
How to draw hands well?
Community Answer. The best trick for drawing hands well is to study your own hands first. Notice the shape, color, texture, angles, etc. Draw your hand in dozens of different positions and in different lighting. This isn't a shortcut, per se, but it's an exercise that will improve your drawing.
How to draw a stick figure?
Make the hands about 1/5 the length of the arm, and make the feet about 1/6 the length of the legs. To get the proportions right, make your stick-figure outline about 7 times as tall as your character’s head. Have the arm lines start about 1/5 of the way down the line you draw for the torso.
How to draw a short hair character?
However, if your character’s hair is going to be short, draw a narrow oval on each side of the head. Have the top of the ears line up with the horizontal line running through the center of the face, and have the bottoms line up with the bottom of the nose. Then, draw the flaps of the ear inside each oval.
How to make your character's nose bigger?
Make the line longer if you want your character’s nose to be big. Make the nose the smallest feature on your character’s face. The nose will overlap with the vertical line you drew. To see it better, make it darker than the vertical line, or erase the vertical line around the nose.
Can anime characters draw hair?
The hairstyle you choose for your character is up to you, but generally, anime hair features pointed ends and distinct sections. You can draw a short, buzzed hairstyle, a medium-length style, or long, flowy hair. Whichever hairstyle you choose, avoid drawing individual strands of hair.
Introduction

Hello! In this tutorial, let's learn how to draw some anime or manga styled portraits! Please note that I mainly specialize in female portraits (at least for now ;u;)
Anatomy
- For drawing pretty and anatomically correct faces, let’s see how the famous loomis head method works. Here is a step by step process of how to use the Loomis head method. This method is a baseline to a typical head and does not serve as a concrete rule to varying head shapes and proportions! First of all, this method suggests that a head can be split into three sections: the di…
Hair
- For the hair, I recommend visualizing the hair as flat strands that twist and turn in 3D space. This is definitely more of a simplification that I use when drawing in anime style rather than realistic. But this helps with drawing hair shapes that seem convincing! ;) I also imagine the back layer of hair as mostly in shadow (pink). In terms of drawing the actual hair overall, I suggest first drawin…
Facial Expressions
- Although I typically don't draw strong facial expressions, here is a rough representation. Lifting of eyebrows and bottom eyelids usually indicate a happy or laughing emotion (1). The opposite applies to angry or sad emotions, which usually entails the lowering of eyebrows and even some protruding muscles between eyebrows for portraying extra lividness! (2). Personally neutral expr…
Poses and Props
- >>> Portraits with figures holding something For female figures or characters, I like to include flowers or accessories as props for a more elegant pose. Below are examples of poses with props such as single flower stems and drinks. Even without props, in half body or full figure portraits, the hands and arms play important roles in achieving expressive poses that convey certain attitudes…
Composition
- >>> Rule of thirds Situating facial features or body parts where lines of the rule of thirds lie will direct more attention to those areas and less to areas that are not on the lines. This is why aligning the eyes at the first horizontal line of the rule of thirds can do justice to a portrait. Also, just by putting a figure off-center on one of the vertical lines can create more of the focus on her…
Thank You !
- Thank you so much for reading up until now! I hope this tip has helped you in any way ^0^ Now don't mind me while I go learn male anatomy.. (starts procrastinating ;u;)
Popular Posts:
- 1. what is an anime ost
- 2. is non human academy an anime
- 3. is the obey me anime on crunchyroll
- 4. is aot a good anime
- 5. what anime is available on crunchyroll
- 6. a-channel anime news network
- 7. how much anime have i watched
- 8. how behind is one piece anime
- 9. de que anime es yuno
- 10. is there anime on hbo